Here is a guide I have posted over at http://tombrereton.com
#Part 1: So I am planning to build an electric longboard, but there are no good solutions out there for cases to mount the electronics in that dont look extremely bulky, ugly or expensive.
So I plan to do a DIY vacuum form ABS plastic shell. I looked at outsourcing this, but it was coming up at $100 for one shell, and I need 2!
So I decided to build my own, so here we go!
NOTE: This former is for A4 sheets of ABS, but can be scaled for larger sheets. I got my sheets from Ebay, but you may have a supplier in your country.
Materials:
- 1.2m, 30x90mm Pine (can be smaller height)
- 2.4m, 30x8mm timber
- 330x240x3mm plywood or MDF x2
- pipe fitting (suits your vacuum size. Mine was a 25 to 20mm fitting)
- thin door seal (I used a raven 4mm thick seal)
- all purpose silicon and wood glue (PVA)
- 12x 50mm timber screws
- 12x 25x4mm bolts, 12x 4mm wing nuts
Total cost is under $50!!
#####Bottom Frame: Starting with the 30x90mm timber, cut it into 2x 300mm and 2x 210mm lengths. Pre drill 3 holes in each corner, and join all 4 pieces in a box shape using glue and 50mm screws. This box should have outer dimensions of 330x240mm.
Take one 330x240mm sheet of plywood and mark out a 30mm margin between all edges. Pre drill holes every 45mm or so at the center of those margins, so you end up with a pattern like this:
Tape the plywood to the wood frame, and mark each hole in the frame. Drill out those holes. Using wood glue and 30mm screws, join the plywood to the frame.
Take the other sheet of plywood (I used MDF for this as it gave a nicer surface) And do the same as above to the other side of the frame, but before you screw it together, mark out a pattern on one side for the vacuum holes. I did a grid of holes approx 30mm apart as seen here:
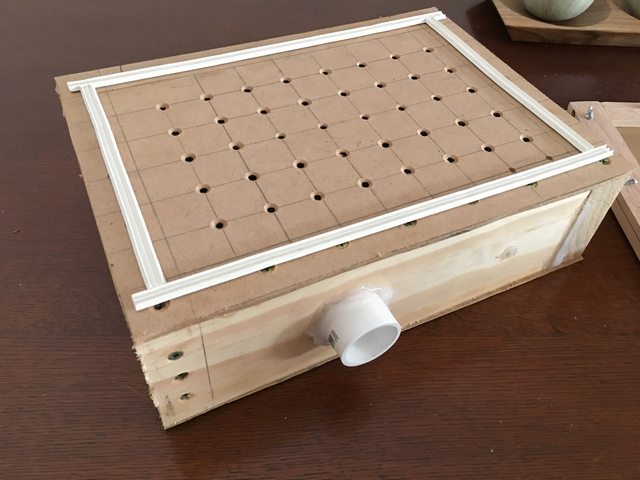
Make sure all of the holes are nice and clean. I used a countersinking bit to make all of the holes nice and rounded.
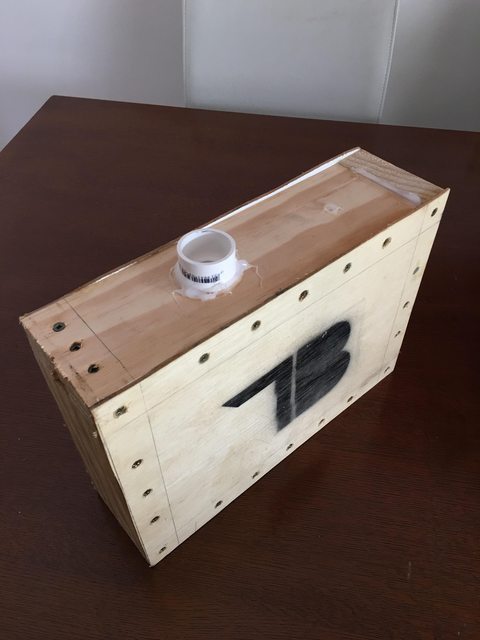
Also, before gluing the top on, mark out a hold for your pipe fitting. To avoid having to make a larger hole, I used a reducer fitting that has a large end for the vacuum and a smaller end where it fits into the wood.
Drill out the hole. If you don’t have a large enough drill bit, use a jigsaw to enlarge it. Using silicon, glue in the fitting, and then glue and screw the top down.
Finally, using the weather strip, mark out a square along the top approximately in the center of the 30mm margin (on top of the screw heads).
Finished bottom should look like this:

#####Top Frame: To build the top frame, take the 2.4m of 30x8mm timber, and cut 4x 330mm and 4x 180mm strips.
Pre drill one hole in each end of the 180mm strips, and a hole in the sides of the 330mm strips and then glue and screw together, being careful not to crack the wood.
Once you have 2 identical frames, tape them together so they are aligned perfectly, and then drill 12 4mm holes. There should be 4 on each long side, and 2 on the short sides. You need to be careful where to do these holes. as you need to be able to fit an A4 sheet of paper in between, so the holes will need to be approx 10mm from the outside edge.
Once you have the holes drilled, take the frames apart, and enlarge one of the frames holes to 6mm. This will be the top frame.
Take 12 4mm bolts and insert them into the bottom frame. You may need to slightly screw them in if it is a tight fit. Using some glue, wood or CA, glue the bolts in so that they cannot fall out or be rotated. Once dried you should have this:
You can see I accidentally started drilling the holes in the center and I didn’t have enough room for my A4 sheet!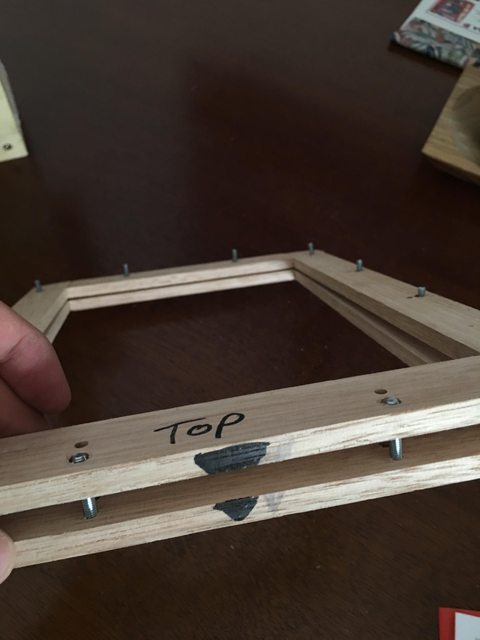
Now you can clamp the two halves together using wing nuts and the former is complete! Here is both pieces with an A4 sheet of acrylic.

I will link part 2 when I have attempted to form some plastic!
(I was using Acrylic sheets for the mockup, waiting for ABS Sheets to arrive!)

#Part 2:
In this part, I will be making a form for what I want to make, and then making it out of ABS Plastic!
#####Form: To make the form, I used 25mm thick hard foam, and drew a rough diagram of the shape I wanted. (Forgot to photograph this step, but here is a photo of the foam):

Then, using a small hacksaw, I cut the shape out of the foam, leaving a chamfer so the plastic can form better. I then sanded the foam to make a nice smooth surface, with lots of rounded edges.
Next, to protect the foam from melting when the hot plastic is placed on top, grab some plaster of Paris (local hardware store should stock this, or hobby store), and do approx 3 coats of plaster. Mine was a 1 part water, 2 parts plaster mix.
A good idea is to wait for the plaster to harden a little before coating. This makes it thicker and easier to work with.
Then sand smooth the form and wipe off the plaster dust. Its good to wait a full 24 hours before using the form so the plaster has time to harden. If using thinner abs, make sure to sand your surface as smooth as possible. I didn’t and my finished form came out with all the bumps you can see on the mould.
You should be left with something like this:

And that’s the form done!
Grab some washers and use a small amount of superglue on them to stick them to the vacuum table, then use a little more superglue to lightly stick the form to the washers. This allows for more airflow.
#####Making a mould:
Time to use our table and form for good!
Take your sheet of ABS and insert it into the holder. Tighten all the wing nuts as tight as possible, they will loosen when the plastic softens.
Get your vacuum hooked up to the table, grab some Vaseline and coat the form in it (for easier removal), and get a bucket, fill it with ice and place a tea towel in it.

Insert the plastic into your oven (suspended, I used 2 picture hooks) and wait for it to deform. The plastic I used went into the oven for 10 minutes at 175 degrees Celsius.
It should begin to droop, when it has drooped approx 70mm, and when touched with a gloved hand, it should ripple like water, it is ready.
Turn on the vacuum and get the tea towel wrung out and ready.
Grab the plastic, and quickly but even place it over the form. Push down on all edged until the vacuum takes hold, and then begin to push on all corners of the mould. When satisfied with the shape, place the tea towel over and keep applying pressure to assure the edges take shape well. Wait a few minutes for the plastic to cool enough to harden, and then remove. If all goes well the form should pop straight out (although it may be cracked from the heat), and the plastic should have held its shape well.
Remove the mould from the holder and wipe off the excess Vaseline. Use a dremel or similar tool to cut away the excess plastic, and voila! You have a perfect replica of your form!
Here is my finished product:
Battery cover:

Cut and installed on the board:

And here is another, this was a block of wood with 30 degree angles cut on 2 sides. This will house my electronics on my eboard.
It is part of my electric skateboard project, which you can find here
And thats all!
 Mine came out to be around $50 AUD for materials, and I can make whatever I like now