This is a small thread on the battery build I’ve done for my Bamboo GT.
I have seen a few different approaches to 18650 battery upgrades and didn’t like the BMS being placed on top of the VESC for a number of reasons. Heat build and thickness increase.
I’ve been playing with 3D printing and CAD design so came up with an extension piece that doesn’t require plastic welding or fibre glassing. The extra length of the battery when going to a 10S4P only equated to an extra 5mm if you take the slope out of the cover and give it a more vertical design. I have cut off just inside the last two screw holes so that it will anchor to the board and also added a lip to the edge so it pulled the cover down onto the deck. Anyway a picture is a thousand words they say.
 There’s another cover piece at the top left of the picture as I printed several.
The second phase is a silicone gasket to give the cover an extra few mm clearance due to the thicker battery. I have done the CAD work for a mould and will make a gasket soon.
I built the battery myself as I have been building battery packs for some time now for telemetry equipment, ROV’s and a few custom skateboard builds.
I opted for HG2’s for the high capacity 3Ah and the high discharge current of 20 Amps per cell.
So my pack is 12Ah and capable of 80 Amp continuous. They are slightly more expensive than the 30Q’s but don’t have as much voltage sag under heavy load.
This is the battery fitted, nice and snug.
There’s another cover piece at the top left of the picture as I printed several.
The second phase is a silicone gasket to give the cover an extra few mm clearance due to the thicker battery. I have done the CAD work for a mould and will make a gasket soon.
I built the battery myself as I have been building battery packs for some time now for telemetry equipment, ROV’s and a few custom skateboard builds.
I opted for HG2’s for the high capacity 3Ah and the high discharge current of 20 Amps per cell.
So my pack is 12Ah and capable of 80 Amp continuous. They are slightly more expensive than the 30Q’s but don’t have as much voltage sag under heavy load.
This is the battery fitted, nice and snug.
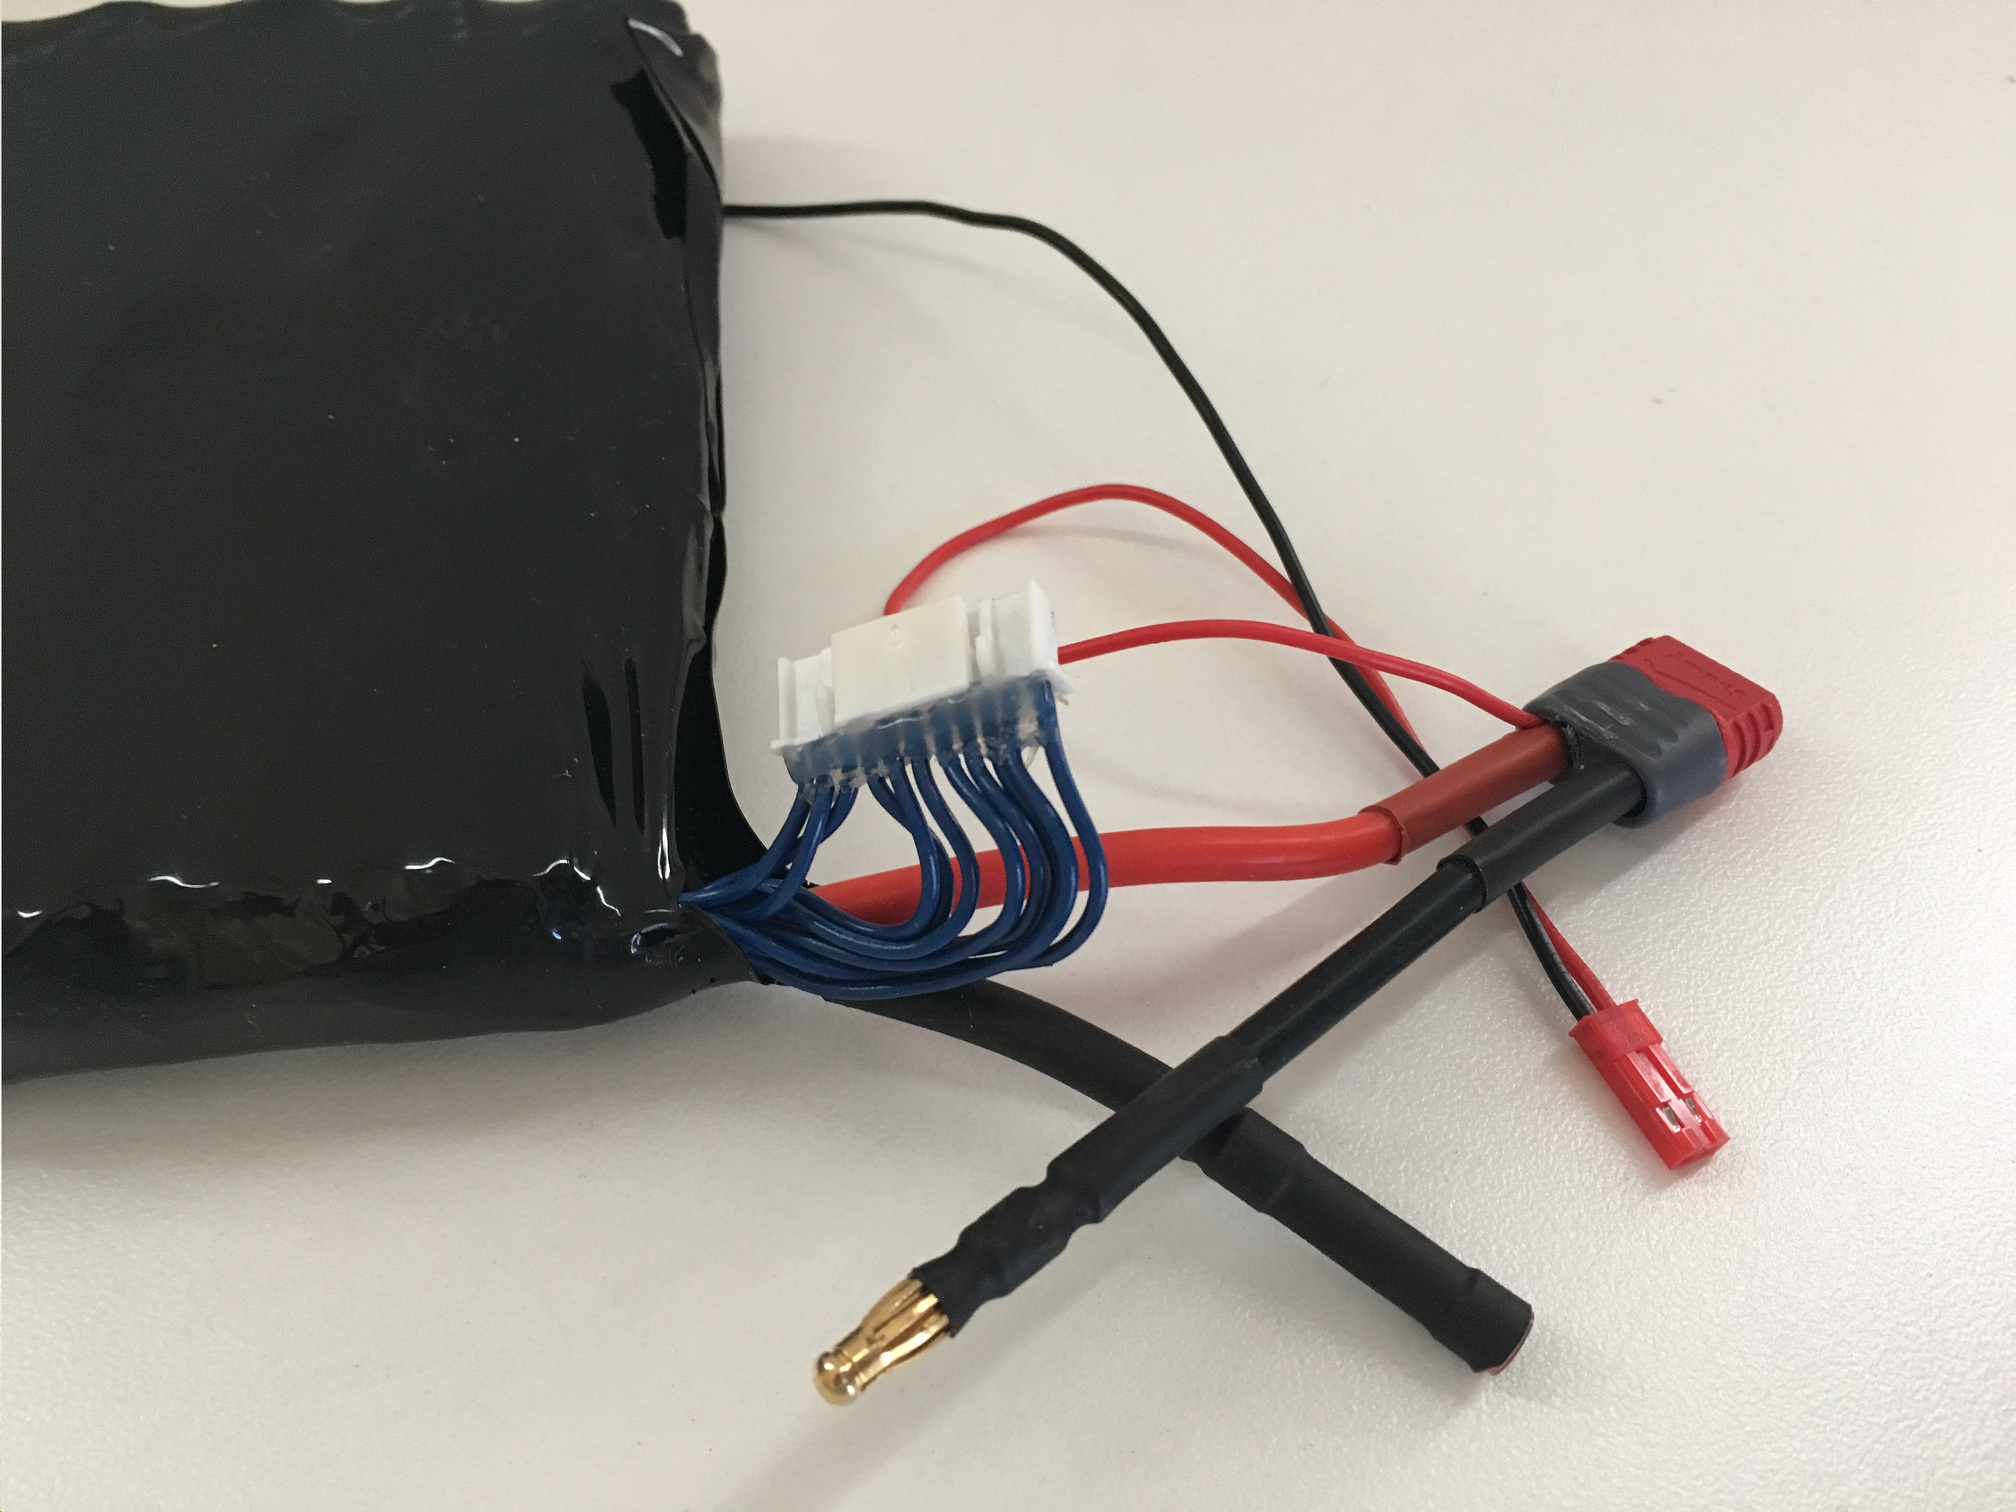
 I sourced an 11 way JST plug that although is not the original Evolve one it fits nicely as you can see. I have also fitted the power leads with 4mm gold plated Supra X bullet connectors so that the battery unplugs in seconds, no soldering required. Well just the first time when I fitted the bullet connectors to the BMS. I can now build a second battery for extended rides, just need my deck allen key and I can change on the road.
 I’ve only tried a few runs with the new battery to test it out. Once I have the new gasket fitted then I can go for a test run for distance. Got a few good hills by me so will be testing it out on those too.
New stuff added 19/8/18
Some info about my battery and it’s build. As I said I have used LG Chem HG2’s for this battery but I have used the Samsung 25R’s. I built a 10S3P to start with from 25R’s. When I fitted it to the board it looked kind of lost in there as there was some much extra space. So I built a 10S4P with HG2’s. I’m spoilt with choice as I import and sell these cells to vape guys near me so I have lots of 25R’s, 30Q’s and HG2’s. This is the 10S3P with 25R’s just before shrink wrap.
Well I built the 10S4P and it didn’t fit so hence the extension piece and soon to be gasket.
The pack was going to be a tight fit width wise so I have used flat braided copper wire for the interconnections., low profile and flexible.These I solder on first then weld them on to the first Nickel strip so no soldering is done onto the cells. This also gives an extra layer of Nickel for increase current capability. I use 0.2mm x 10mm Nickel and my welder is a 15KVA beast so welds are good and strong.
This is the 10S3P with 25R’s just before shrink wrap.
Well I built the 10S4P and it didn’t fit so hence the extension piece and soon to be gasket.
The pack was going to be a tight fit width wise so I have used flat braided copper wire for the interconnections., low profile and flexible.These I solder on first then weld them on to the first Nickel strip so no soldering is done onto the cells. This also gives an extra layer of Nickel for increase current capability. I use 0.2mm x 10mm Nickel and my welder is a 15KVA beast so welds are good and strong.
 This shot shows the welder and HG2’s in a jig I made with the 3D printer to keep everything nice and straight. The pre soldered braided connectors just to the left. A couple of spare extension cover pieces on the right I made incase of cockups.
Everything conductive gets Kapton taped and then wrapped in reinforced clear duct tape, then shrink wrapped. This battery got 12AWG silicone power leads even though the Evolve battery uses 14AWG, I had the space to work with so decided on the higher current capability of the 12AWG. The braided wire is 6mm2 which according to RS components rated to 60A continuous so should be fine for such a small length (50mm).
I soldered the leads directly to the BMS to start with then decided to change to bullet connectors. Soldering to the board needs a big soldering iron and a lot of heat. I am planning on trying a few different batteries so the bullet connectors is a simple solution. They are used for the motors on some boards so why not the BMS?
I picked up a 4A charger from my battery supplier as the original Evolve one is only 2A. I also have a West Mountain Battery tester so the battery got fully tested before the first test run.
This shot shows the welder and HG2’s in a jig I made with the 3D printer to keep everything nice and straight. The pre soldered braided connectors just to the left. A couple of spare extension cover pieces on the right I made incase of cockups.
Everything conductive gets Kapton taped and then wrapped in reinforced clear duct tape, then shrink wrapped. This battery got 12AWG silicone power leads even though the Evolve battery uses 14AWG, I had the space to work with so decided on the higher current capability of the 12AWG. The braided wire is 6mm2 which according to RS components rated to 60A continuous so should be fine for such a small length (50mm).
I soldered the leads directly to the BMS to start with then decided to change to bullet connectors. Soldering to the board needs a big soldering iron and a lot of heat. I am planning on trying a few different batteries so the bullet connectors is a simple solution. They are used for the motors on some boards so why not the BMS?
I picked up a 4A charger from my battery supplier as the original Evolve one is only 2A. I also have a West Mountain Battery tester so the battery got fully tested before the first test run. This shot shows the battery in place, cover extension, 4A charger and the West Mountain tester in the top right corner. I use a gas soldering iron as they get hotter than electric ones. You have to be careful of the exhaust port on the side of the tip, had a few close calls forgetting about that.
New AT wheels fitted, almost ready to hit the road (well dirt tracks here in the Australian bush) Just the gasket to make and fit.
This shot shows the battery in place, cover extension, 4A charger and the West Mountain tester in the top right corner. I use a gas soldering iron as they get hotter than electric ones. You have to be careful of the exhaust port on the side of the tip, had a few close calls forgetting about that.
New AT wheels fitted, almost ready to hit the road (well dirt tracks here in the Australian bush) Just the gasket to make and fit.

