So i have the opportunity to buy a bosted deck without motors or batterys. My idea was anyway to make a flex build with dual hub motors and seperated battery vesc compartements (back/front). Would it work with the wiring boosted did or am i trying to fix something that is easier build? Thought I ask before i jump the gun.
Is it actually the Boosted deck itself, or just a Vanguard? Either way you can do the same wiring technique Boosted uses, by replacing the ones already on there.
Is is the actual boosted deck.
 Ye wiring canal are there so i guess i should do it. 80.- seems like a good deal to me
Yeah, normal vanguards are normally a lot more than that. You’ll have to replace the grip tape though. And if you plan on using that bottom enclosure, I’m not sure if that’s possible to fit everything, who knows though.

So i think it should be fairly easy. Dual hub in the back (leaning towards carvon 2,5). Using the compartments or 3d printing my own. Vescs ill probably go with enertion or Ollin. But what battery and how big I am not sure yet.
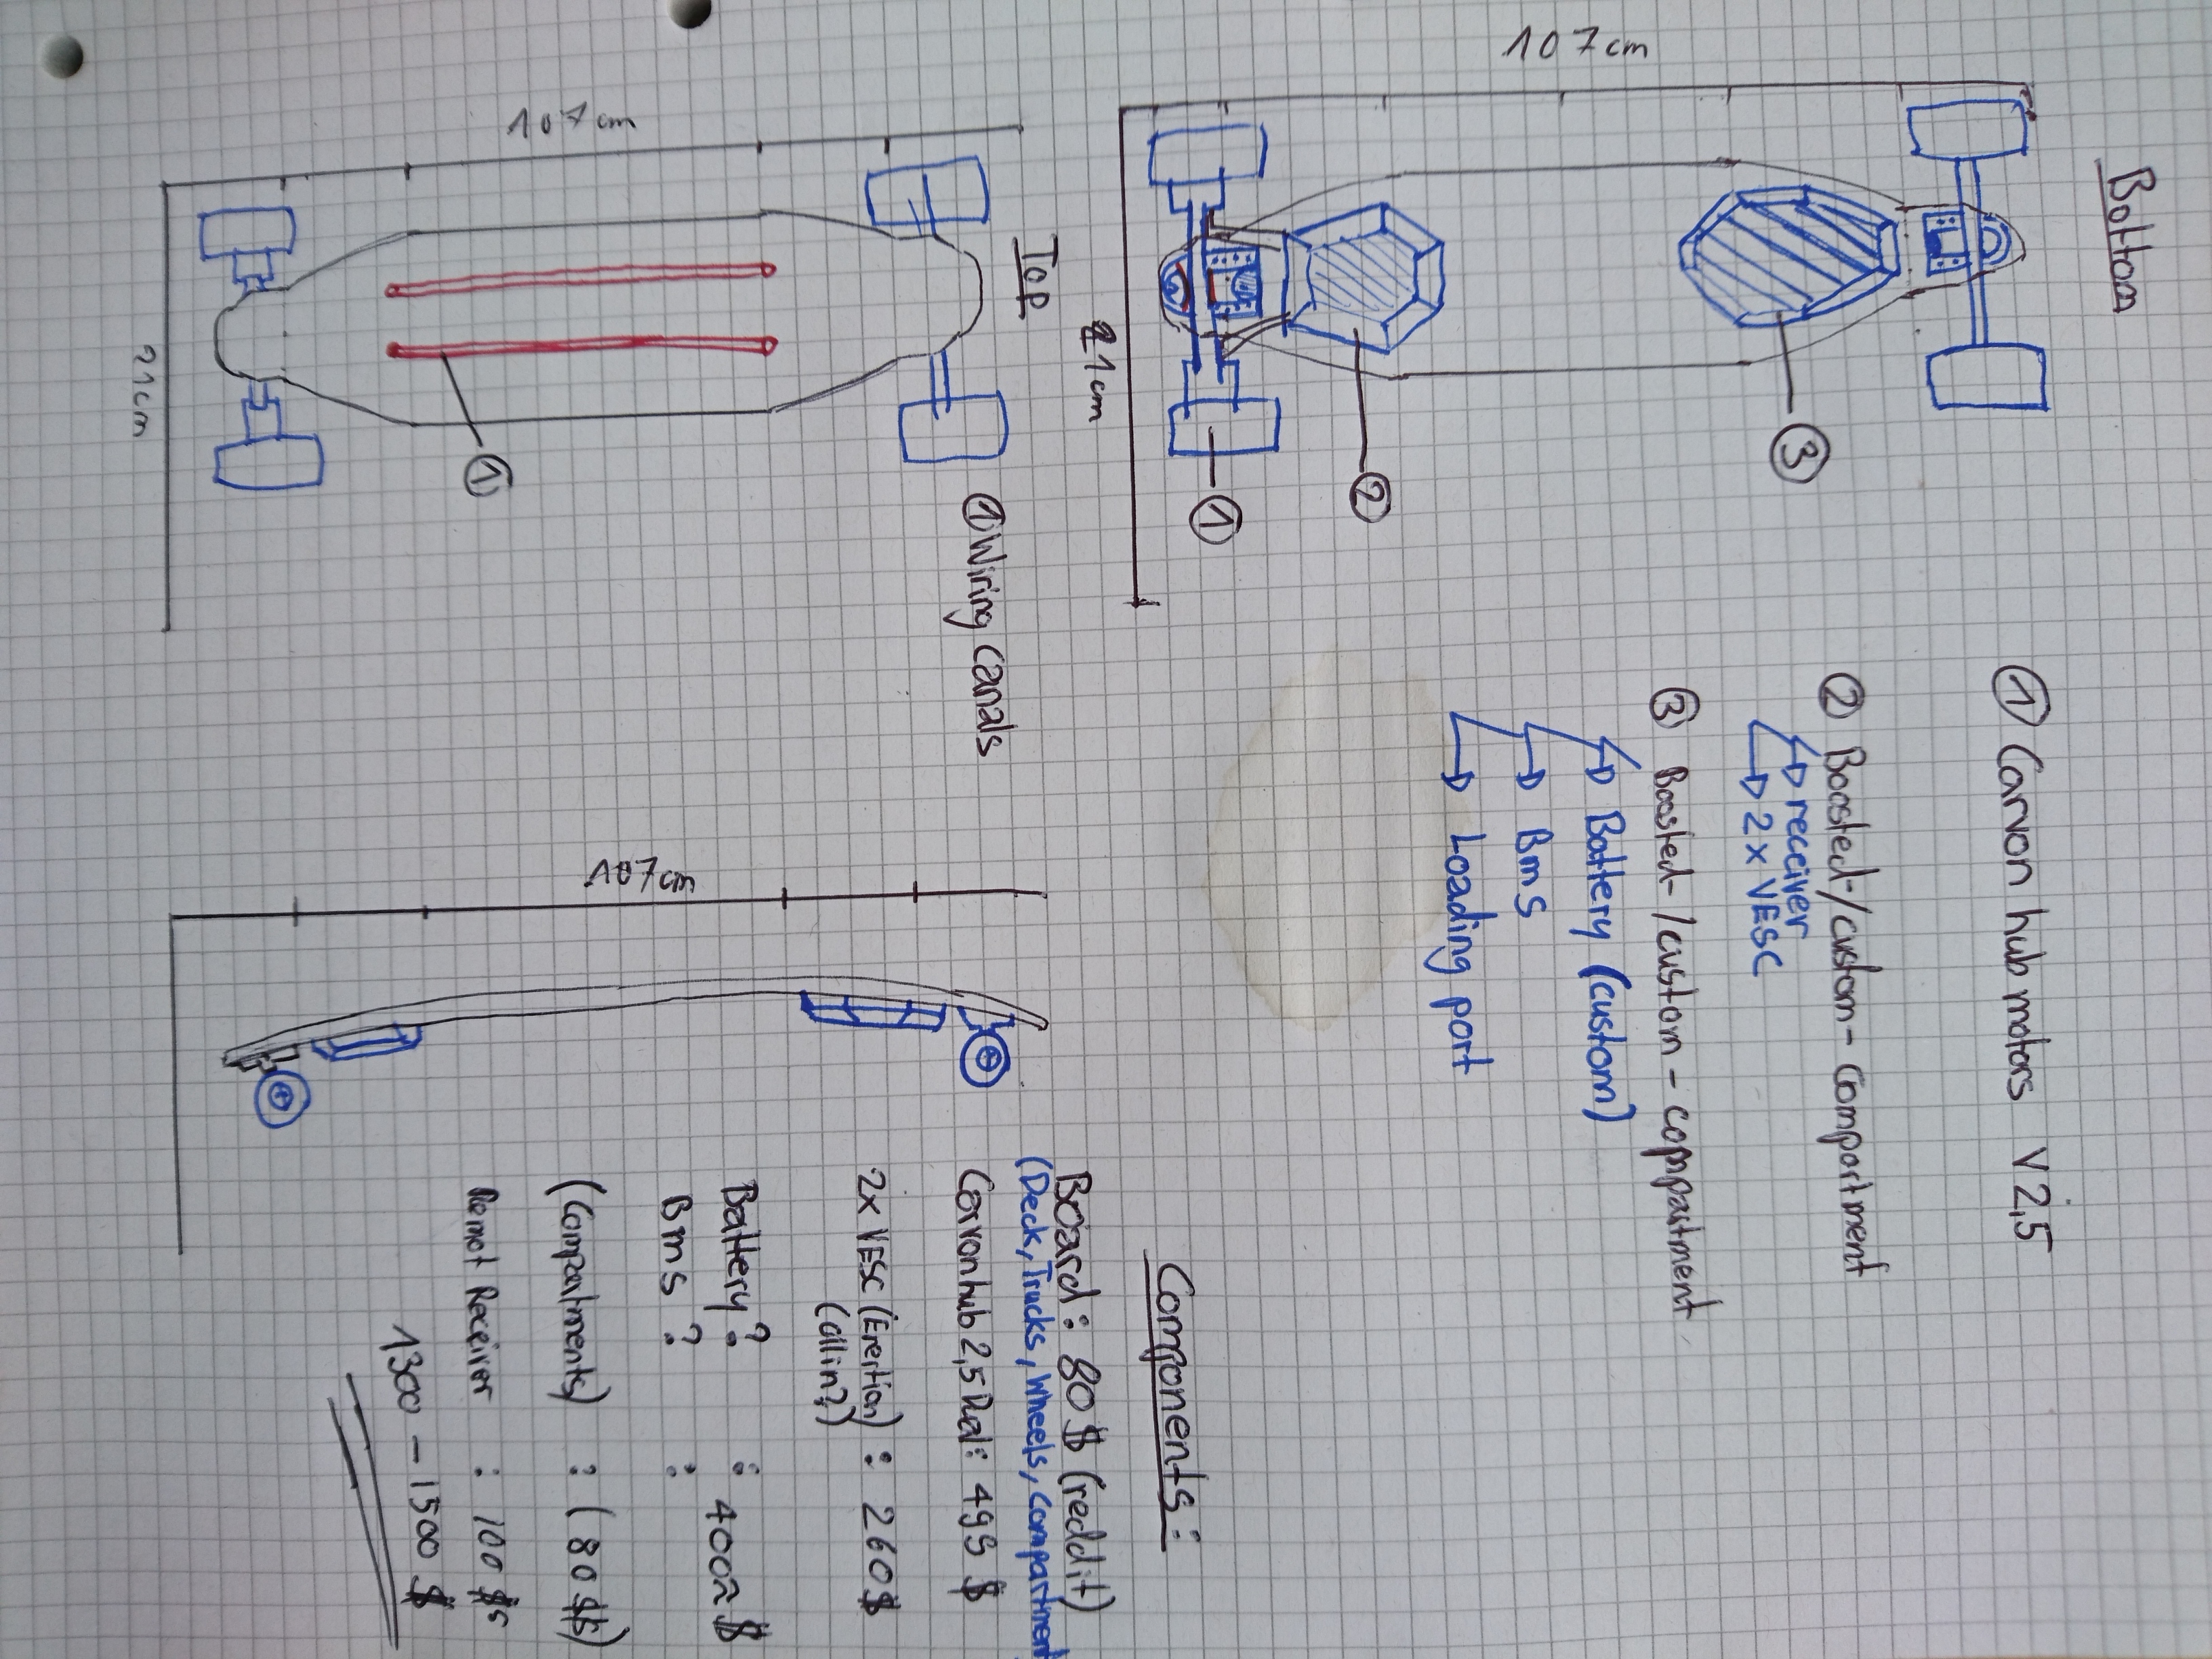
Kinda put a spreadsheet together (sorry for the bad format and drawings, I am in a rural area for our national Holiday and barely reception and no pc with me. But you know, you got an Idea about a new project and you cannot stop yourself, some of you know what i mean
I changed the title to be more uniform 
Build looks good, I would recommend two battery enclosures to account for flex.
Well first, the offer fell through because somone just kept outbiding me on the used deck. Secondly unfortunate stuff happens and my budget toock a hit.
So my question now is can i build/buy a custom battery pack + enclosure, get 2 vescs, for a reasonable price?
Plan now is: Board: https://www.muirskate.com/longboard/decks/71092/madrid-2016-bamboo-market-price-longboard-skateboard-deck-w-grip Motors: 2.5v carvon dual hubs Battery: Thought 10S3P Samsung 25R Cells (10S4P mayby) Vesc’s: carvon vescs Remote /receiver: Not yet decided. Hardware is everything avaible form my stock.
I mean the motors (399.-), battery i (guess around 350.-), 2 vecs ( 320.-), remote/receiver (100.-) = ca. 1100-1300.-
I mean its duable, but holidays are soon over and i will be back at uni with way less budget to spend and time to build etc. So has anyone an Idea to speed up the process or safe a buck here and there ? Sadly noone deos custom battery packs in EU yet 
Ps: If anyone has the Idea for the a good batterypack for the set up or has experience about their vescs, it would be greatly appreciated.
1 Like
If you want to save some money and ready to go through little bit of hassle you could consider changing the battery pack to LiPo. I have same kind of build what you have in mind and my lipos cost around 100€. Lipos need more attention and their life cycle is not as long as with 18560 but if you are really on tight budget, that is something to consider
Also be sure to check out dunkirks build, it is same kind of build with DIY 18650-pack
Good luck with your build!
thanks alot for you input. First your hometown/island loocks astonishing. Im quite often in denmakr Sweden. Might have to take a detour in the near future
Yeah will check those links out. I thought about Lipo safes a big chunk. 100$ compared to a betterypack bms solution for 400$. What range do you get with your battery setup on the carvon hubs ?
Actually I live in Helsinki, Finland but I go hiking (and e-longboarding from now on) to Norway twice a year so it feels like a second home Can highly recommend
I get range of 20km with the 12S 6Ah nanotechs. But I dont recommend buying the nanotech ones unless you get good deal, sometimes they feel sluggish.
do you use a BMS in your set up ?
So I decided to cut of some cost of this project since my Budget took a hit. (Student life … )
-
motors and vesc from carvon / Dual hub Blank Raw edition + 2 of their vescs opted for their hubs. (597.-) http://www.carvonskates.com/store/p2/CarvON_V2.5_Dual_Hub_Motors___Front_Truck___Blank_Wheels_Set_(Raw_Edition).html http://www.carvonskates.com/store/p35/VESC_For_CARVON_Hub_Motor.html
-
Battery from hobbyking / 2 x ZIPPY Flightmax 8000mAh 5S1P 30C (cheapest semi good battery option?!) (147.-) All other options of prebuilt batterypacks were too costly for not being exactly what I wanted. As soon as somone does custom battery packs in the EU or I will end up getting the Tools and read up on DIY approcha on battery I will compromise with a “OK” solution for the time being. http://www.hobbyking.com/hobbyking/store/__16227__ZIPPY_Flightmax_8000mAh_5S1P_30C.html
-
Remote a Nano remote mayby from the Forum or a European reseller. (60-75.-)
-
Compartments custom compartments from the forum.
-
Board Landyachtz 2016 Osteon (owned) https://www.muirskate.com/longboard/decks/71368/landyachtz-2016-osteon-longboard-skateboard-deck-w-grip
-
Still loocking:
- Do I need a BMS ?
- Dont know yet how I will do the wiring exactly
- 10s or 12s ?
PS:
- I leanred and was told from different places that keeping it 10s is a lot safer for your battery and also vesc. 12s is possible but bares more risk. Am i being over safe or is this concern valid ?
- Their vesc is fairly cheap and them setting them up saves me hassel and I strongly believe the BDLC tool has a burning passion to mess with me. Or should i go the safe route and buy two ollin vesc and do the settings myself ?
- I’d love for the build to have 2 compartments, how should i connect the battery to the vesc? Wiring under grip tape in a canal or wiring tube undearneth ?
Weird this is that makes me feel unsure is that for 200$ more i can buy an evolve bamboo GT or for 300$ more an M1 Monolith (granted both are ETA stil)… Sure I can upgrade my build with a better battery etc. But can you even reach the same level of comfort and reliability (kinda branded sheep since my first DIY sucked)
No, just low voltage cutoff with vesc and I charge the batteries parallel with a balancing charger. So I have to plug off the batteries and connect them to the paraboard. That is the extra hassel I have to go through when not using BMS
So. Deck has arrived. Carvon’s should arrive any second. So i am ordering everything asap so i can get shredding as soon as possible.
Hello Jan Battery - fine, but it has bullet connectors. What does your VESC have for batterie connectors? So you should probably buy some XT60 or xt90 connectors. See below under harness.
Charger - good, its a nice one as it doesn’t need a seperate power supply. good
Plugs - buy two packs, then you have 4, fine. If you need a soldering iron, let me know.
Volt checker - the one you linked works well. but it beeps and makes a lot of noice and flashes. Not really needed in my opinion if you have a VESC and do the proper settings. I prefere the following one (the one I had on my ride the other day) http://www.dx.com/p/skyrc-lipopal-2-6s-lipo-battery-voltage-checker-equilizer-voltage-indicator-self-voltage-balancer-245187#.V90nrbiLSCg (with free shipping)
Harness, you linked a parallel harness with xt90. This might be fine for your VESCs. But probably your vesc has xt60? Then you need this one http://www.hobbyking.com/hobbyking/store/_31462__XT60_Harness_for_2_Packs_in_Parallel_1pc_EU_Warehouse.html you need one.
And then you need a harness to serialize your batteries. This one uses x60. http://www.hobbyking.com/hobbyking/store/_31464__XT60_Harness_for_2_Packs_in_Series_1pc_EU_Warehouse.html and here the one for XT90 : http://www.hobbyking.com/hobbyking/store/_31482__XT90_Battery_Harness_10AWG_for_2_Packs_in_Series_EU_Warehouse.html You need one, and it has to match the connector of your VESC harness. Makes sense?
Canbus? My very personal opinion: less stress if you use PPM. Then you need a PPM Y-Wire. Something like this: http://www.hobbyking.com/hobbyking/store/_9692__Futaba_Y_Servo_Lead_15cm_Length_5pcs_bag.html Maybe this is not the perfect one, depends on what you have on your VESC. Hope you get the point.
Update: dutue missing funds (studen life …) this build was put on hold but I am trying to finish it now.
So luckily I found a bettery pack with bms and all the fun stuff for a price I can live with (and eat smth. ) .
All I need now are connecters, harness etc.,and an enclosure and I will be good to go. Expecting to continue “building” in a a week or 2.
I have a similar idea for next summer for my first build. Will truely follow this one.
Good luck!
I just realised I never updated this thread. Basically, I got all the parts, threw them together and voilà it worked. But it was ugly, the wiring wasn’t ideal and It just didn’t feel right.
So I decided to rebuild my build, since I like doing it and I don’t have the funds for a new one
This is how it ran before for a few month. Like I said, it worked fine. The perfect deck.

Things I wanted to change:
-
I had vicious griptape on it since I originally used it as a freeride and fun deck to mess around. But on an esk8 hardly usefull, it trashes any clothes it touches and grabing it becomes truely unpleasent with the added weight.
-
The wires from the carvons (2,5) are tiny I wanted to pack them into a tube.
-
Overal make it more sexy I guess
-
Swap the battery out (was my old 10s3p space cell. I am actually surprised this thing still lives…) for a 10s4p.
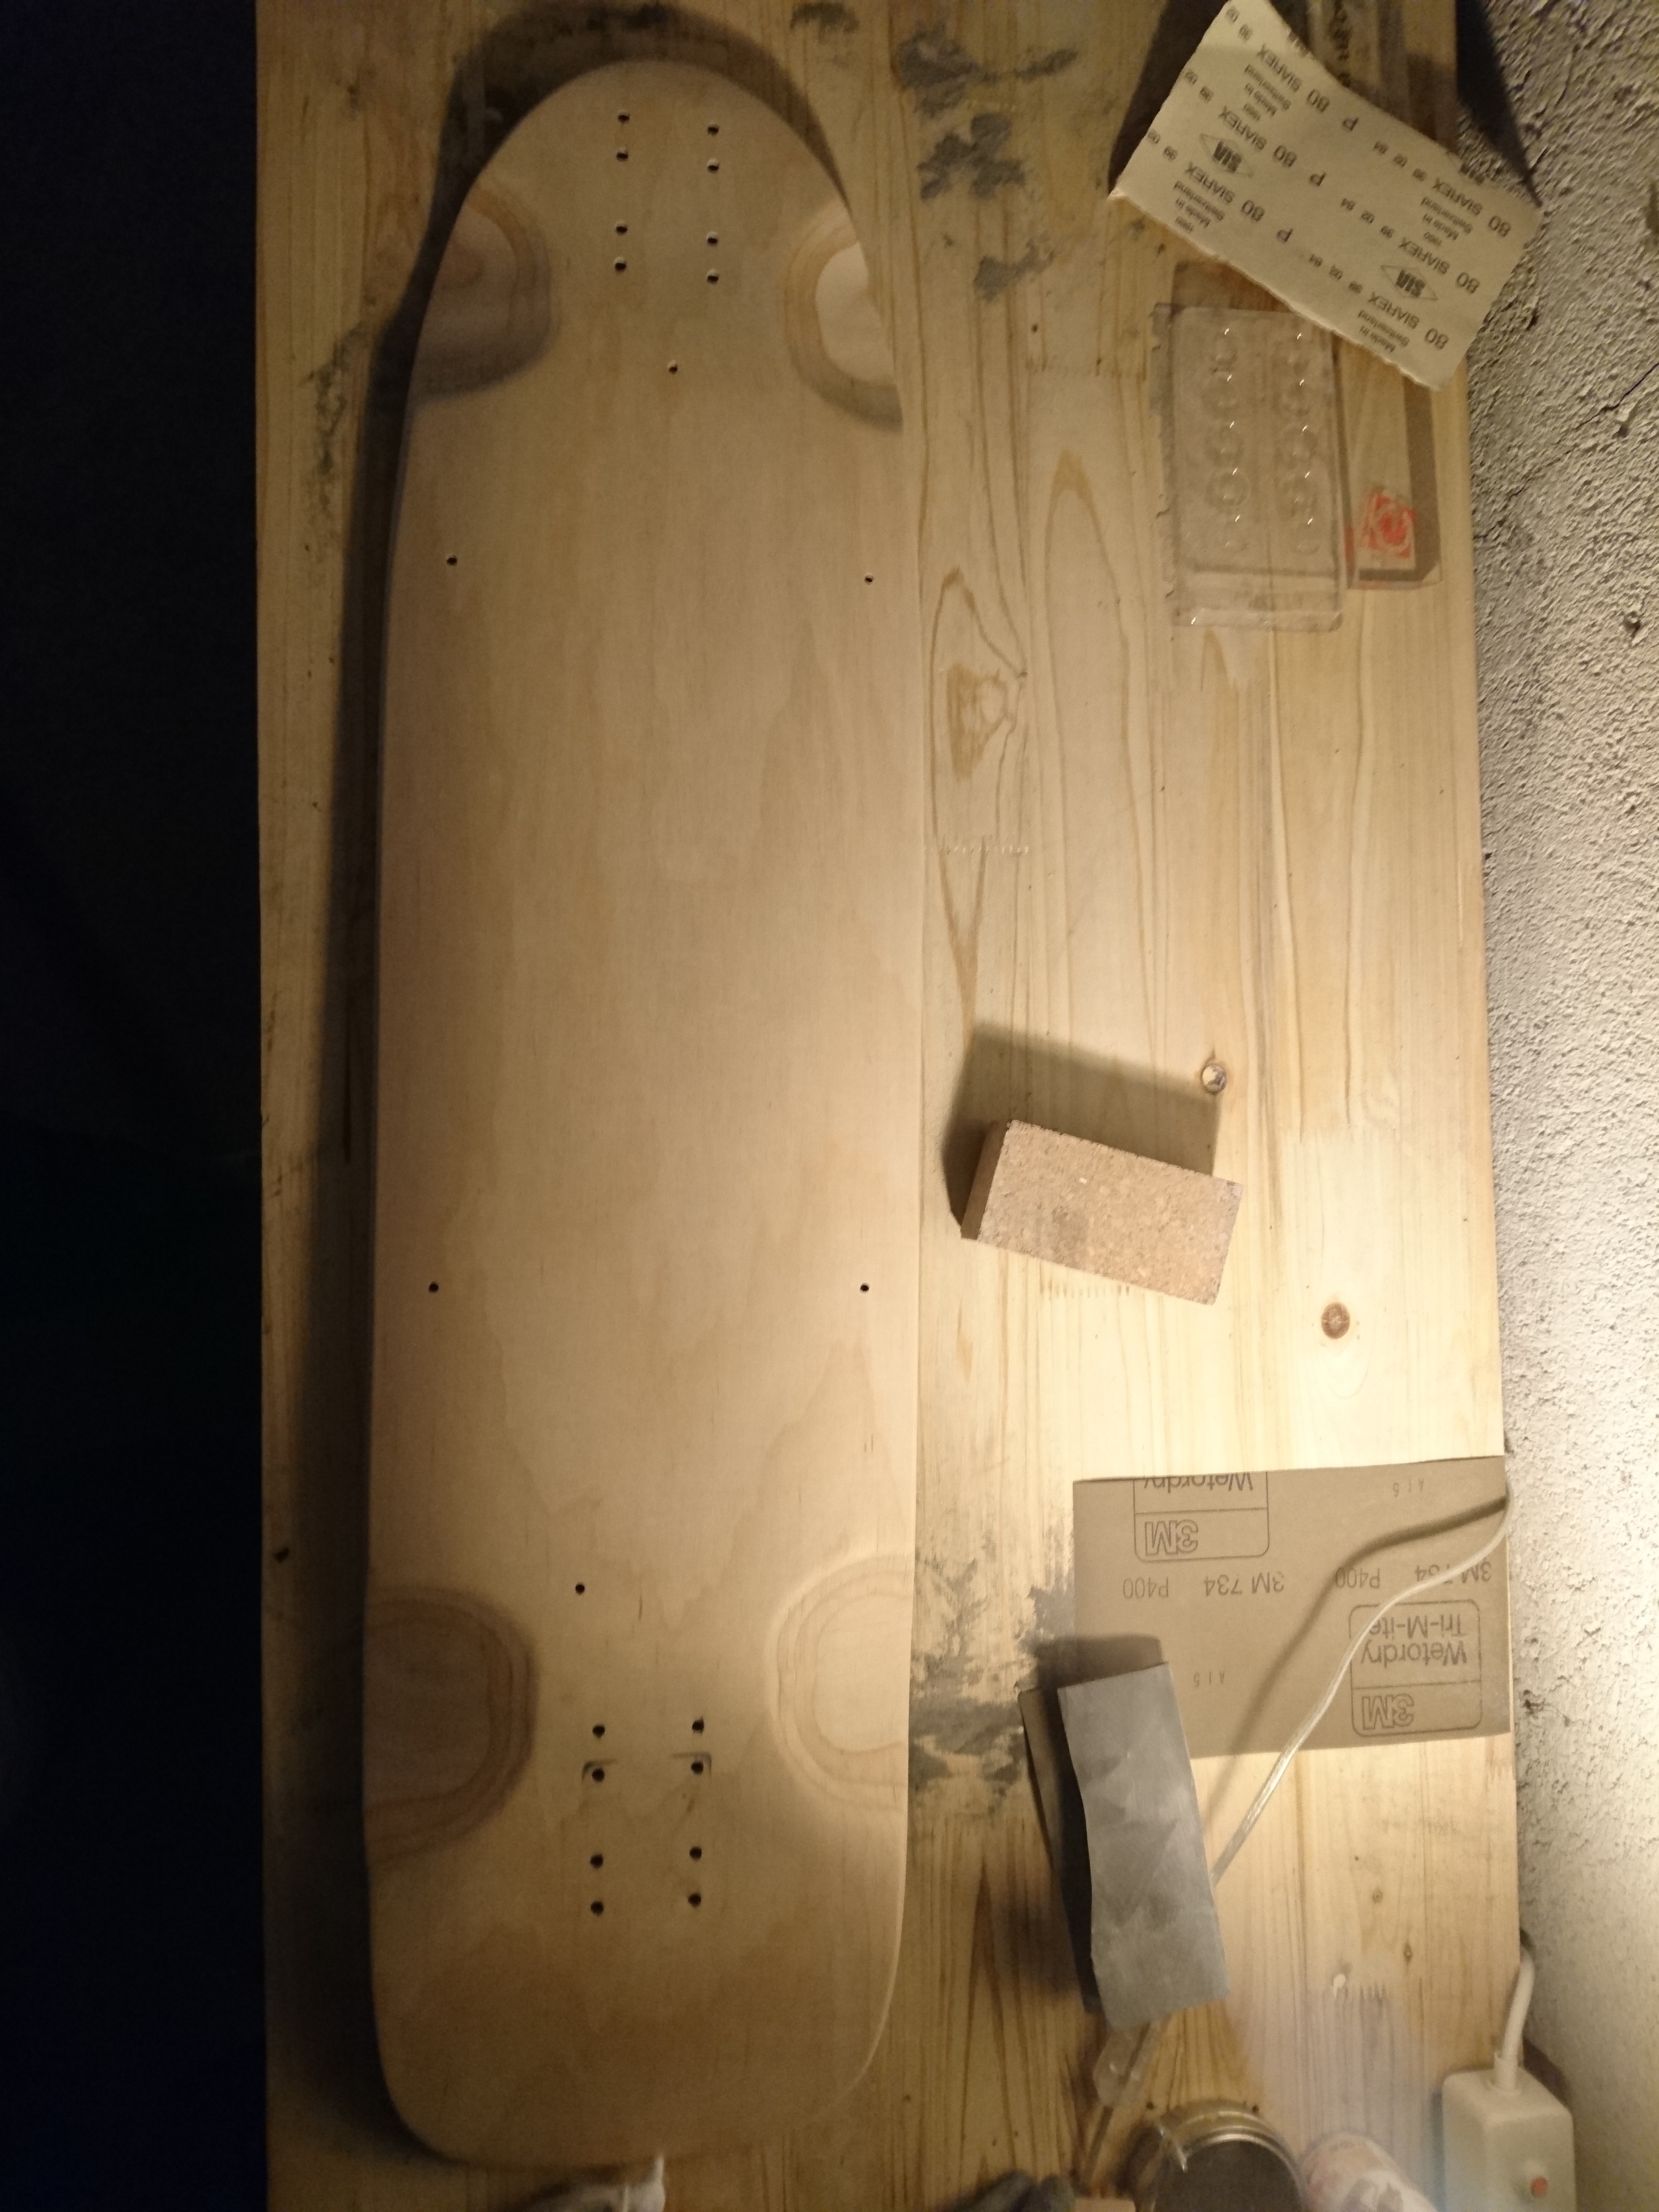
After removing the enclosure and the griptape, I had to do something. The graphics are just so ugly and since I wanted to be a little creative with the griptape I had to grind wood.


Now I had an Idea, I wanted a nice graphic on it, since the old one bothered me so much. Usually they are streetside, but esk8 aren’t usual so heck the graphic wont be either and on top. Since it is a wide and long deck, my feet wont touch the middel. Actually I think none of my boards have griptape all over, just a patch front and rear.
So, what does one put on a board? Well thought since I am swiss and we are all about our mountains which I love and would never want to miss I guess I will put some mountains there :slight_smile
- So what I did is find a suitable design, so no it is not mine, then draw it with pencile and sharpie on the deck and then re-draw it with my soldering iron. Never did it before, messed up quite often but I think it still loocks decent ! Will coat it with a bit of beeswax for the wood, then spray it with “nano spray” ( what we call them here, they make pretty much every surface hydrophob.

So next on the agenda is fit everything in the enclosure, do the wiring, having some fun with griptape and mount it all back up.
While I am at it, I will change the pivot cups and bushings, since It is so slow that I want it as carvy as possible. Will also do a complete check on all the bearings and clean out the carvons which should be fun…
2 Likes
Alright Update, she is finished
- So first I did the griptape, I wanted to try something different but still having 2 full “platforms” to stand on, I won’t sacrifice grip for loocks.

- Then fitting all of the stuff into the enclosure.

- After that it was time for the assembly !

- She is done !

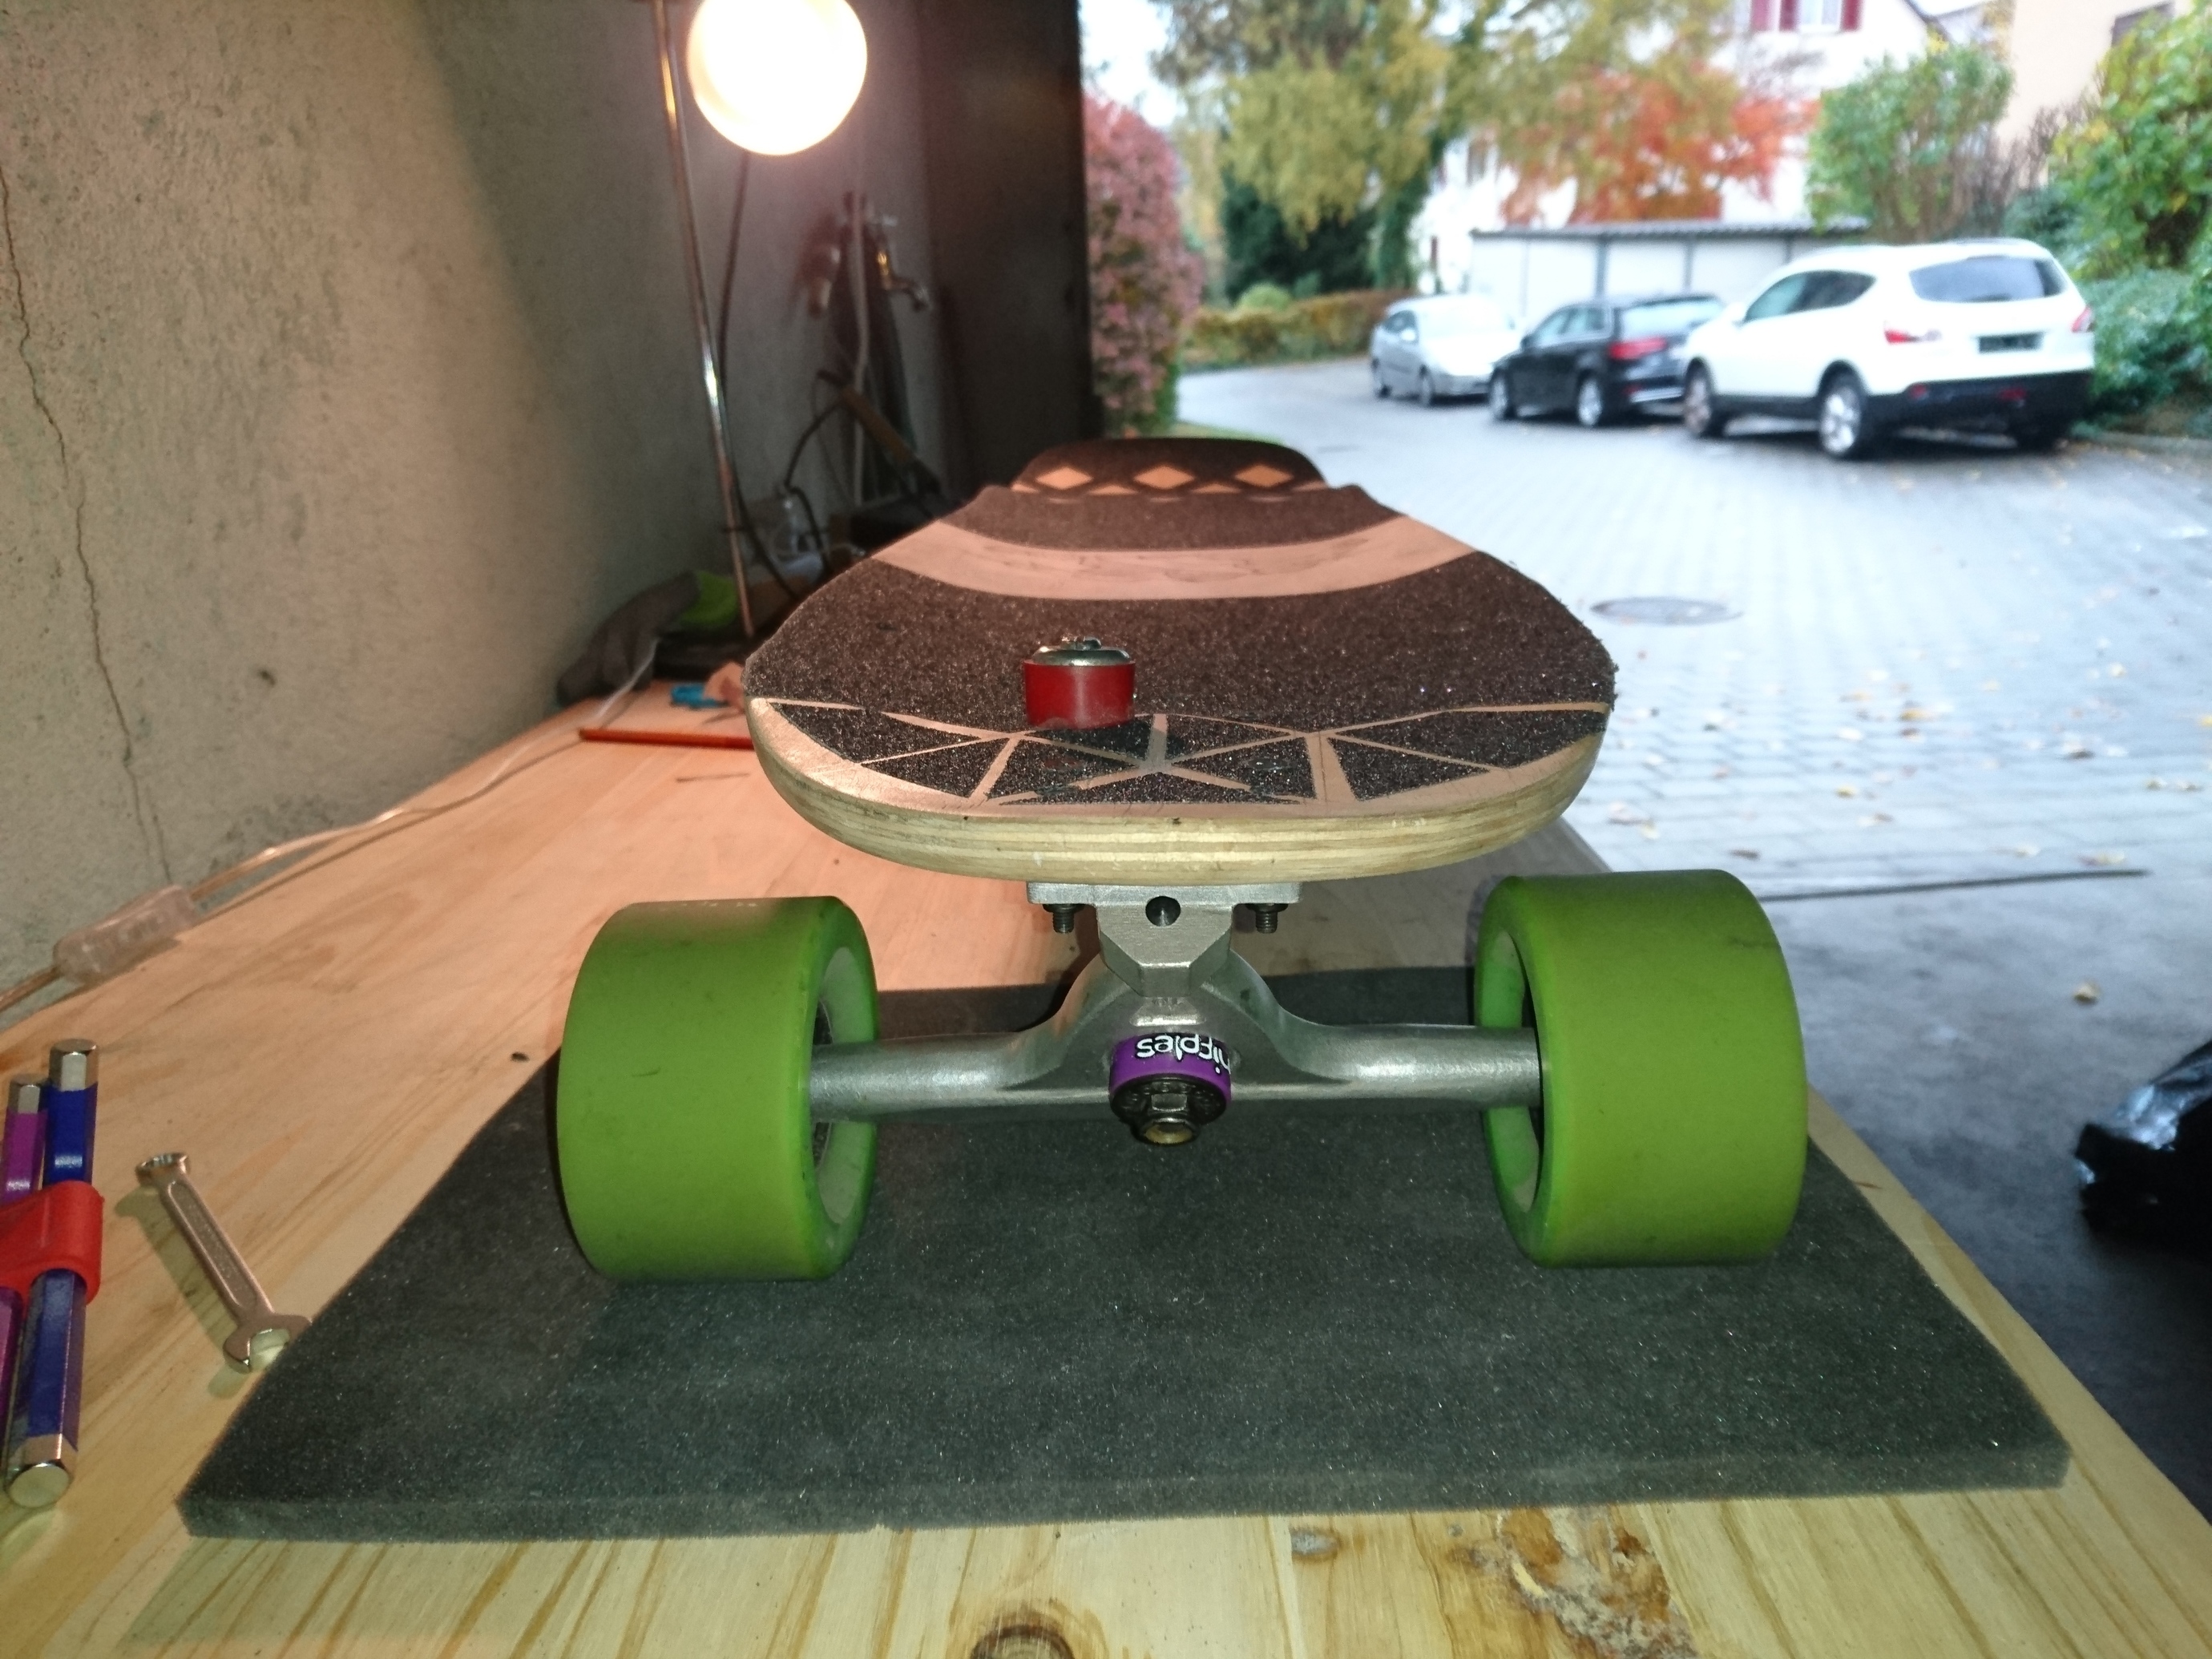

- Things I ended up changing: 1.) Bushings (orangatang nippels medium) 2.) Pivot cups 3.) Packed the wires into this Wire tube 4.) From Vicious to Jessup grip tape (so my clothes dont all loock like I ate them) 5.) wedged the truck 5 degrees in the back.
5 Likes