38x165x320 Coolermaster Novatoch TKL Keyboard for comparison
38x160x200 For me
There’s some flex to the board. Putting some clamps and hopefully the enclosure would conform to the curvature more easily before I start drilling and mounting stuffs.
If you will do this, the enclosure will fit perfect…
clamp the sides of the enclosure (just like you have done in the pic above), using a heat gun heat the front and back of the enclosure and (with welding gloves) press down slightly on the corners. This will ben the enclosure from the center and as it cools make it conform to the deck.
Be careful how much you heat it, there is a fine line between soft and puddle of goo :).
@philvanzu Nahh I rather not destroy the board. Am too lazy to paint it either ways. LOL
So… I followed @mmaner suggestion of using a heatgun… Didnt quite work out fine. Using medium heat and the edges wrapped upwards. Maybe I should have heated longer for it to be softer? The flexibility I heated to, was probably slightly tougher than a gummy bear? Should I have done it longer to make it more malleable?
Moving on, I actually did some heating and some “compression tool method” Kinda formed the board to the slight curvature shape. which is pretty great.
More pictures and steps soon.
I NEED HELP ON MOUNTING STUFFS INSIDE THE ENCLOSURE!!!
Here’s a picture of how’s I am going to mount my enclosure.
Here’s like the top View. Of everything.
Foc box - Heatsink glued to the deck (Plastic housing facing enclosure)
BMS
Antispark switch - Gonna be placed as (Enclosure-BMS-Antispark-Deck)
Water proof switch
Charging port
(Right of 5; Not numbered in picture) The motor phase wires would come through. With rubber gasket.
Some considerations I have made are:
on/off switch placement(4) - In rocky roads, it wouldnt turn it off accidently
Charging port location(5) are protected against oncoming rocks/water
Battery will be super glued to the Deck(10S2P)
Antispark(3) would have an protective isolation shield/cover. Extra protection from metallic case of BMS and causing a short
Receiver would be thrown inside…depending on leftover space? Else mount it outside?
Any suggestions on better ways to mount the focbox for better heat dispensation?
Or even the antispark switch/ on-off switch/charging port?
Thinking of placing a square battery lcd indicator on the side (beside focbox(item 1)) Not confirm if I would use it eventually or mount it outside tho
Left to right: Motor 3 poles, charging port, Switch
Finally done up my 10S 2p with BMS.
Wrapped up my battery with the green paper thingy and plastic heat shrink wrap
Tried positioning into the enclosure with the board.
Notice the big gap between the board and enclosure!!!
I was pushing as hard as I can against the deck.
Heat the enclosure once again to conform the shape. Pretty much smaller gap. Probably still 2-4mm of spacing between the deck and enclosure.
Im planning to hot glue the battery and ESC to the deck itself. Then cover it up up threaded inserts in the deck and screwing it together.
I highly suspect there will still be a small gap between the deck and enclosure, even after screwing in the enclosure. Any ideas how to fully seal up the tiny gap?? Damm worried if I accidentally rode over a puddle of water and water gets in…
That’s exactly what happened to me with my dinghy build, I ended up with just enough edges to make it work but if I had to remake this build I’d use the epoxy pools of flatness technique instead.
yes the little beast enclosure from eskating.eu and the dinghy is basically the little brother of the tugboat. I ended up doing much more aggressive reshaping than I originally intended to because the enclosure was not deep enough to accomodate 2 rows of cells when reshaped,
What I ended up doing was put a big book in the enclosure the same size as my battery wrapped in adhesive tape so it would not deform then I really went at it with a heat gun, but the result is a bit wonky and I have no border left at all in the middle of the enclosure.
Battery is 10S4P, there’s just enough room for a focbox, you can see a link to my build log with more pics of the shaping process if you click on my name.
@philvanzu That is sick dude! How I only managed to cramped in 10S2P with my focbox, antispark switch and BMS. My BMS is huge, which kinda explained the “space wastage”
Im planning to do a DIY encloure using Fiber Glass Cloth and Finish Resin from HobbyKing. Something like this:
My bms does only 15A, I only use it for charging that’s why it’s so small and all the antisparks I tried have died super quickly so I only trust XT90S now.
Yes fiberglass / cf is the best for a custom enclosure wise choice. I was on a tight budget otherwise i’d have done it too.
I have no idea since I never made one but the enclosure coming with the Lacroix deck is only 1 mm thick and still amazingly strong. I imagine probably 4 sheets would be enough but you should really ask someone who knows this stuff.
As for vibrations, everything under your deck should always vibrate as one, nothing should ever be loose or rattling.
 38x165x320 Coolermaster Novatoch TKL Keyboard for comparison
 38x160x200 For me
 There’s some flex to the board. Putting some clamps and hopefully the enclosure would conform to the curvature more easily before I start drilling and mounting stuffs.

 Here’s a picture of how’s I am going to mount my enclosure.
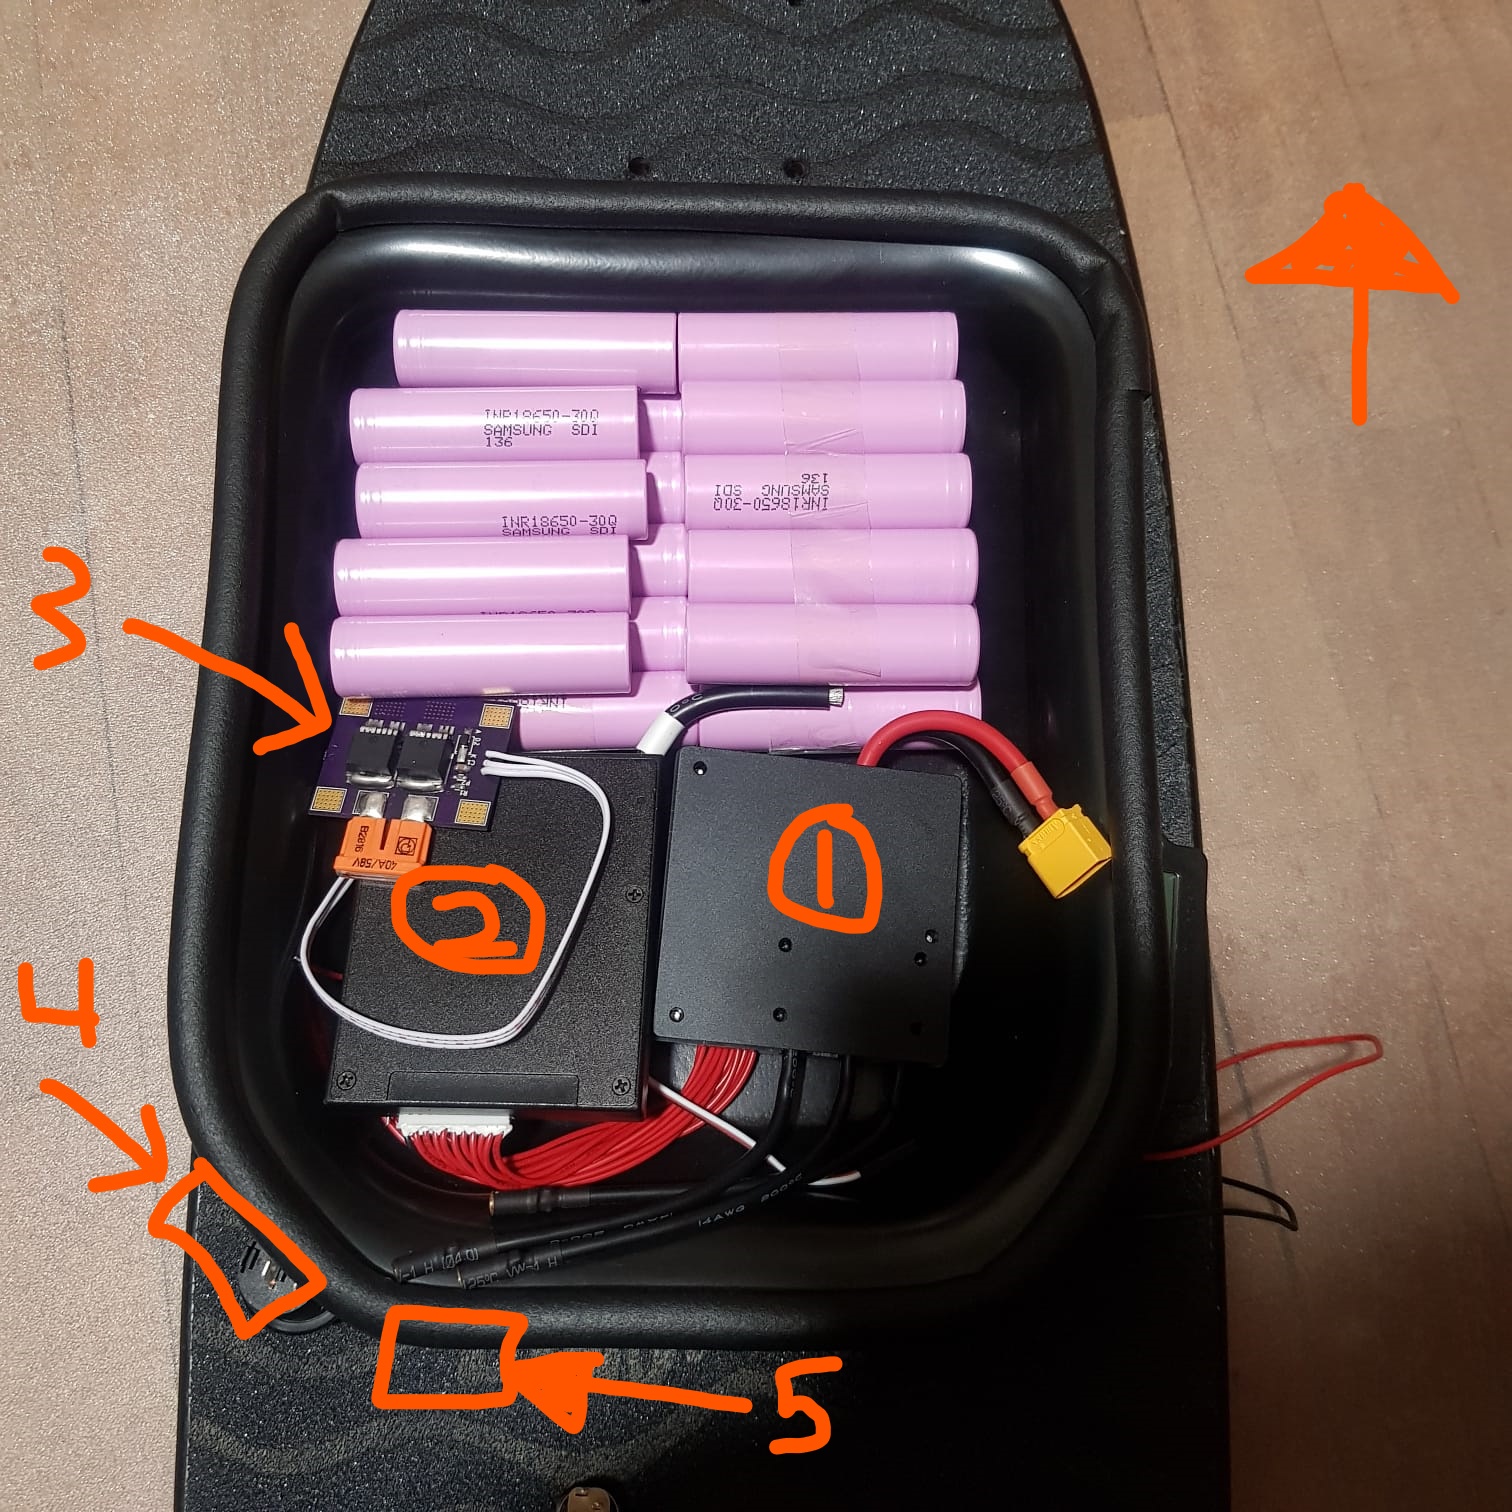
 Left to right: Motor 3 poles, charging port, Switch
 Finally done up my 10S 2p with BMS.
Wrapped up my battery with the green paper thingy and plastic heat shrink wrap
Finally done up my 10S 2p with BMS.
Wrapped up my battery with the green paper thingy and plastic heat shrink wrap Tried positioning into the enclosure with the board.
Notice the big gap between the board and enclosure!!!
I was pushing as hard as I can against the deck.
Tried positioning into the enclosure with the board.
Notice the big gap between the board and enclosure!!!
I was pushing as hard as I can against the deck. Heat the enclosure once again to conform the shape. Pretty much smaller gap. Probably still 2-4mm of spacing between the deck and enclosure.