Motor wire management - inlaid motor wires and plugs - beware of bondo

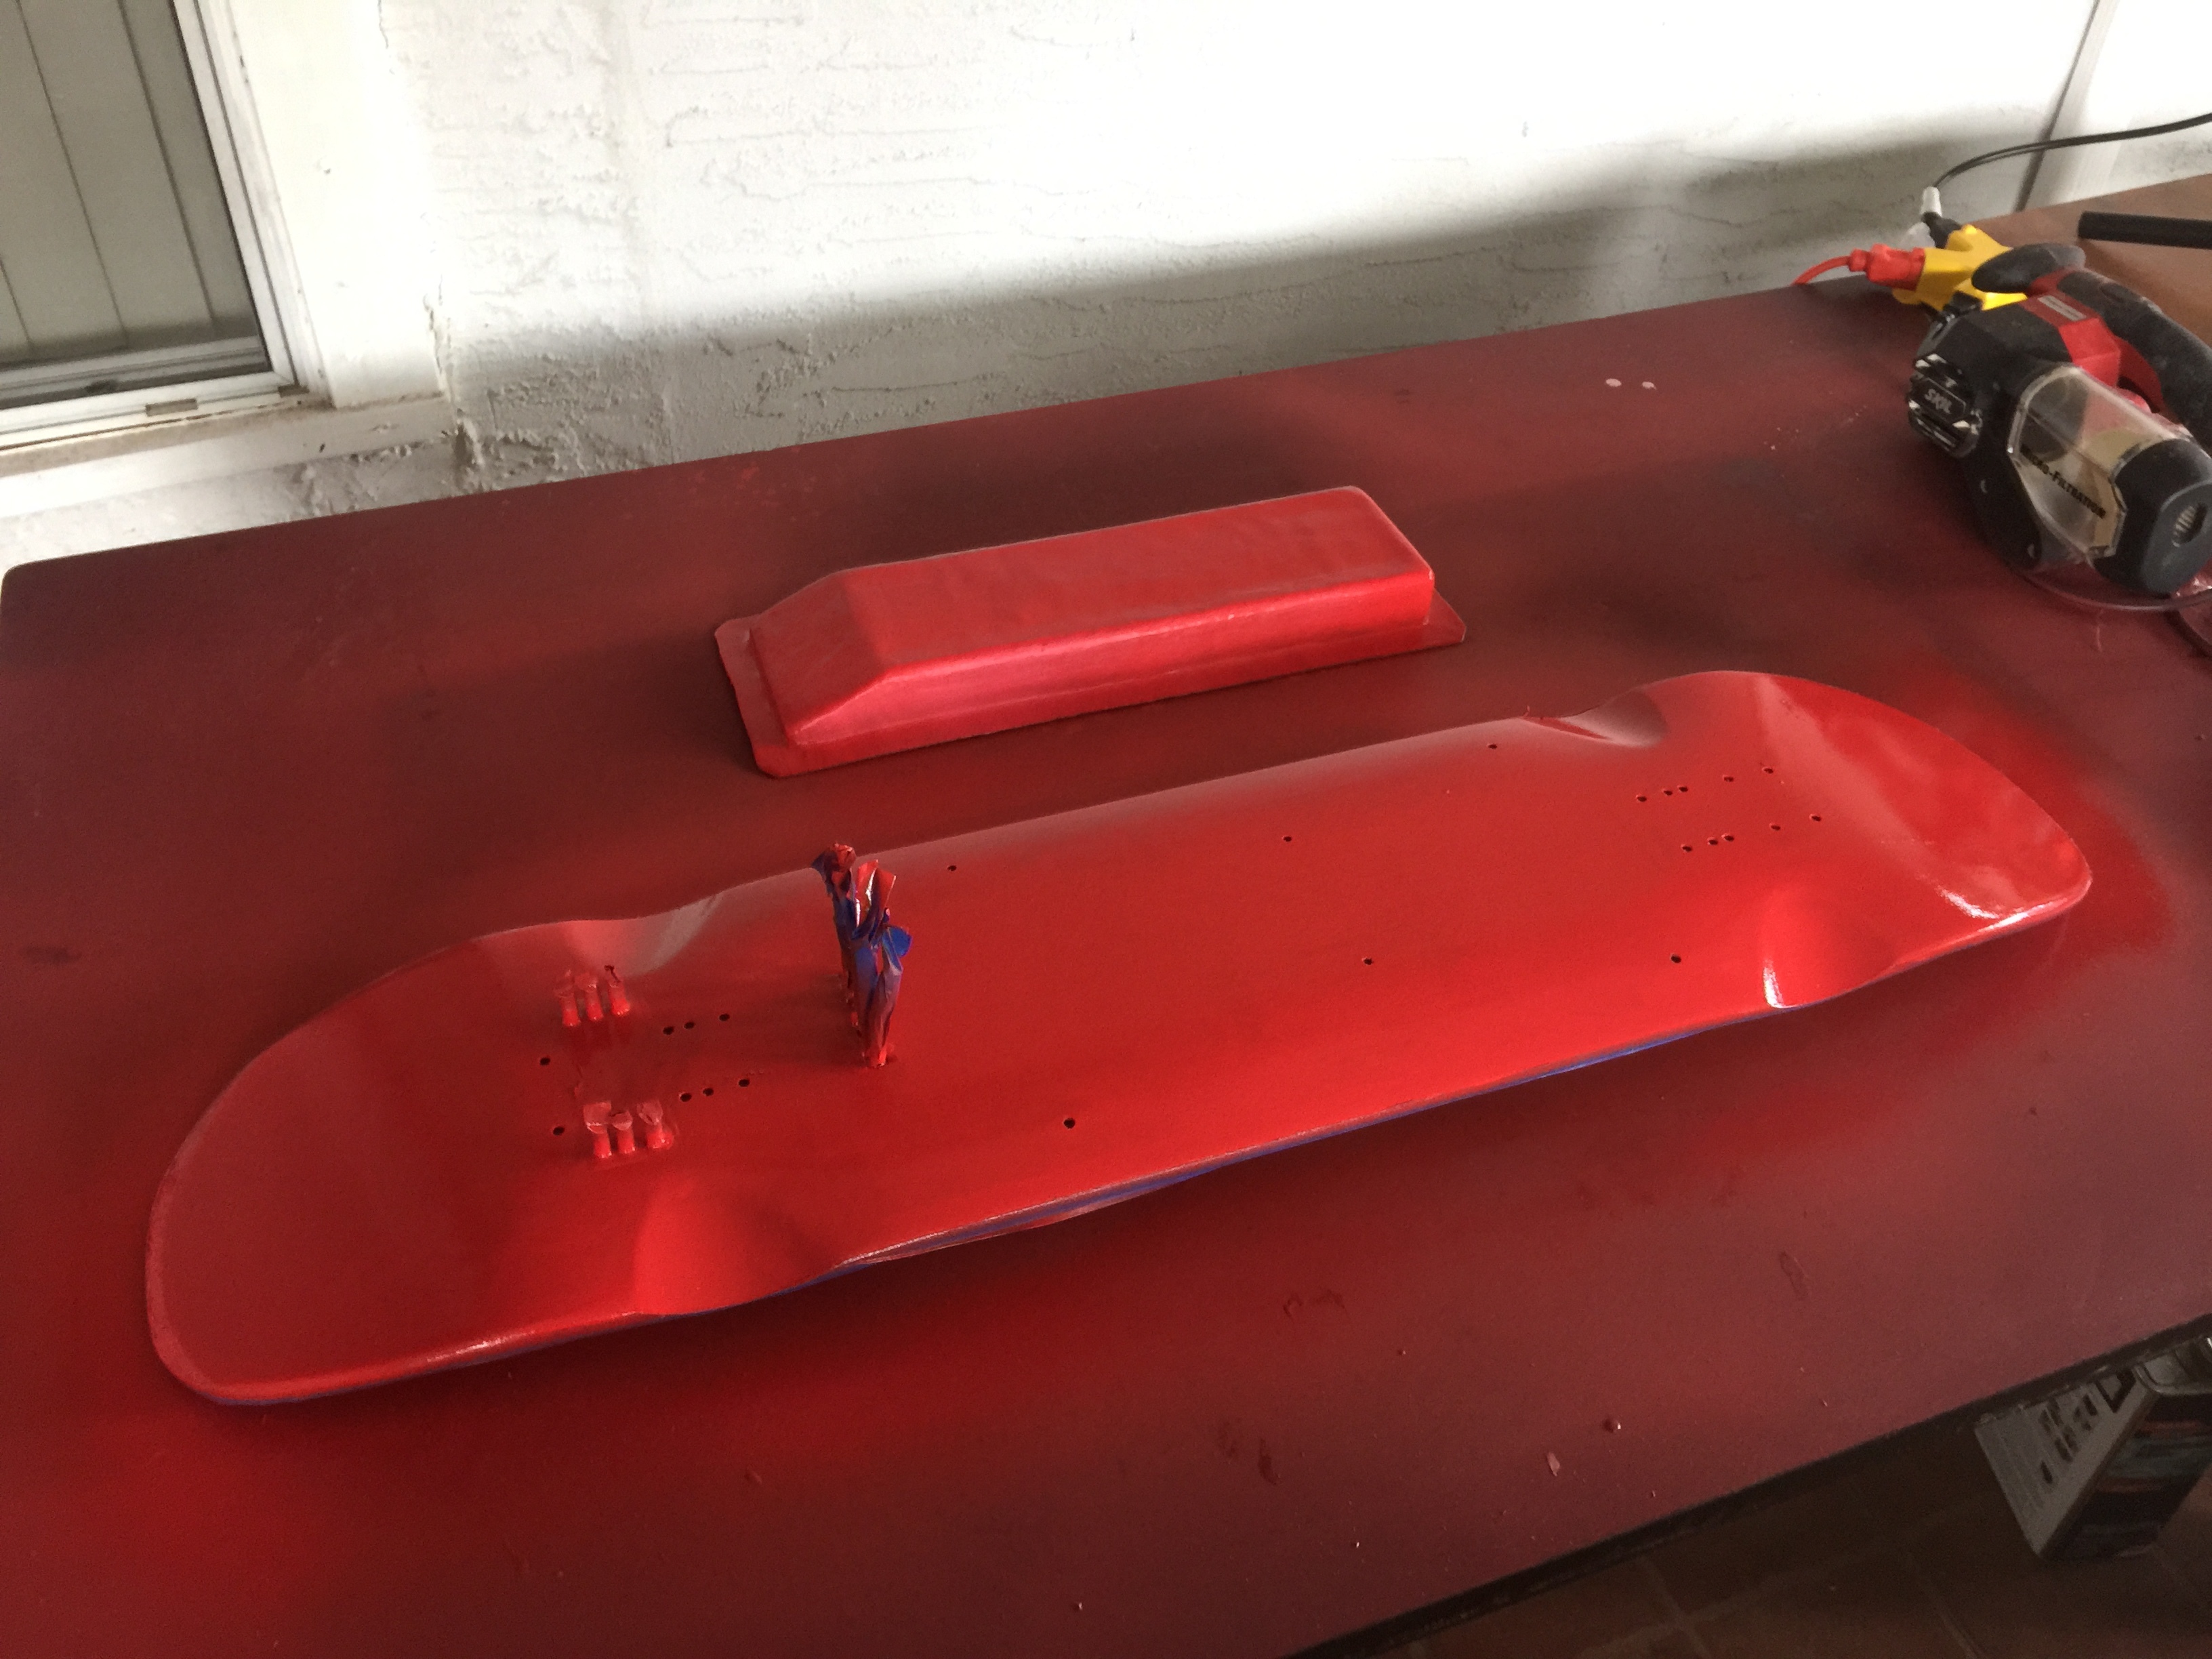
For the past couple of weekends i’ve been giving my rig a complete makeover. New wheels and bearings, new paint, new box, and some built in motor wire management. Also, I went with red because as we all know red is 20% faster than the next fastest color, so immediate performance improvements will be had based on the color alone.

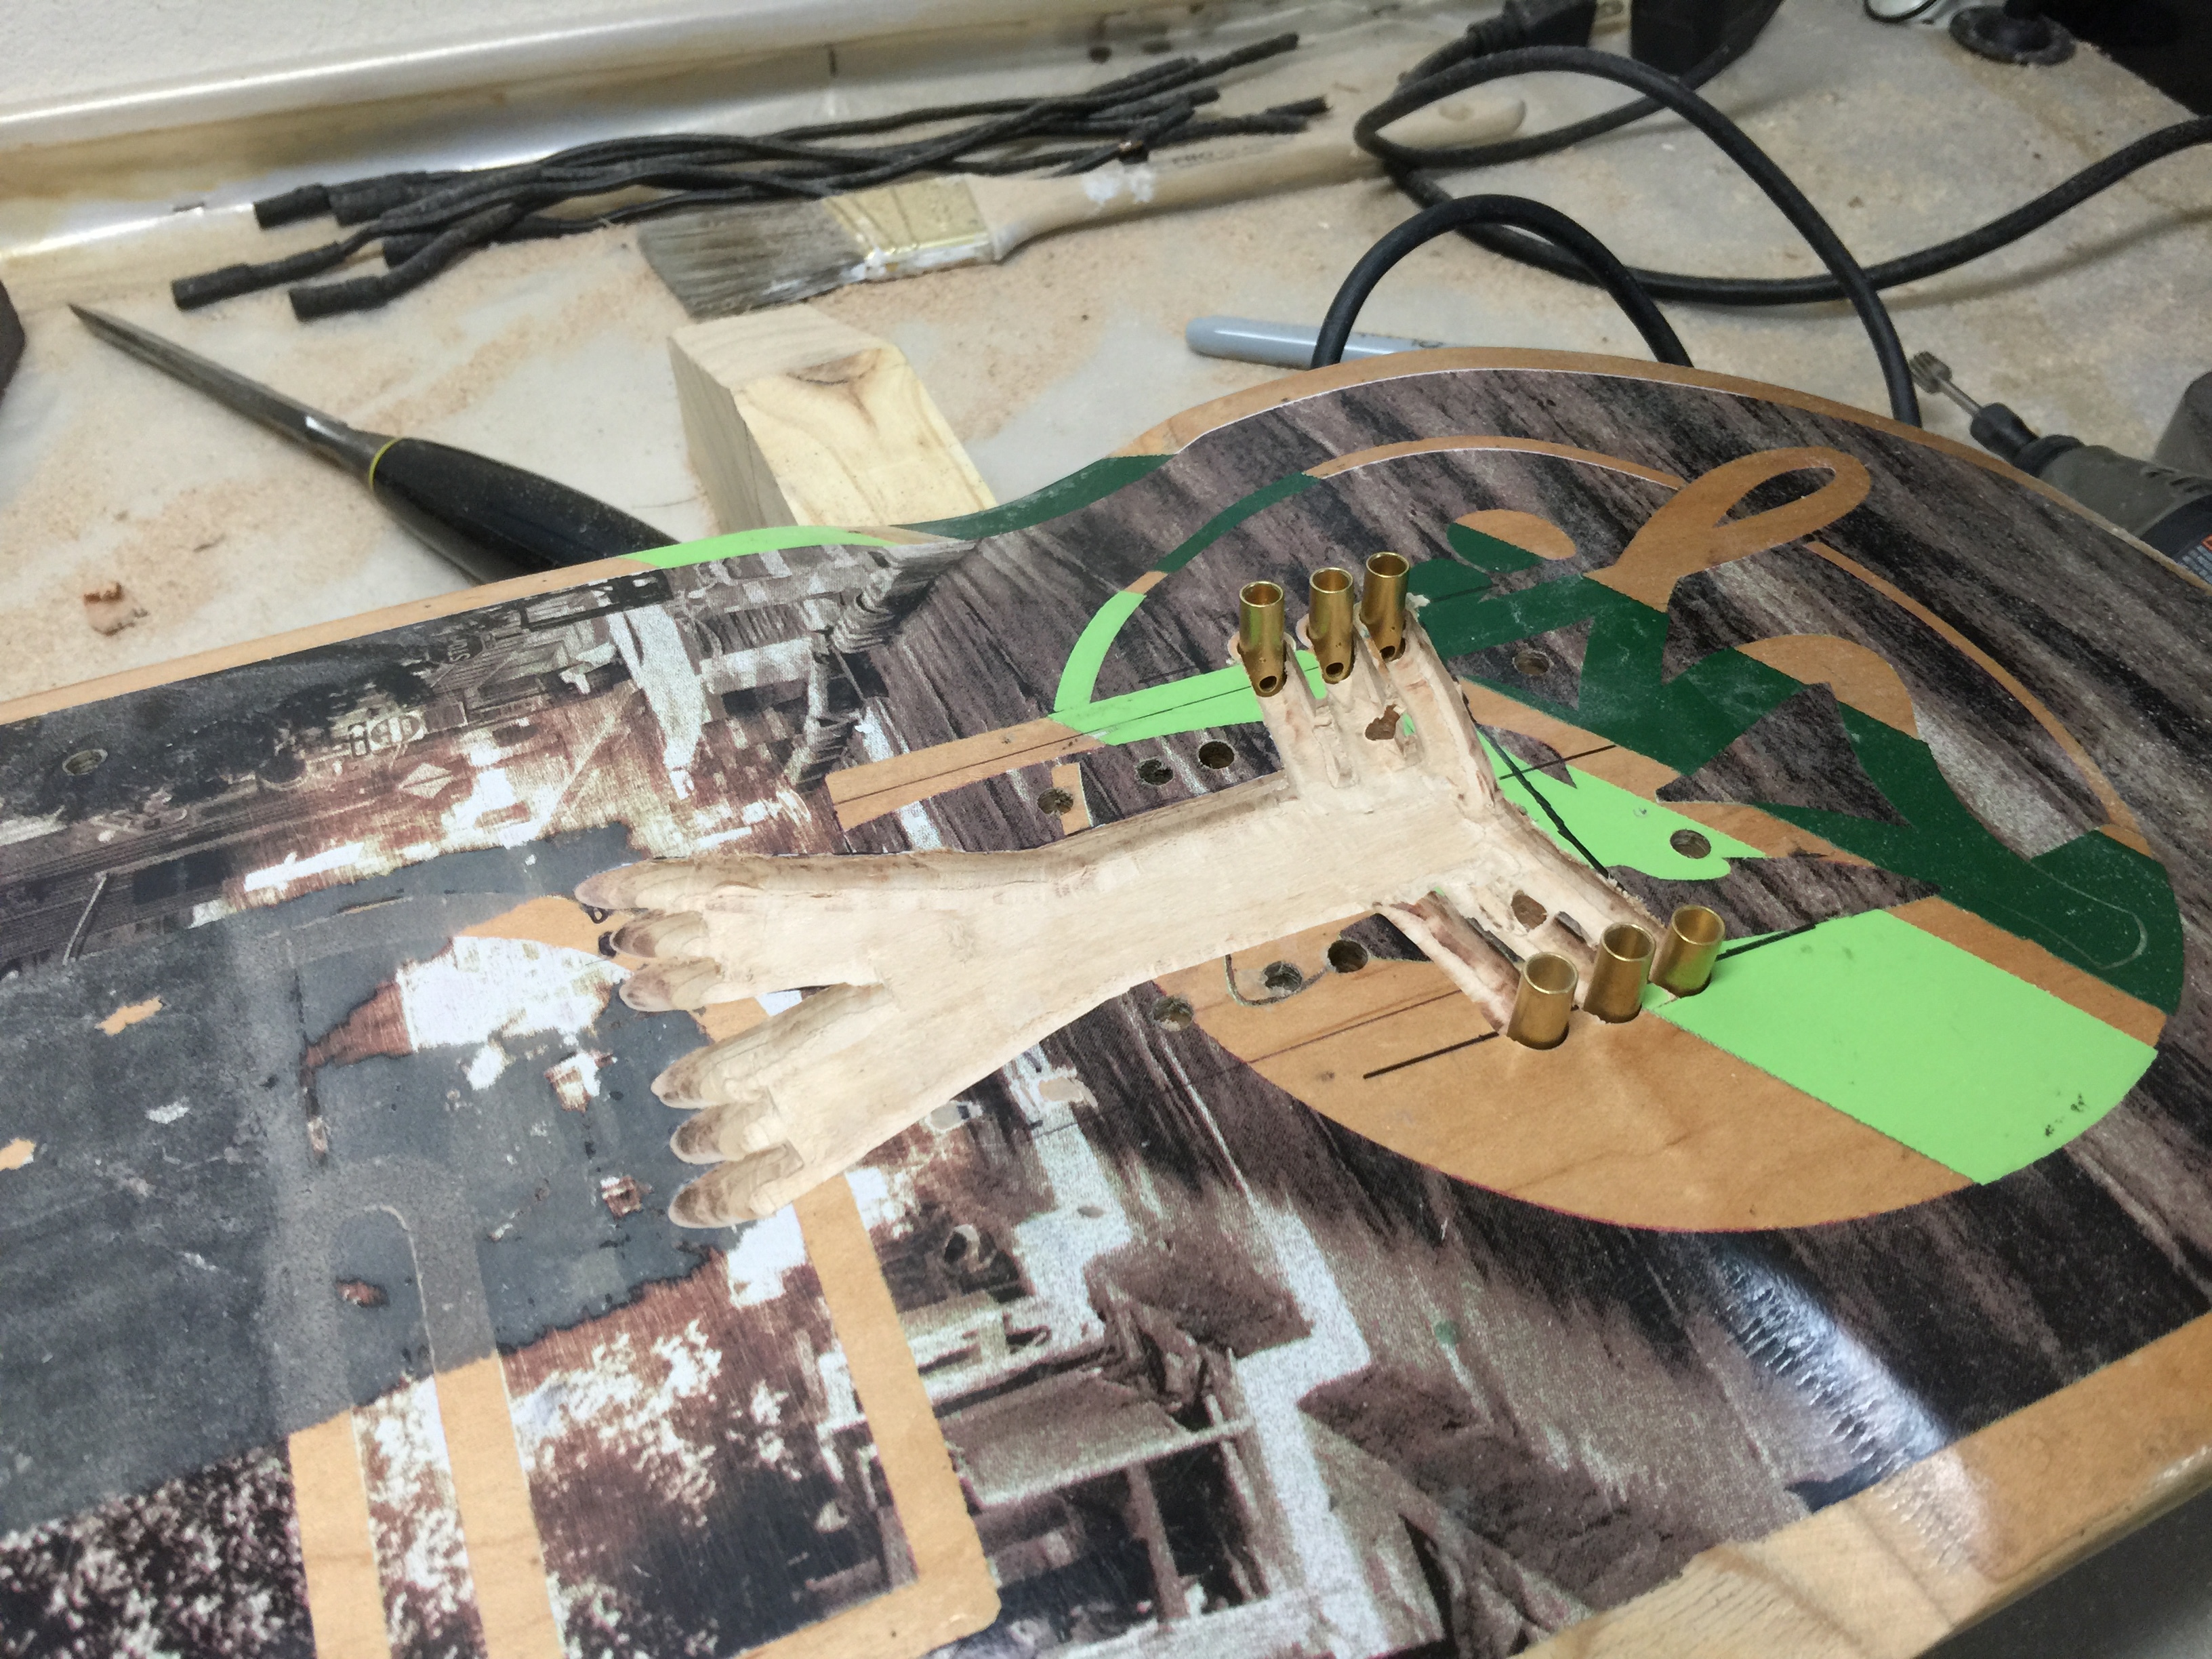
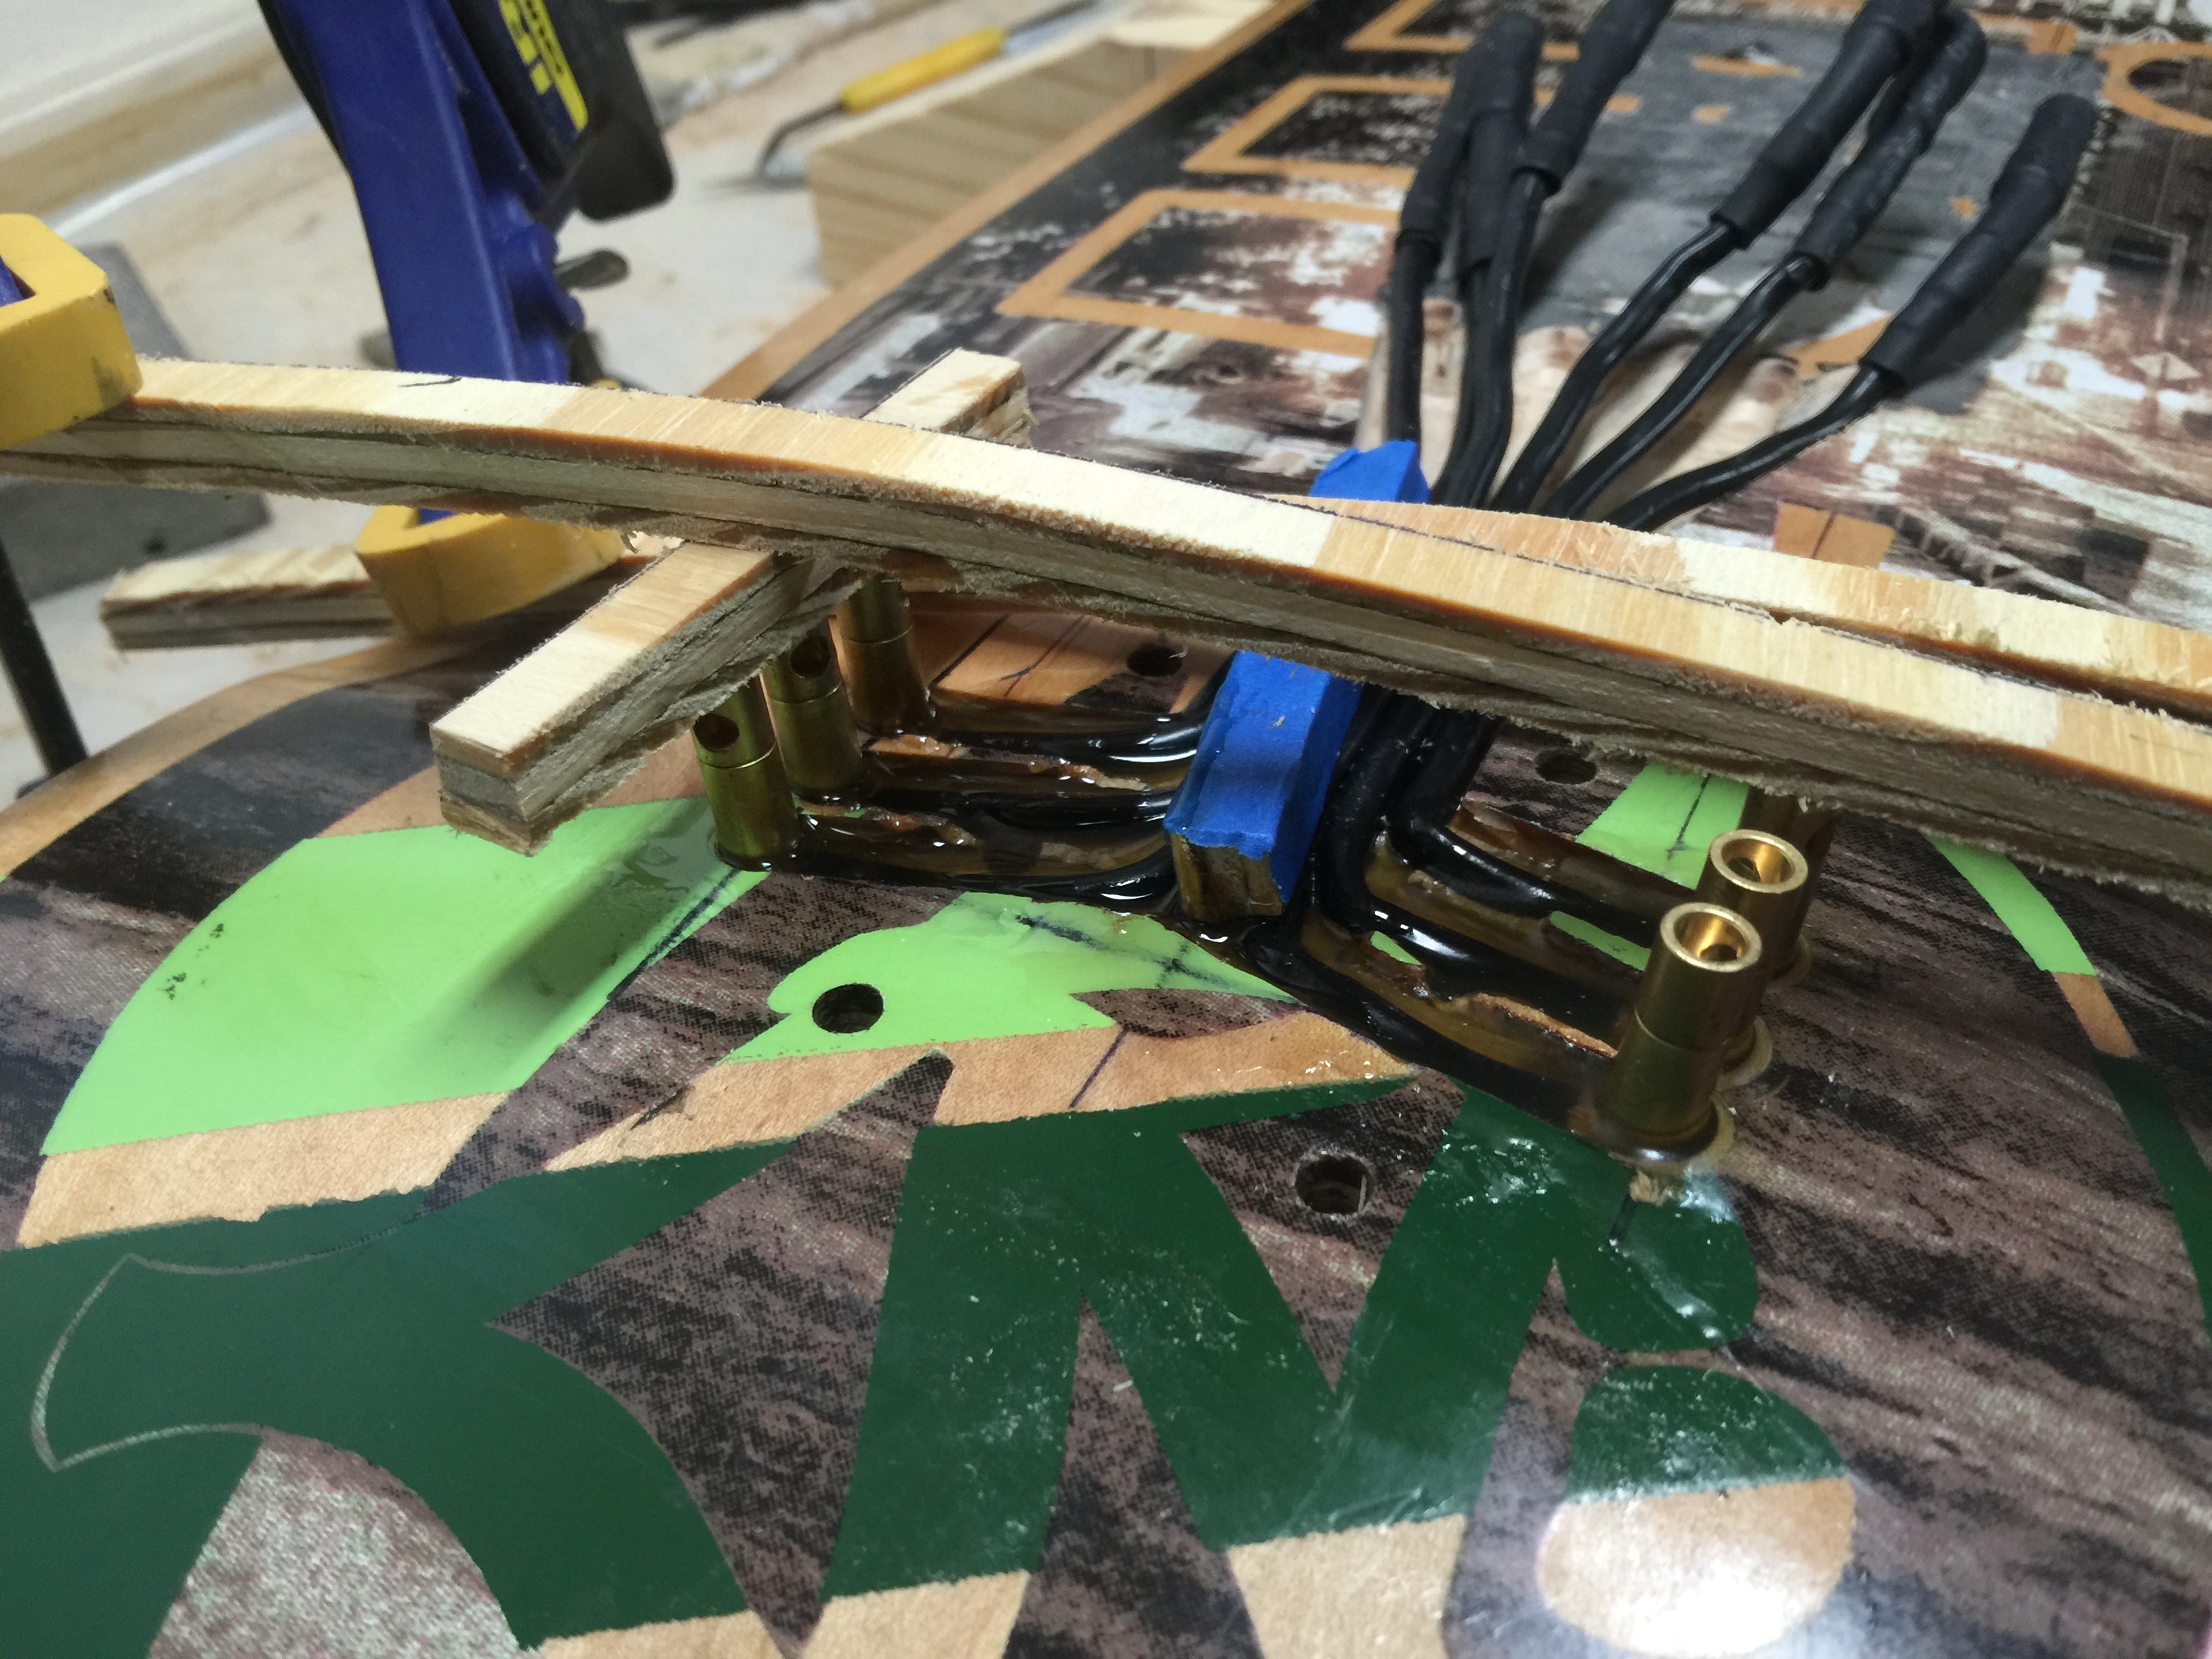
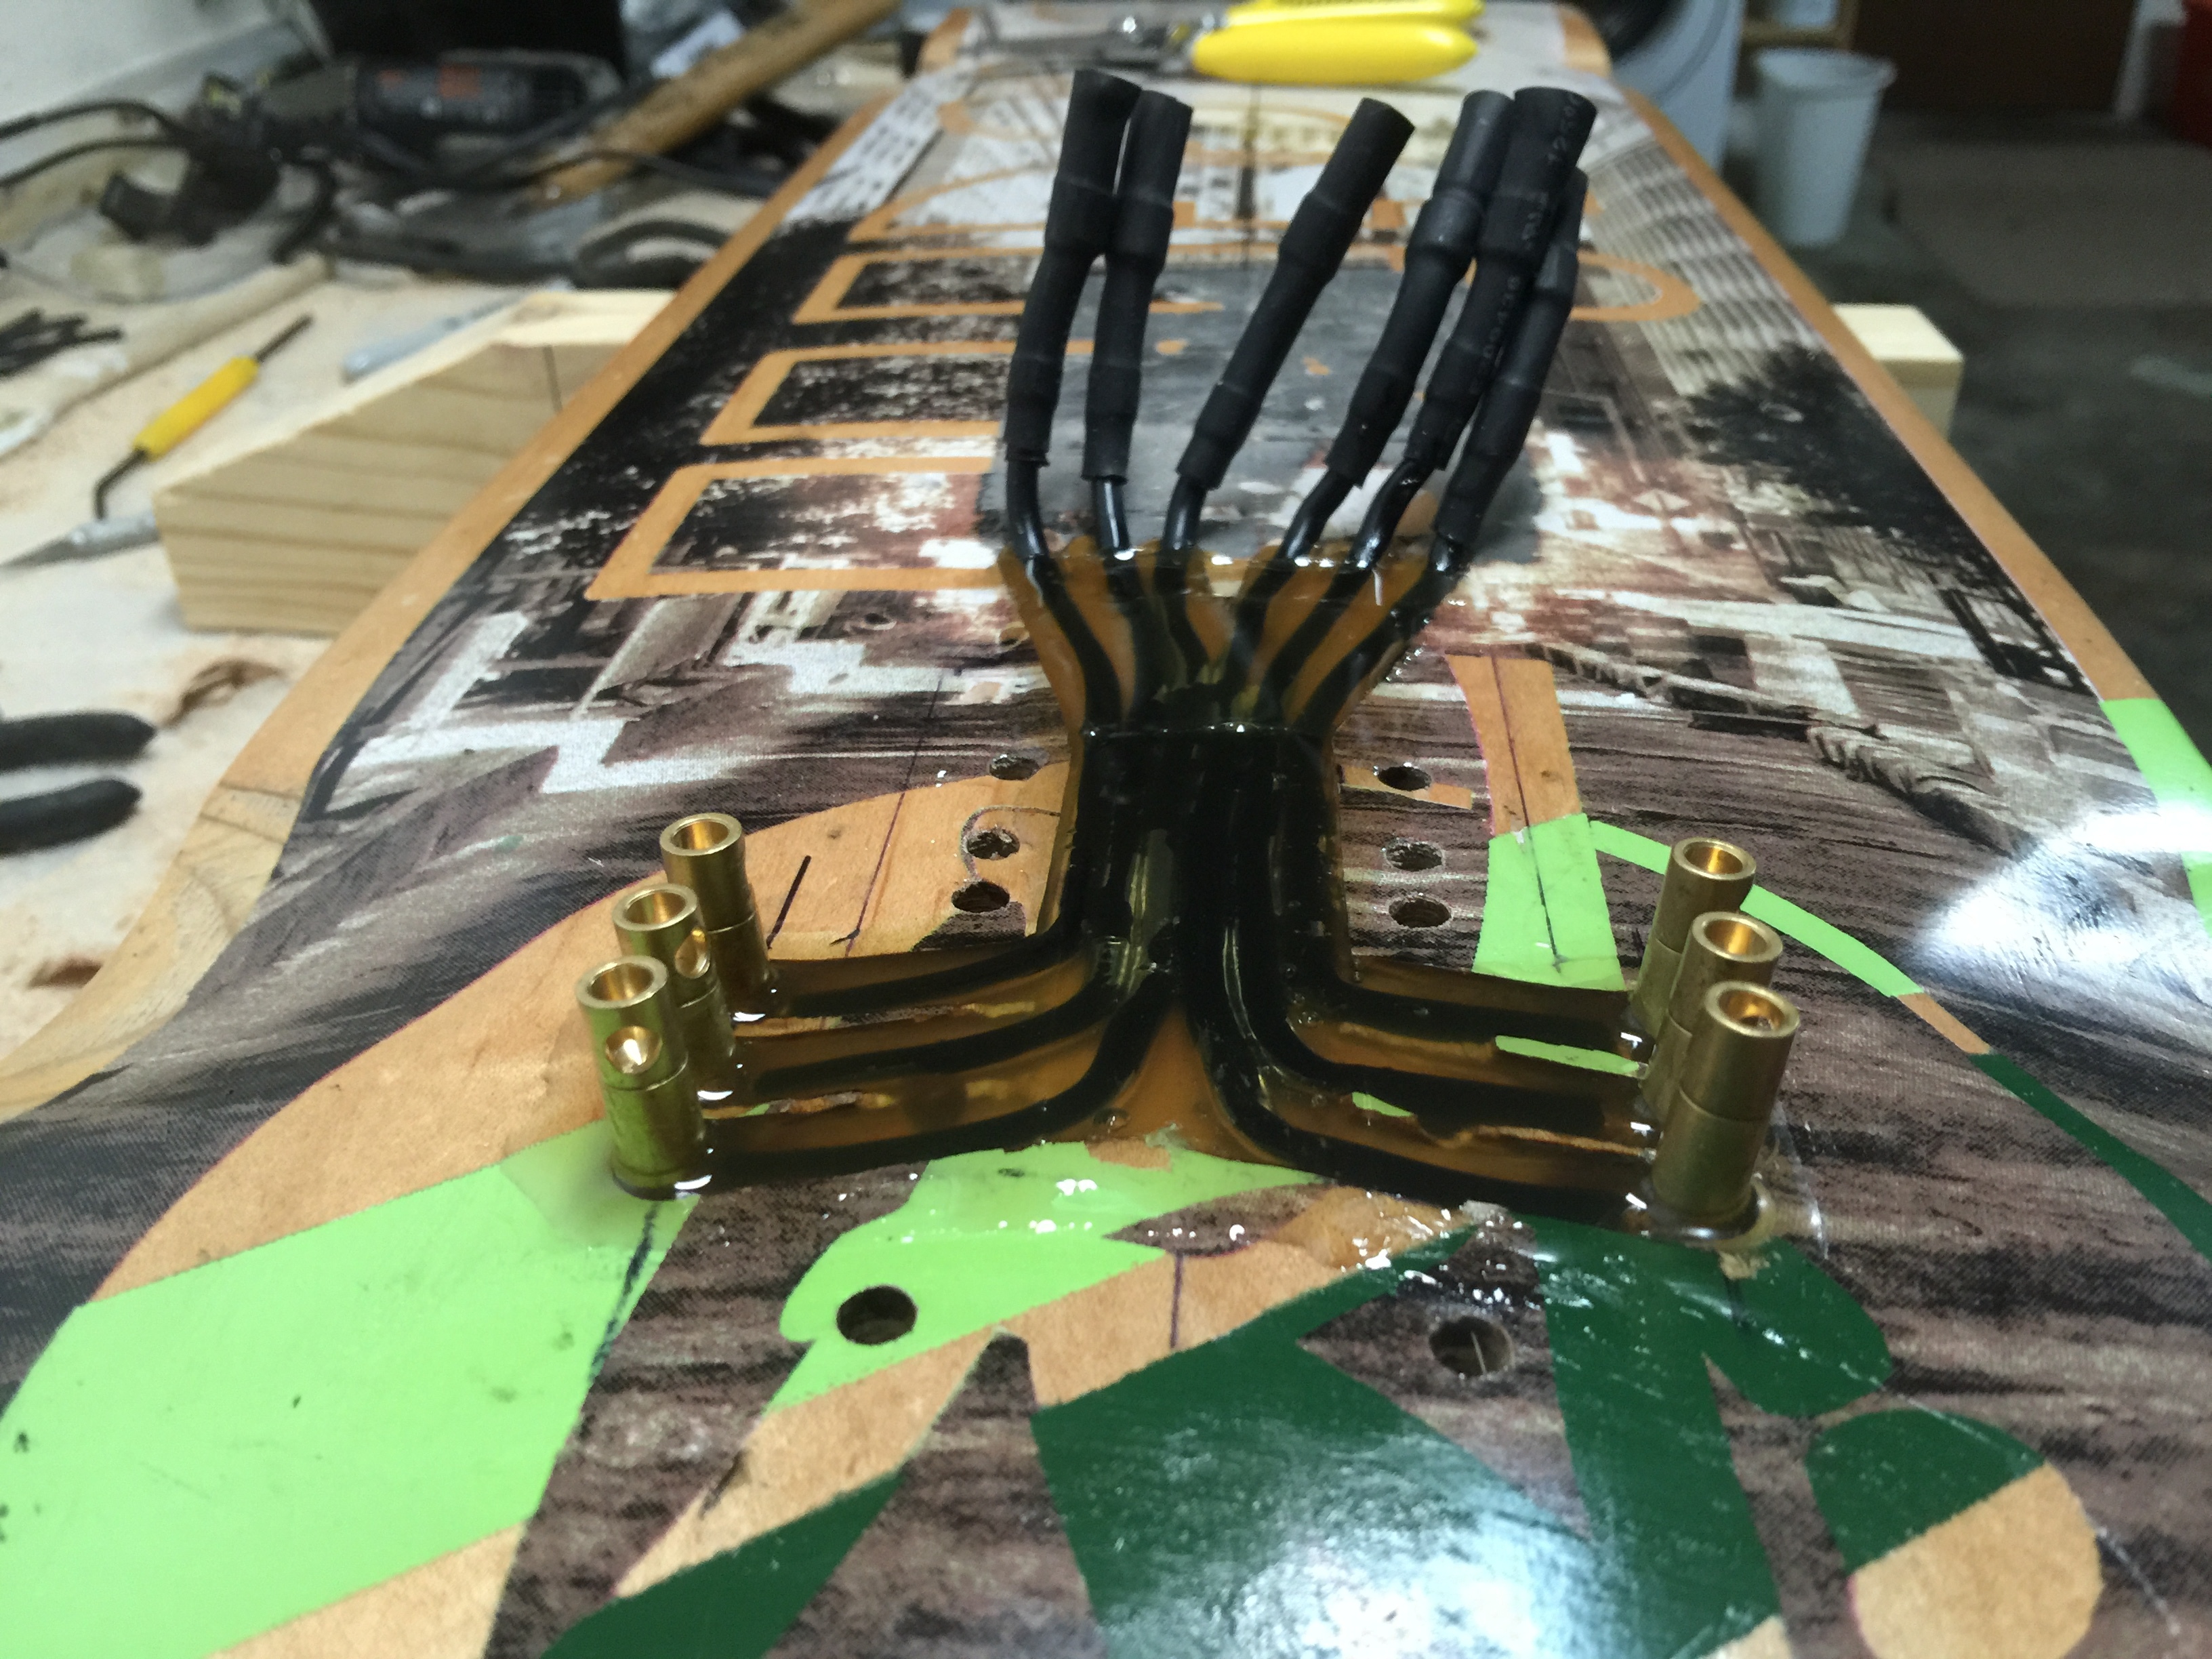
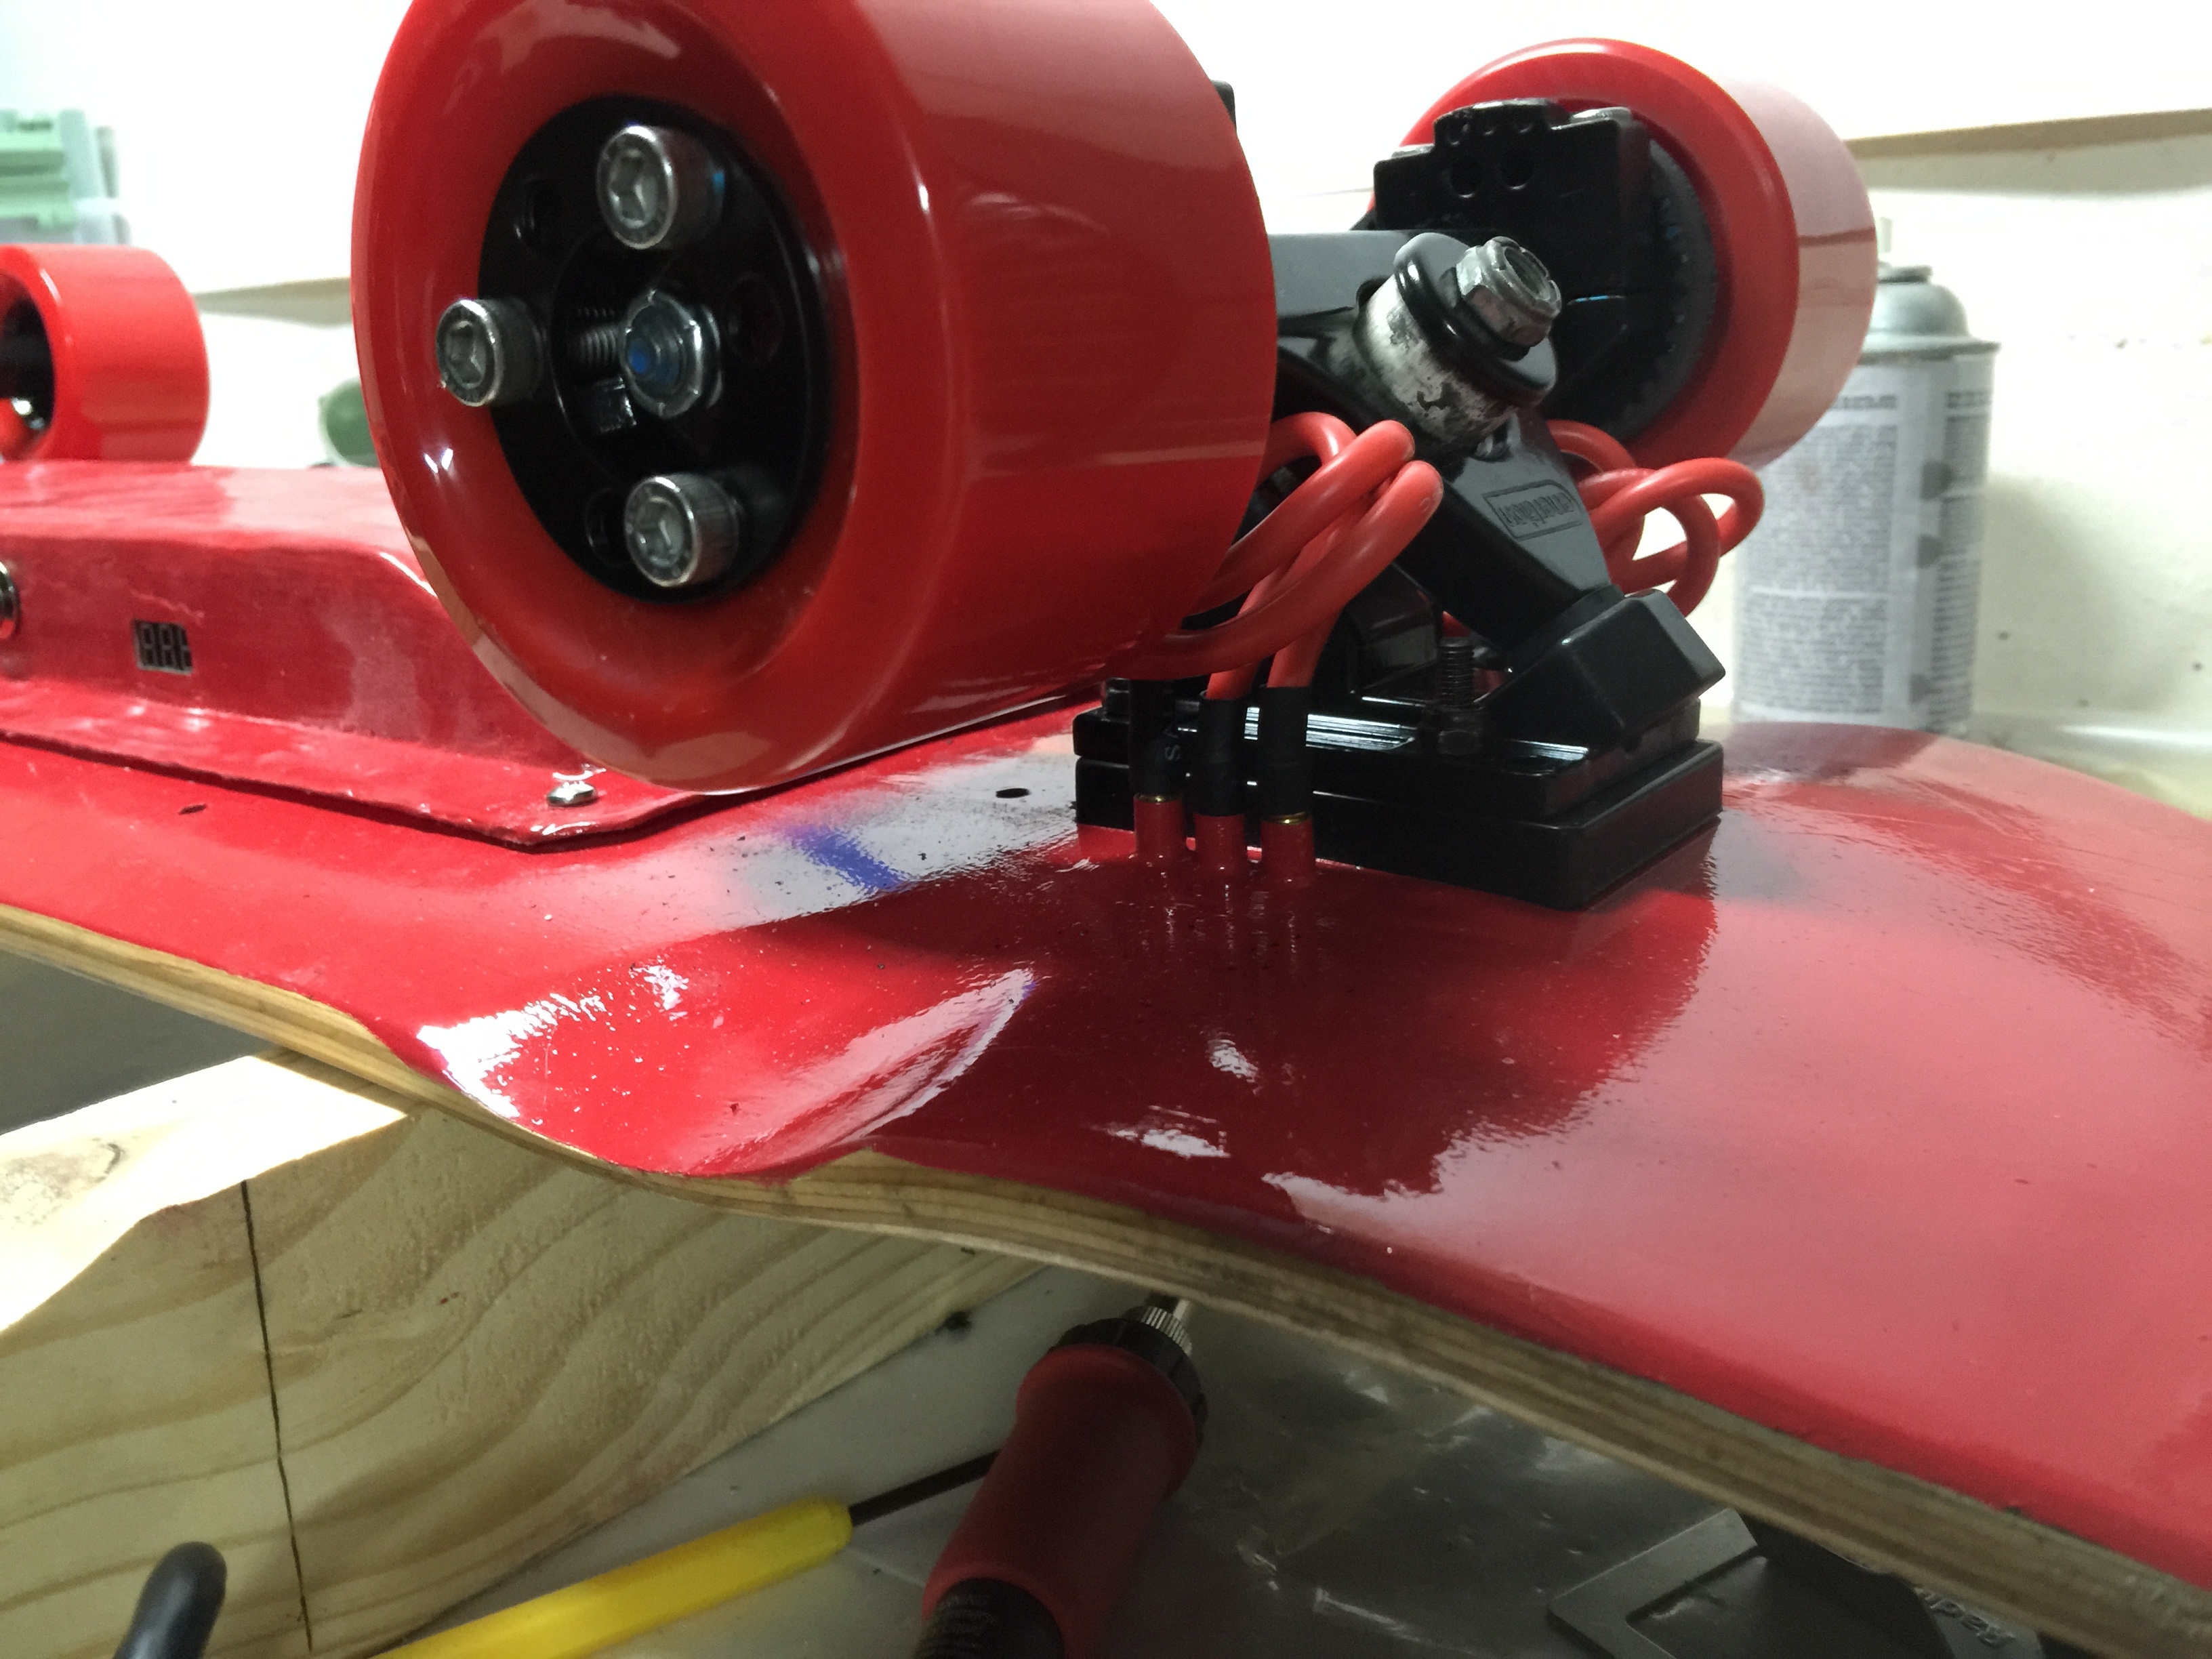
I wanted to make the motor wires all but disappear if I could, so i thought that if I moved the plugs closer to the motors (as in right next to the rear trucks) and hid the wires running from those plugs to the ESC inside the deck, i could achieve something close to what I wanted. The results turned out pretty good.

I also wanted a new box, so i did this with that in mind. I sculpted a box out of Bondo fiberglassing resin, but i’m not 100% happy with the way the box turned out, so i’m going to try making another one by vacuum forming some ABS. Functionally the box is amazing and works great, but its a little wavy and lumpy so it doesn’t quite have the polish i’m looking for. Also, Bondo is absolutely horrible stuff to work with and ABS is much less expensive and likely much tougher.

I started by grabbing my dremel and creating the wire channels:

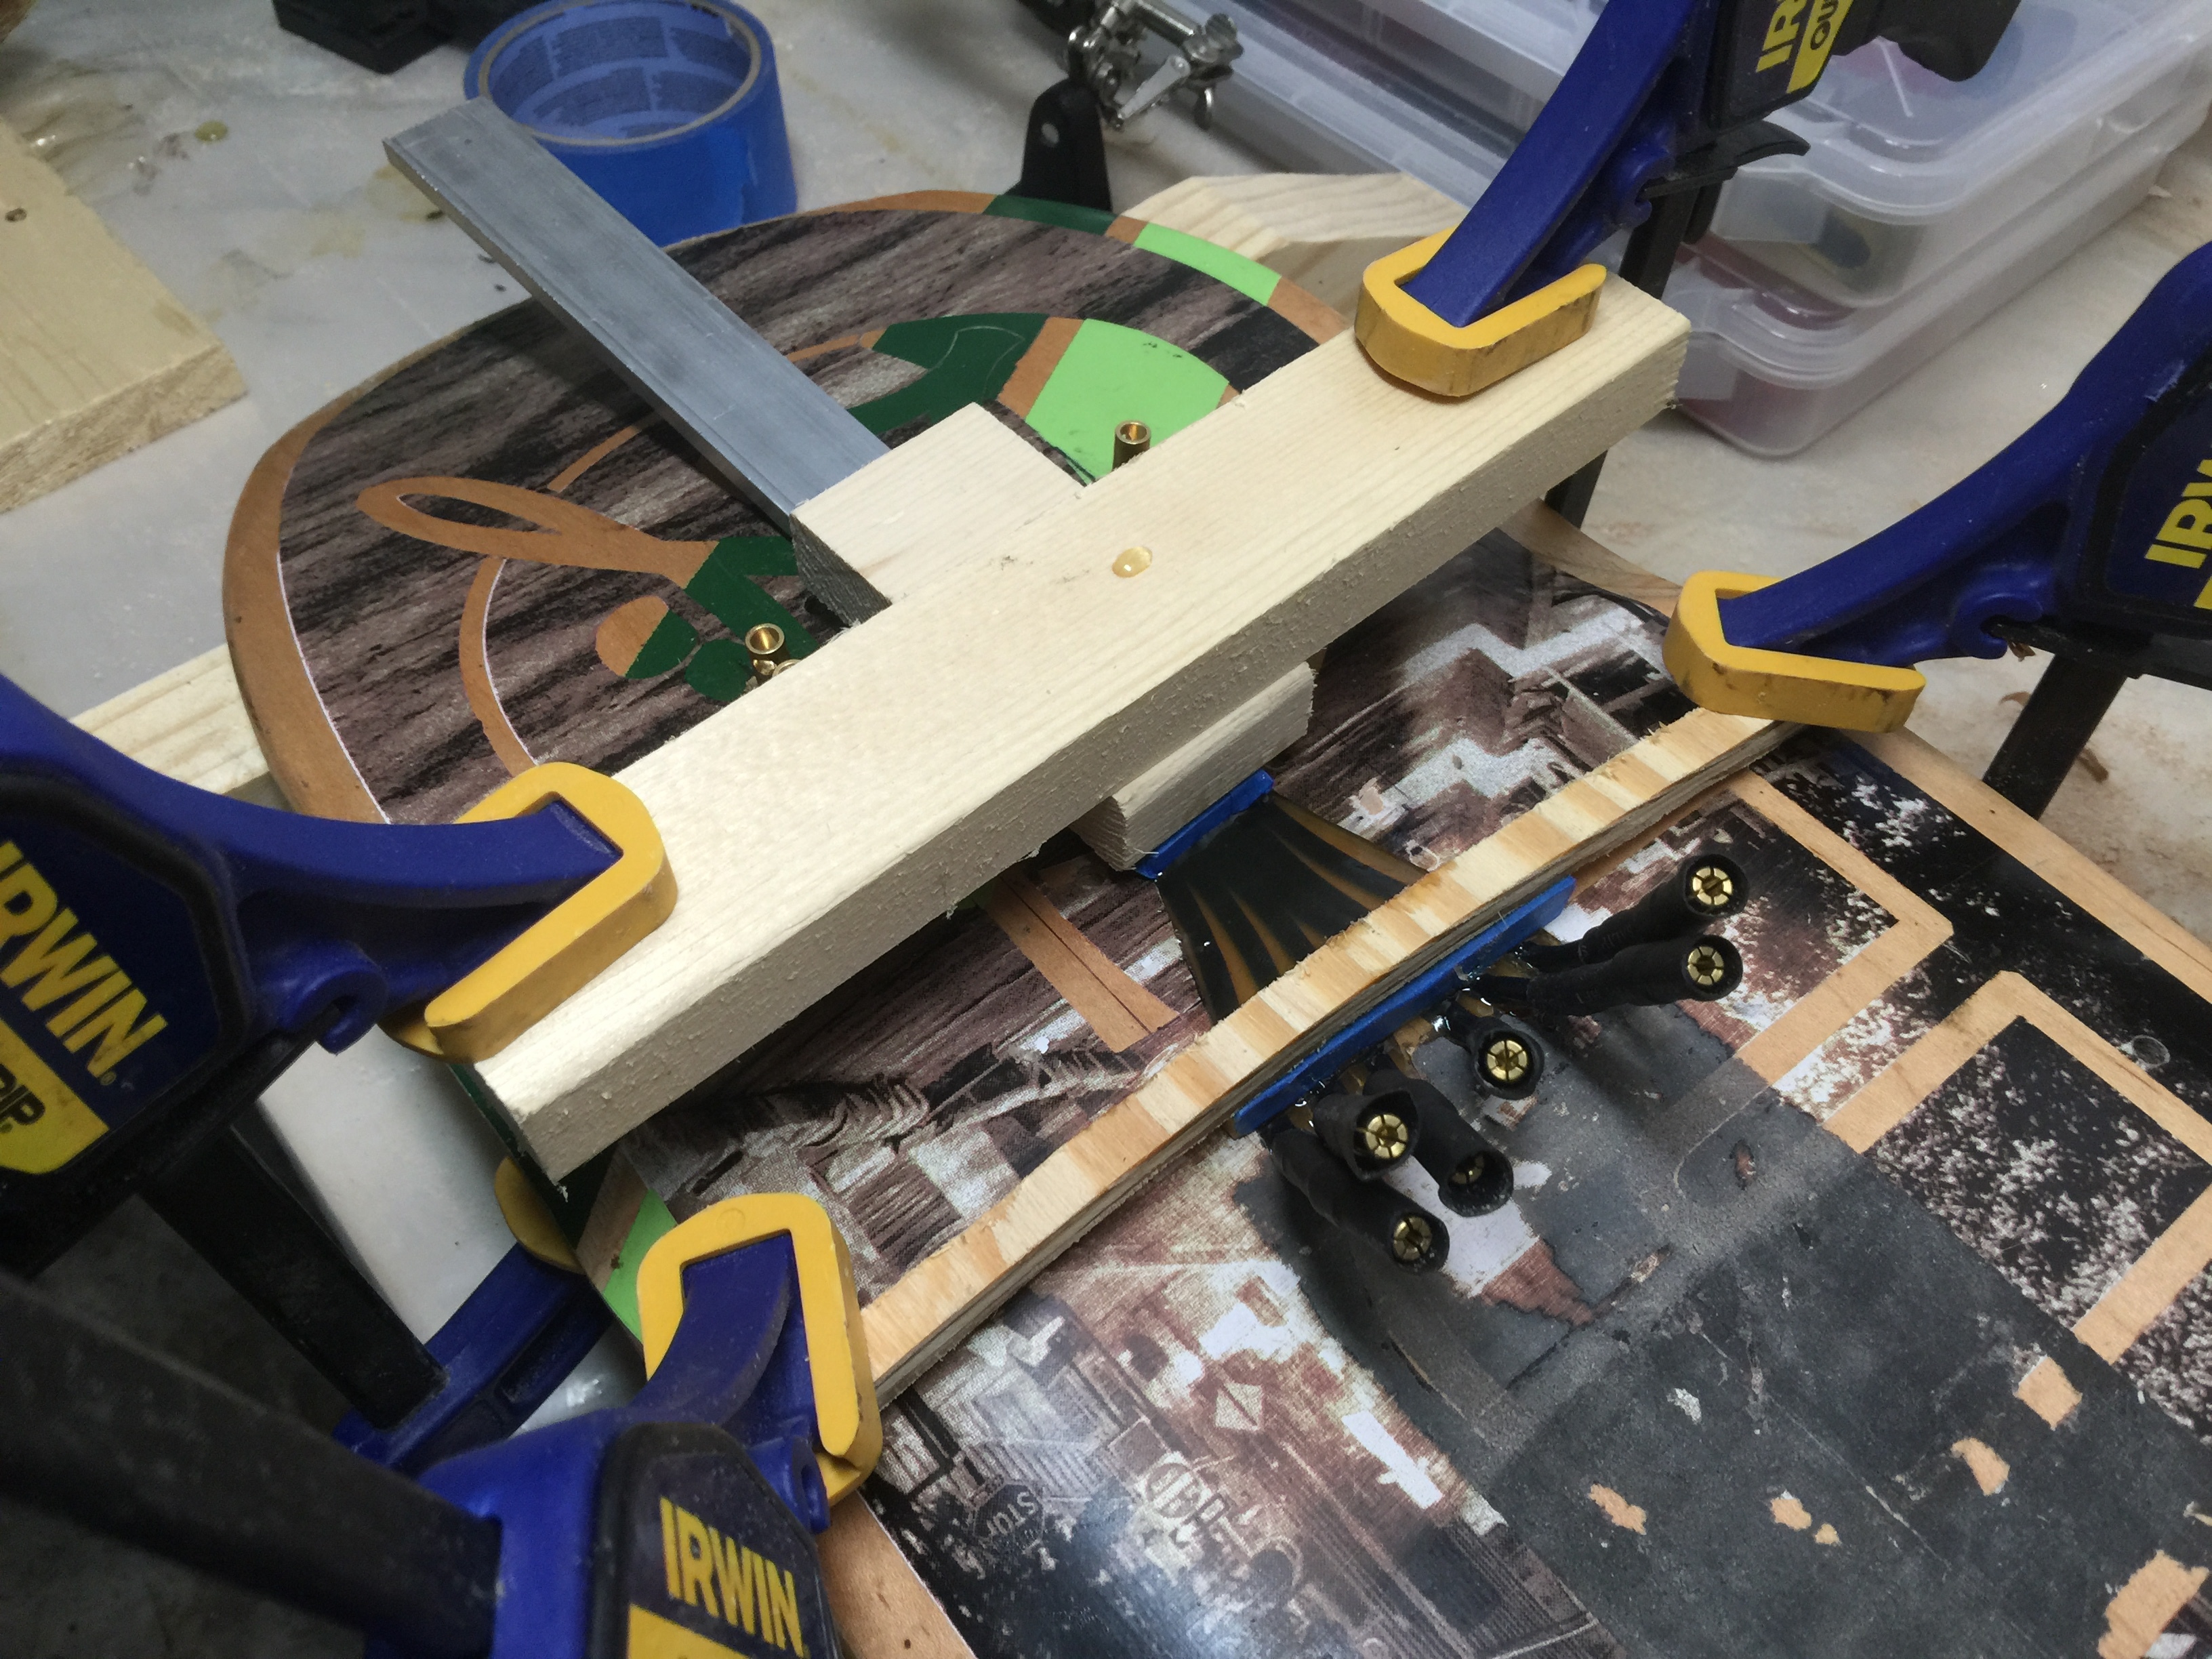
I used a solid core wire for this, so it was springy and had to be clamped while the resin set. I had to do one side, then the other, then the center section. The blue tape kept the resin from sticking to the blocks so when it was hardened they just came right off leaving a fairly smooth surface on the resin.

first side:

then the second side:

both sides done:

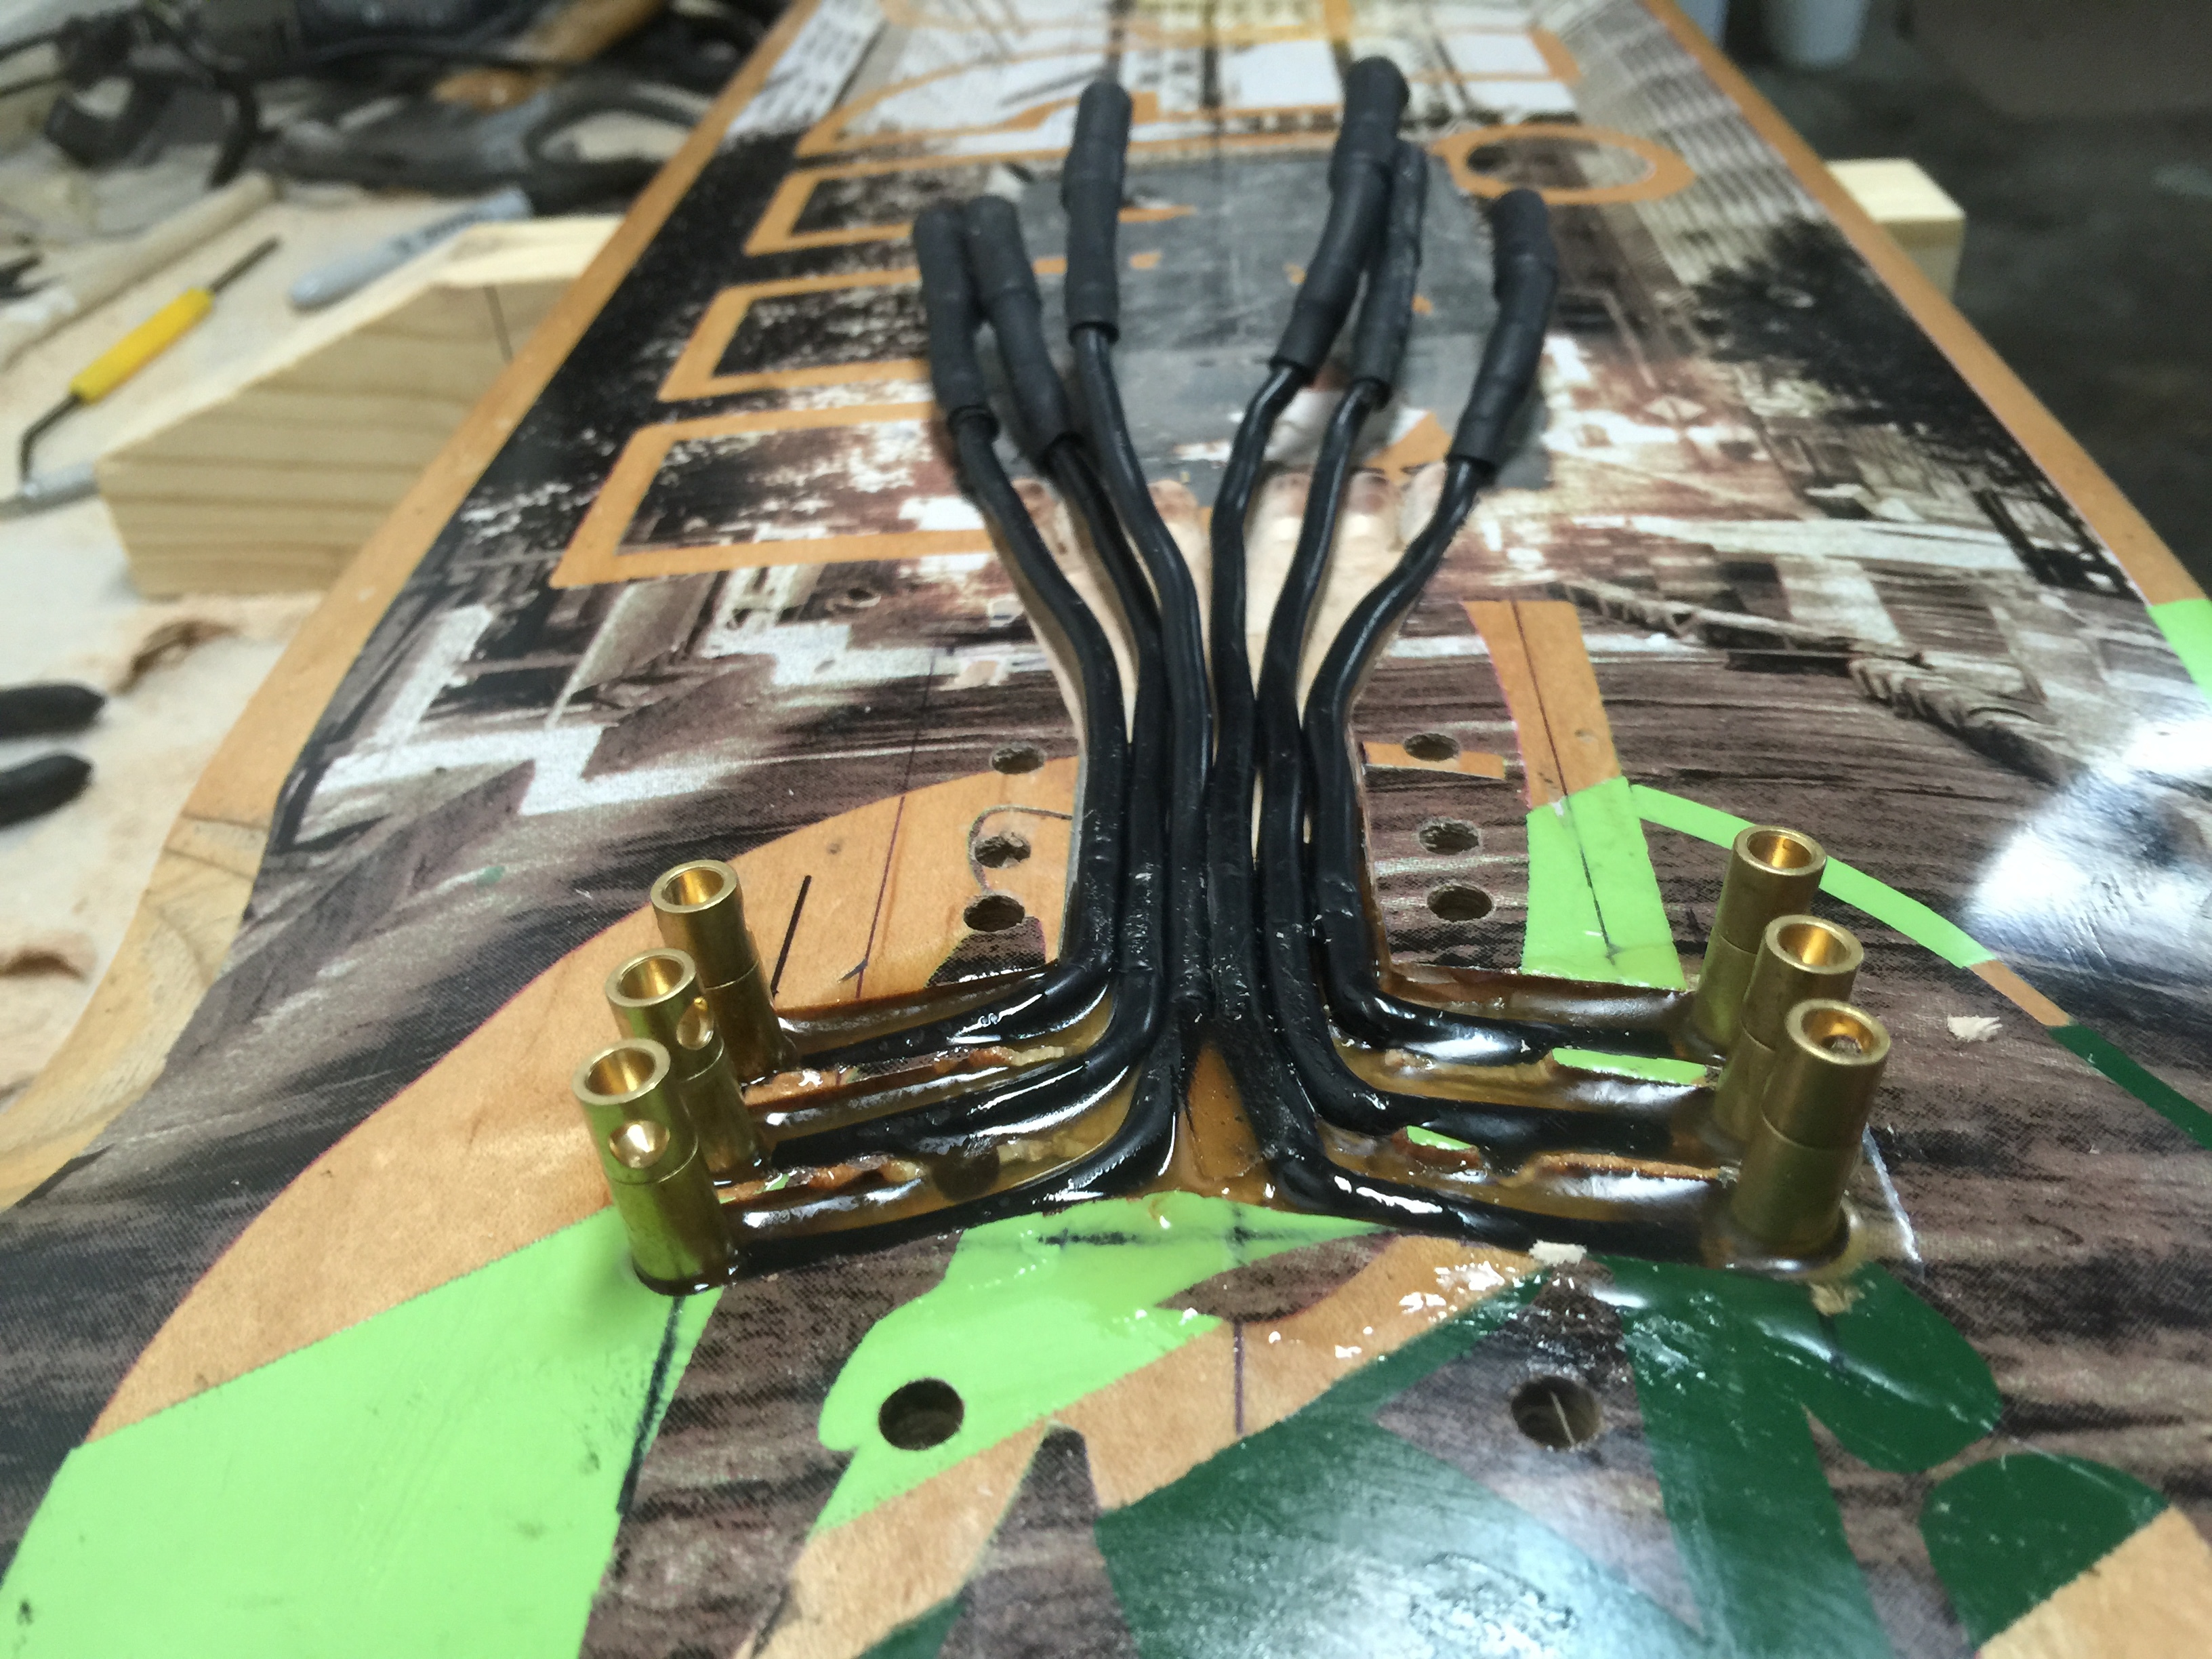
then I clamped the middle and filled in the rest of the channel with resin:

so then a final top coat to fill in all the gaps:

once dried it can be sanded smooth:

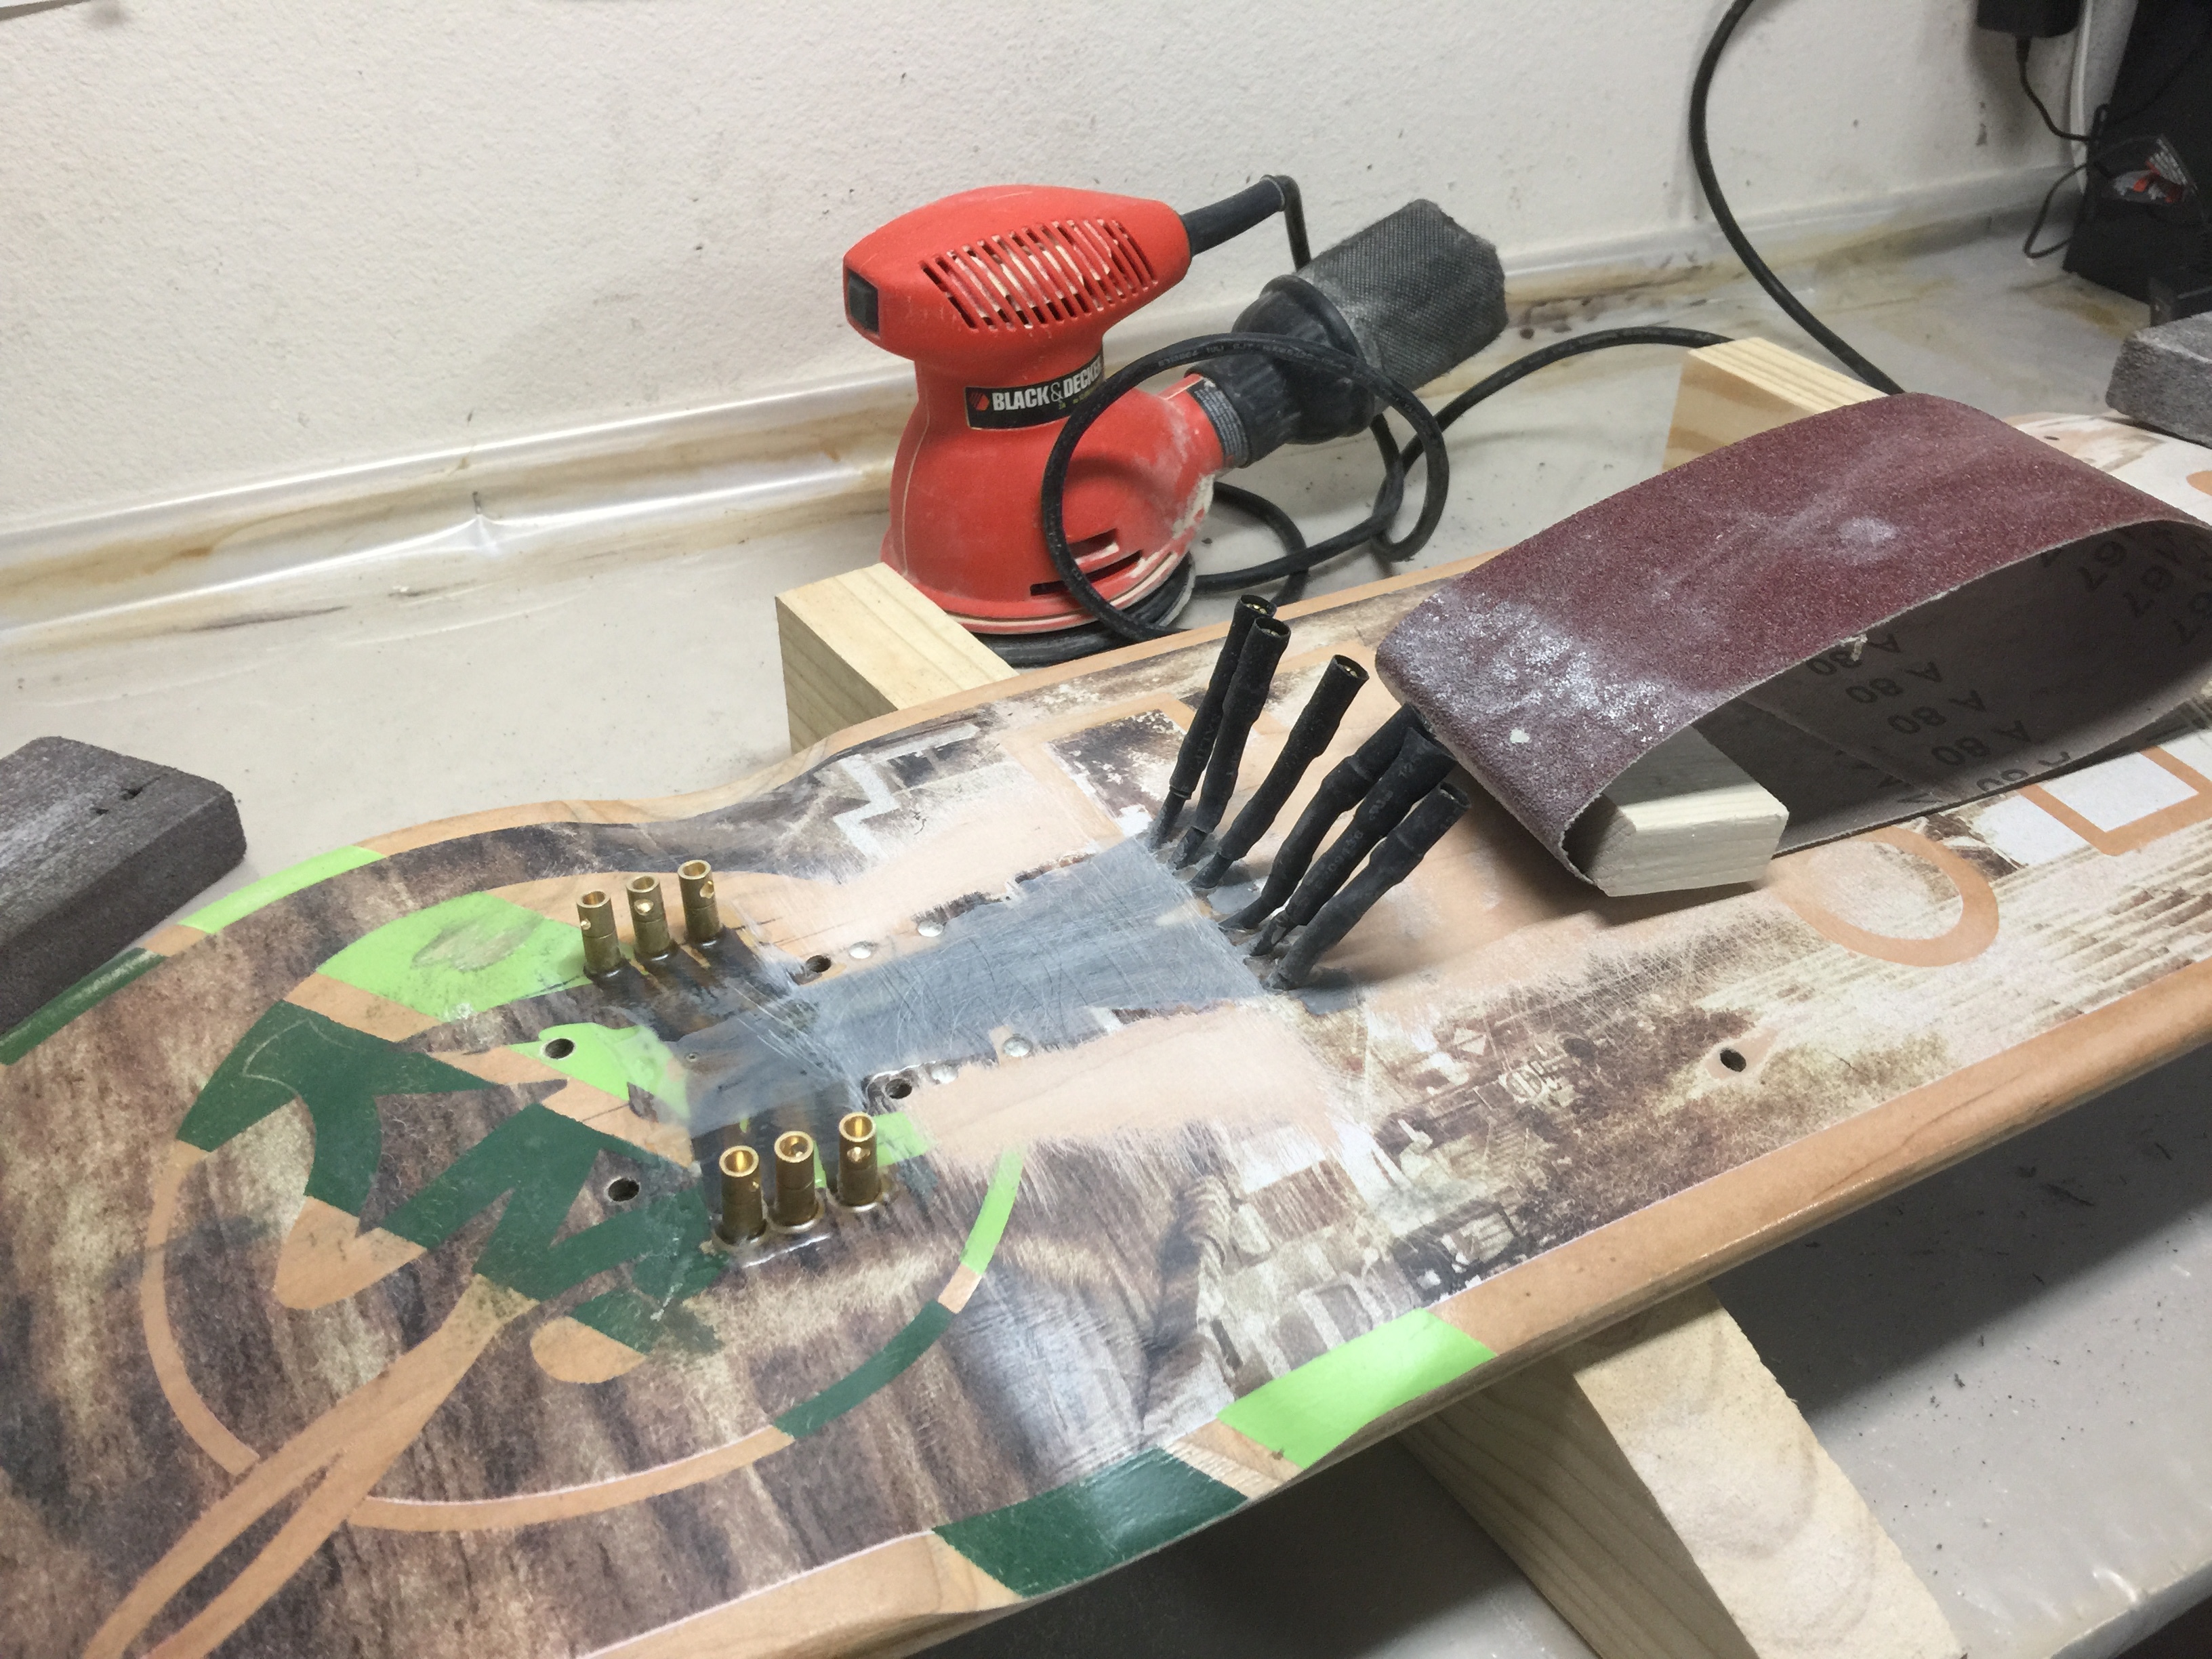
then i went back over it with a finer grit:

taped it all up for a coat of paint:

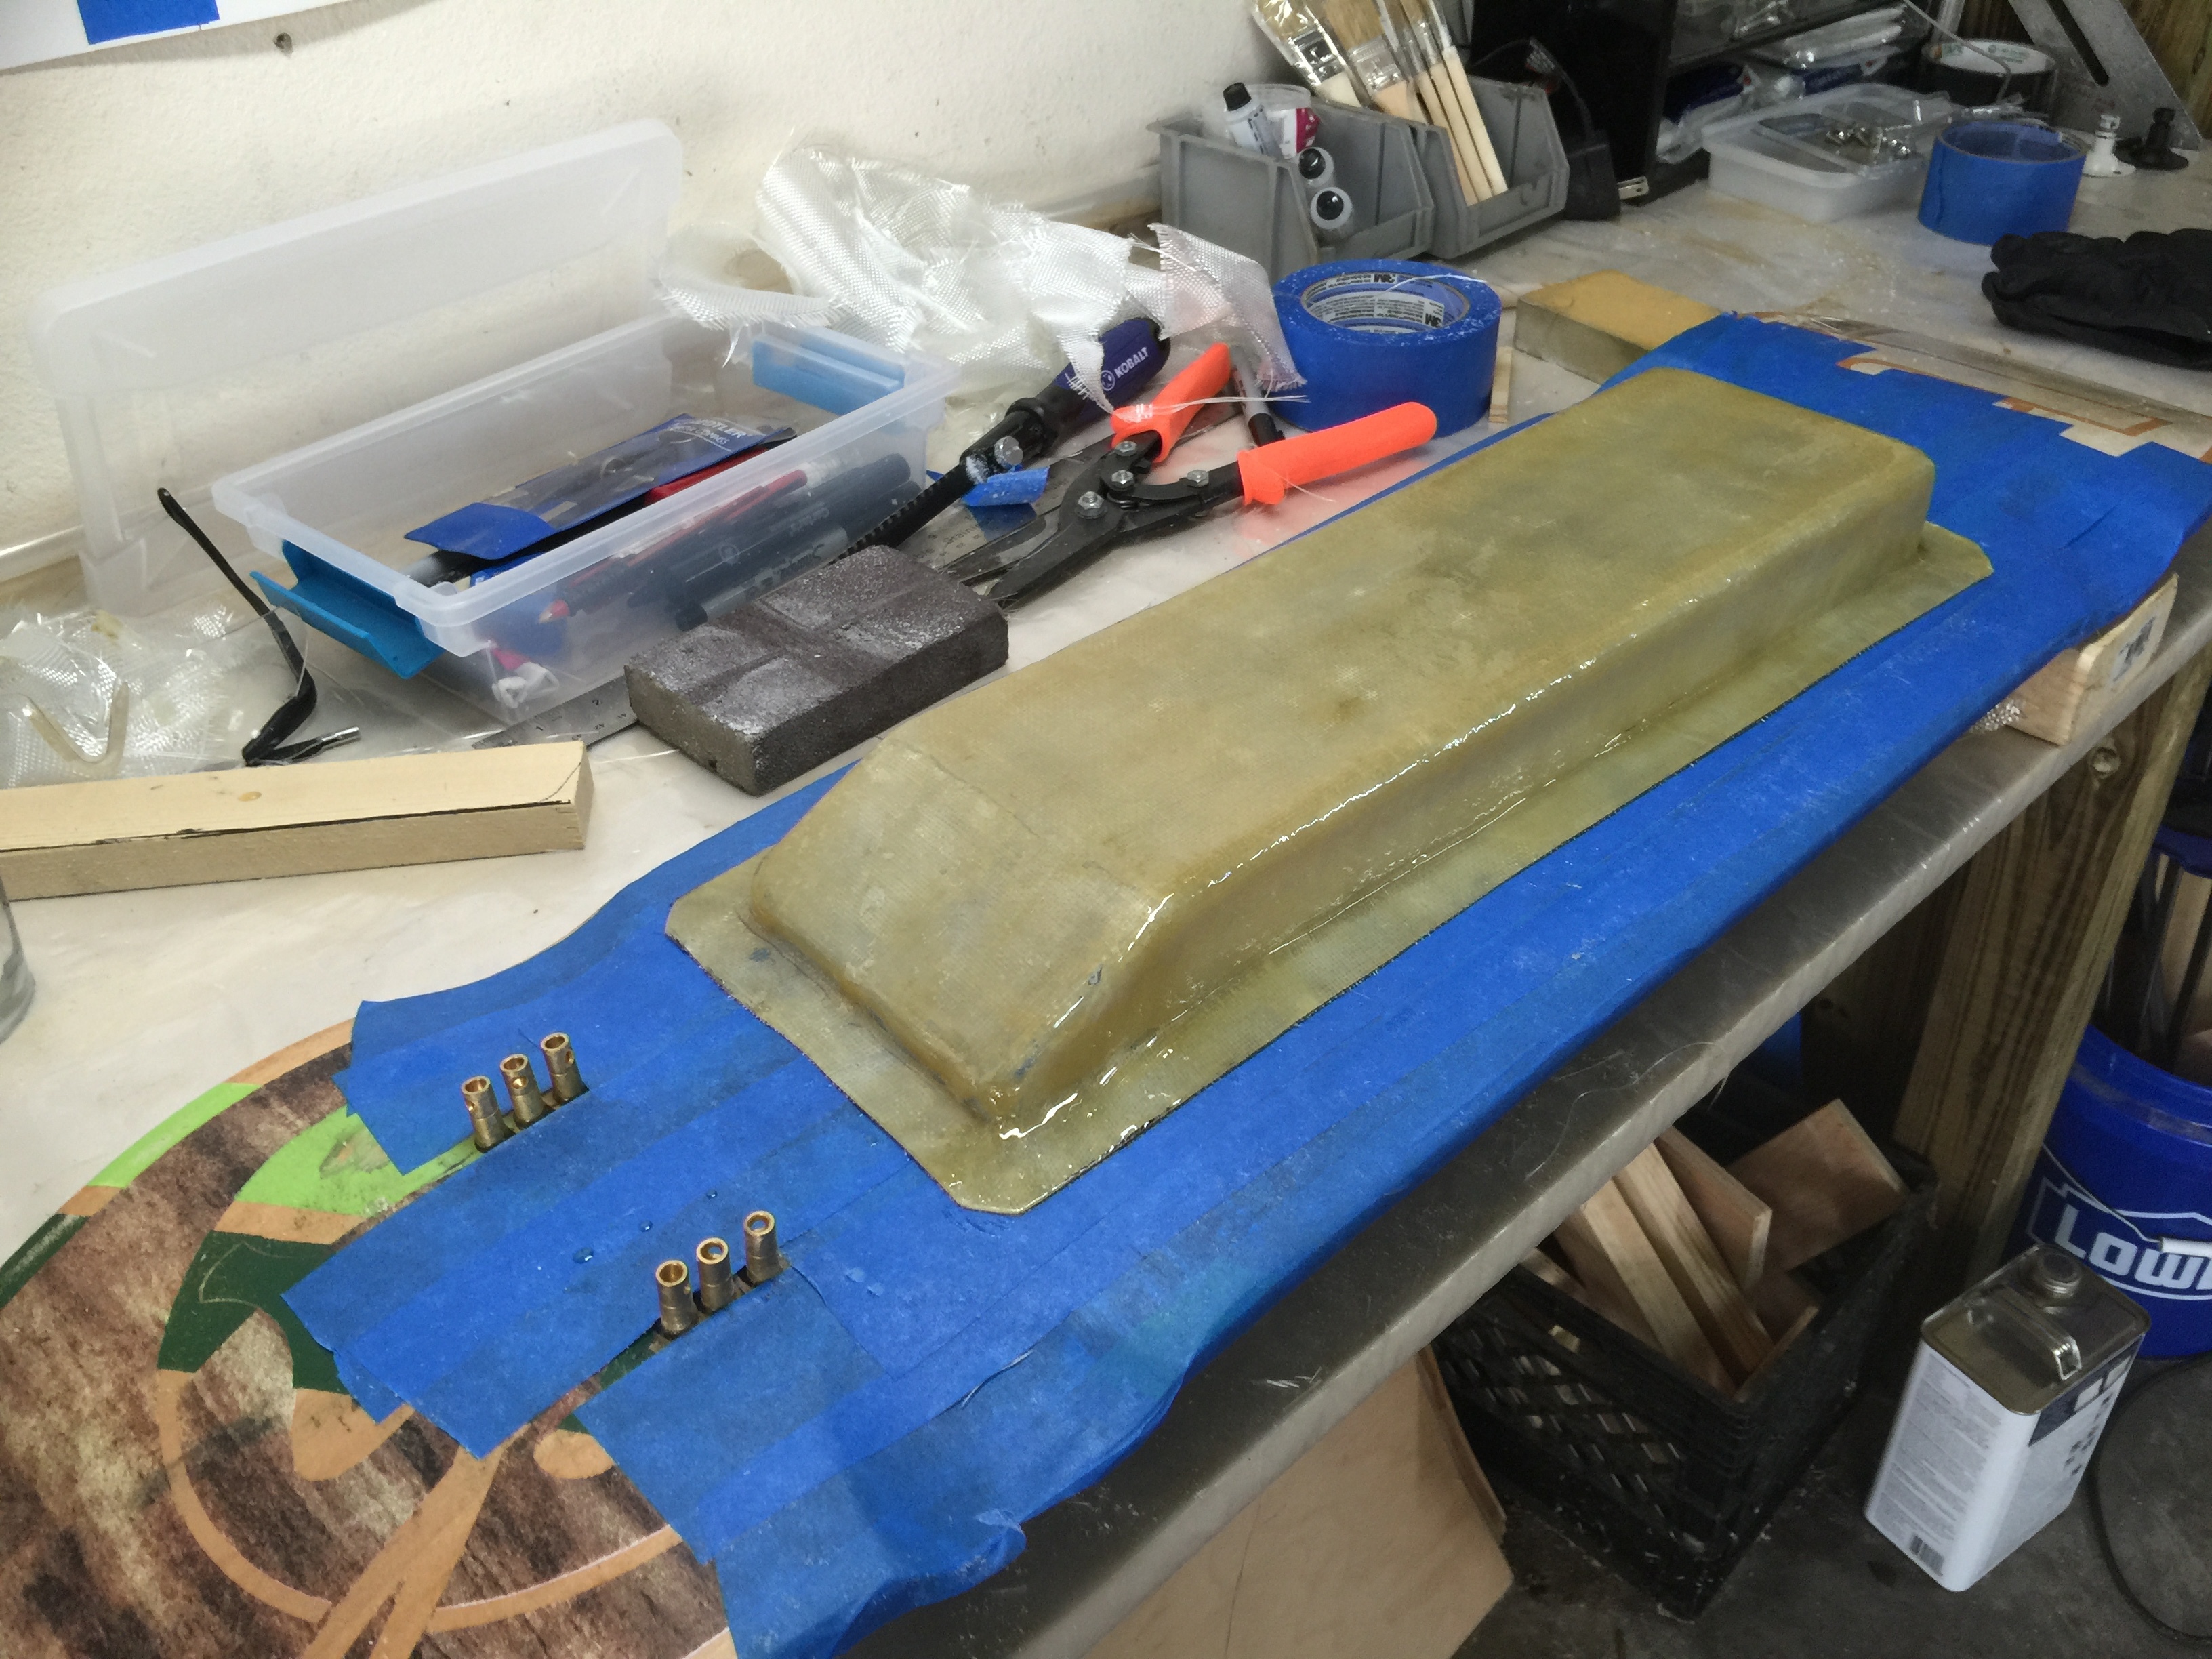
So then it was time to make a mold for this new box. The plan was to carve one out of styrofoam sheets, tape it all up with blue tape, spray on some release agent (i used cooking spray), then start layering on fiberglass cloth and resin.

first step was to make a block big enough to carve down into a box shape. Loctite spray adhesive laminates styrofoam board pretty well and surprisingly doesn’t melt the foam at all. It also works very quickly.

it also cuts and sands very easily. I had no idea you could sand styrofoam, but you can. I also had some layout drawings on the foam block to remind me of where things will go.

so then i needed to cut a hole out of the form so that it could lay over the wires poking out of my deck and be in its proper position. The saran wrap was used to wrap up the foam before i taped it all up to help keep the bondo resin off the foam, as the foam will dissolve quickly if any resin touches it, and taping can sometimes have leaks.

so then i taped up the board and the foam and taped the foam to the board, then sprayed the whole thing with cooking spray:

then it was time to lay on the fabric and dab in the resin with a brush:

I’d rather not go into detail about how to apply fiberglass resin. I chose to work with Bondo because it was cheap and readily available at Lowes and has easy to follow directions. It also gets everywhere and the timing is such that i wasn’t able to get pictures of the application process. It actually is very simple to use, but I will never work with it again for making boxes. Its horrible. The fumes are terrible, and you need what seems like an endless supply of gloves and disposible paint brushes. I could go on and on but rest assured Bondo is awful.

Anyway, the final result wasn’t that terrible. I ended up with this before sanding:

then after a dozen sanding and resin reapplication sessions, I ended up with something only slightly smoother and more attractive:

I did go back a few more times and reinforce the corners and things but ultimately i gave up trying to make it look any better because at this point i was really hating the Bondo and was wishing i had just flumped some hot plastic over a vac table instead.

So then i painted everything. EVERYTHING. My only regret with the painting is that i don’t yet have a drying booth. I plan to make a small one that will be powered by either my heat gun or a repurposed space heater. Florida humidity is such that spray paint will literally never cure outside unless in direct sunlight, but it rained all weekend i can’t stink up the house with paint smell, so i just had to wait forever. I chose Duplicolor spray paint because it can easily provide a factory like finish without buffing and is pretty forgiving about temp and humidity as long as you bring it inside the house to cure after it has mostly dried.

so then the paint finally dried and it was time to reassemble everything. I started by packing the box with all of the electronics. Drilled holes for the charging port and power button, and a square hole was dremeled out for the volt meter. I made some little extension cords for the ESC out of flexible silicone wire, as seen on onloop’s motors:

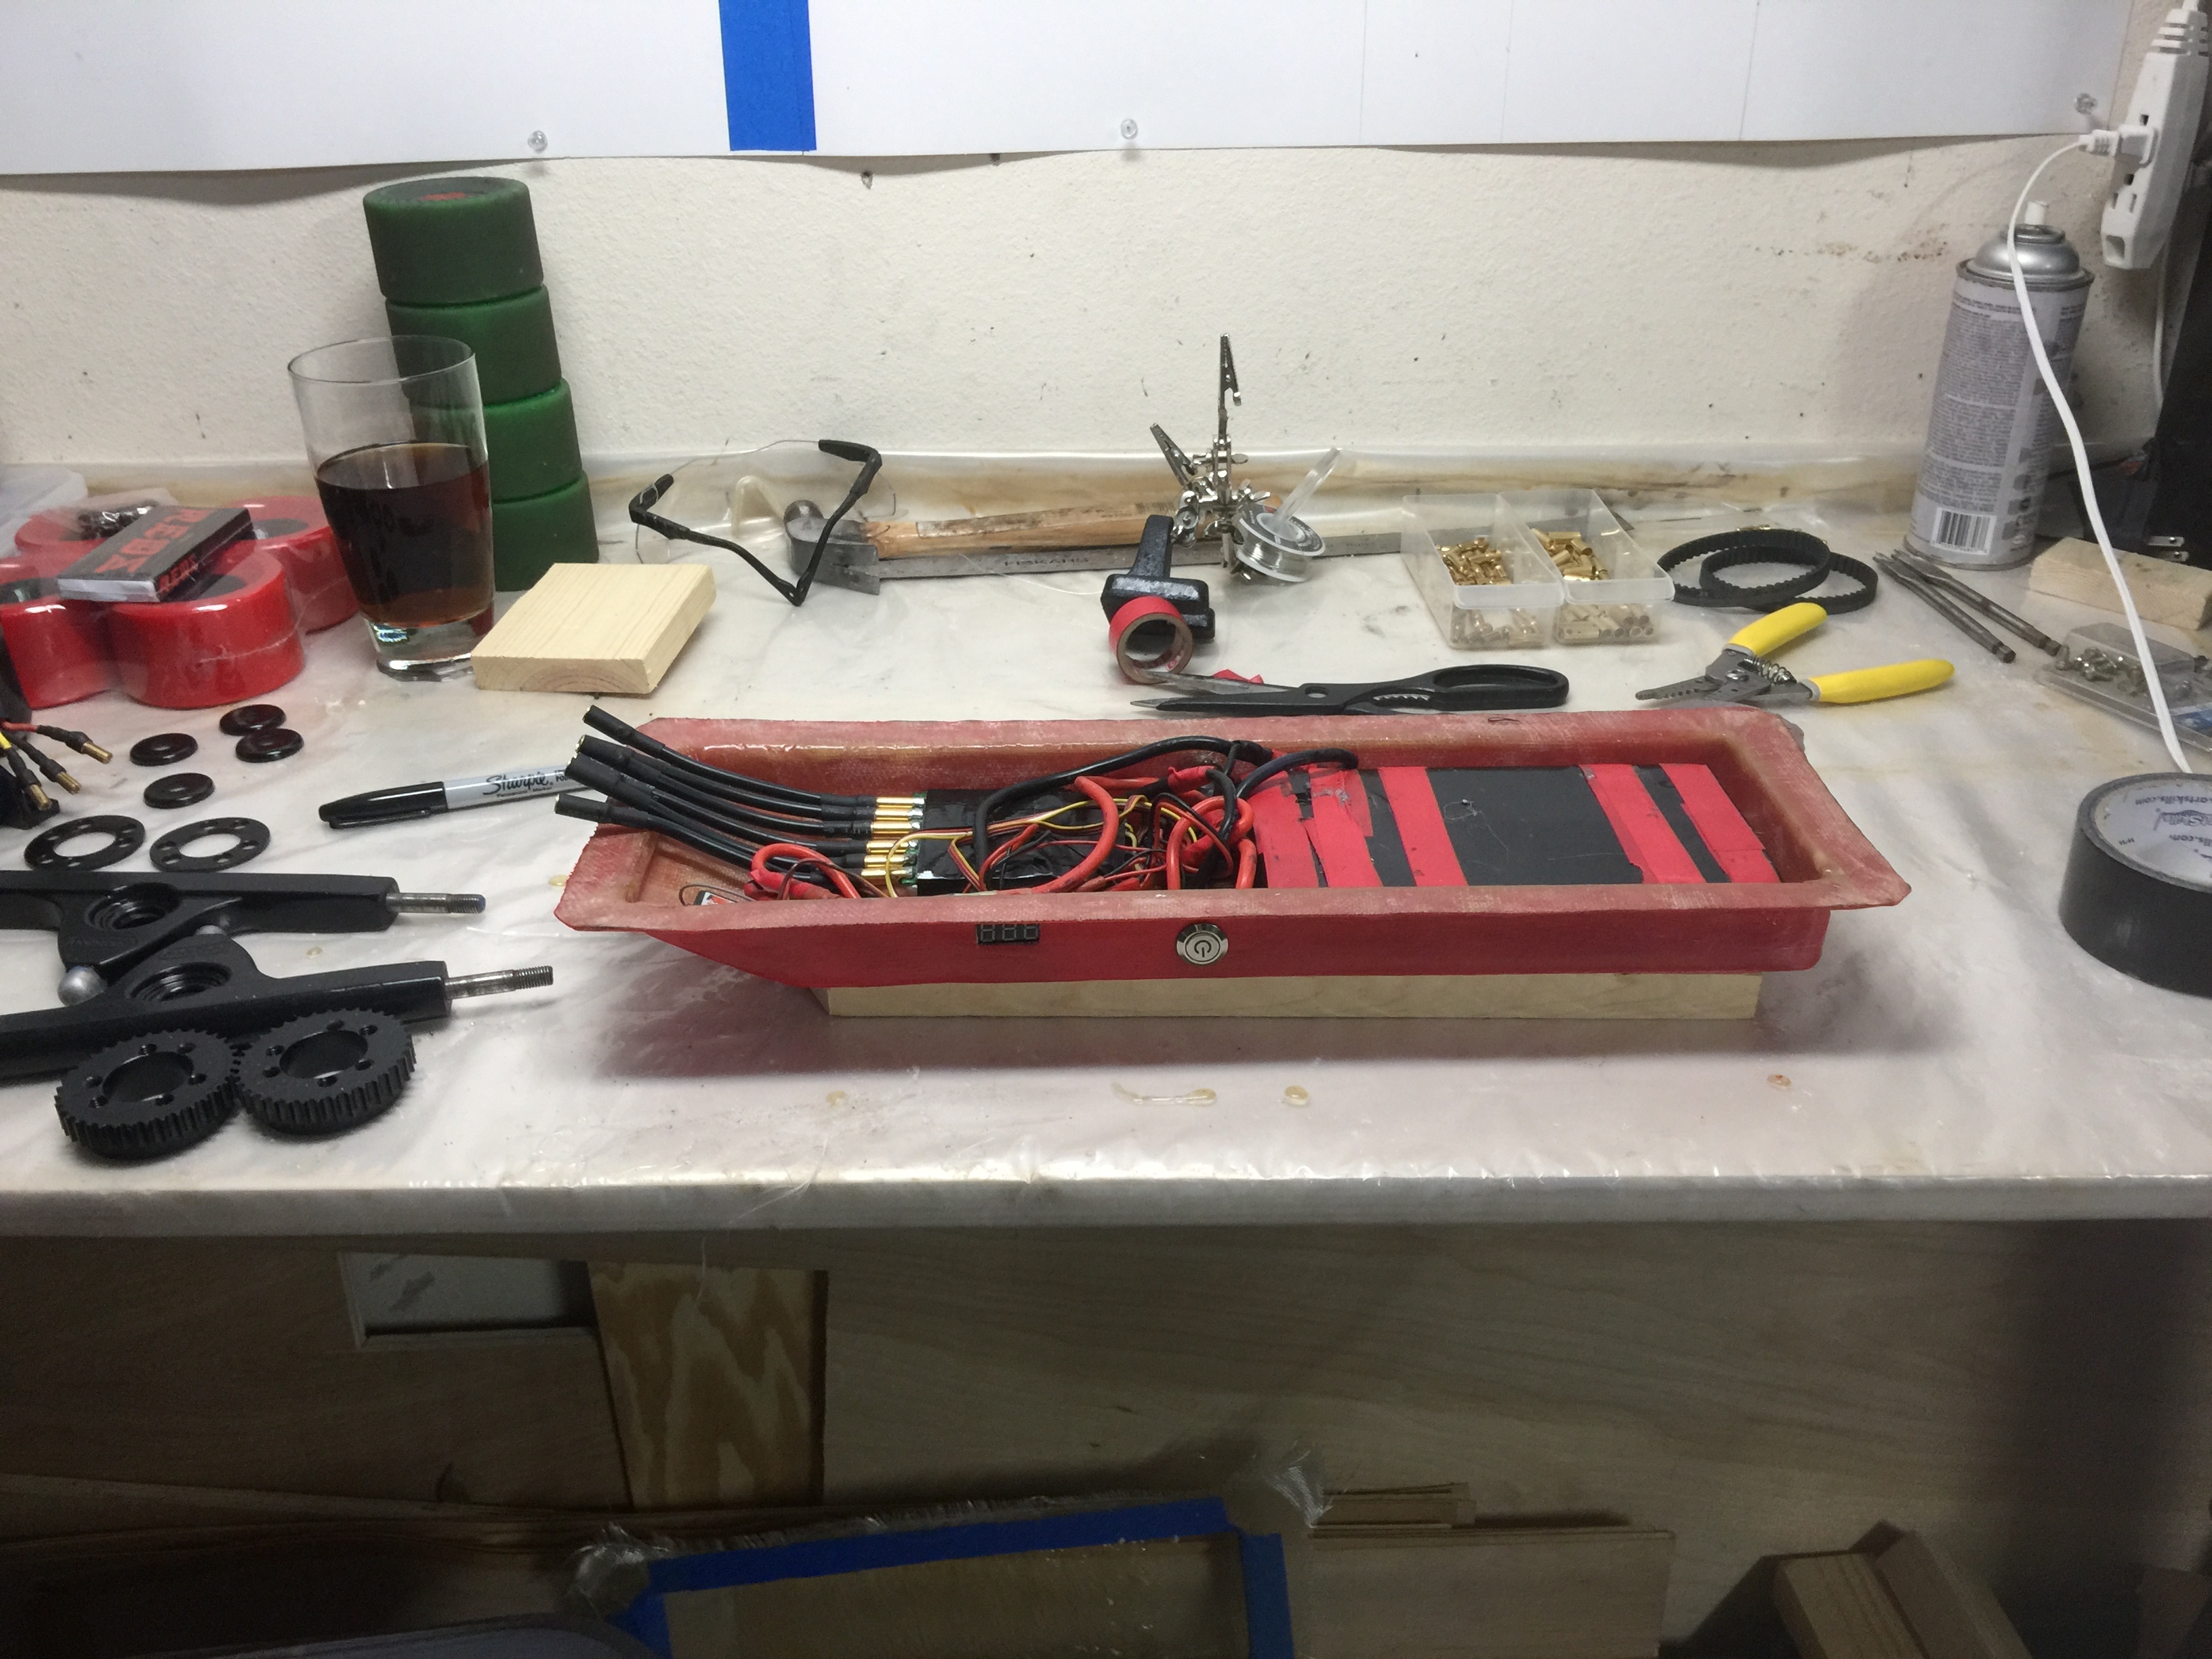
but one final touch was to replace the leads on the motors with longer, redder, more flexible silicone ones. This wasn’t just aesthetic, i needed flexible wires here and the propdrives have very non-flexible, very short leads. That’s no good for this application because they’ll be bending around as the truck leans back and forth. But they also needed to be red because it makes them 20% faster.

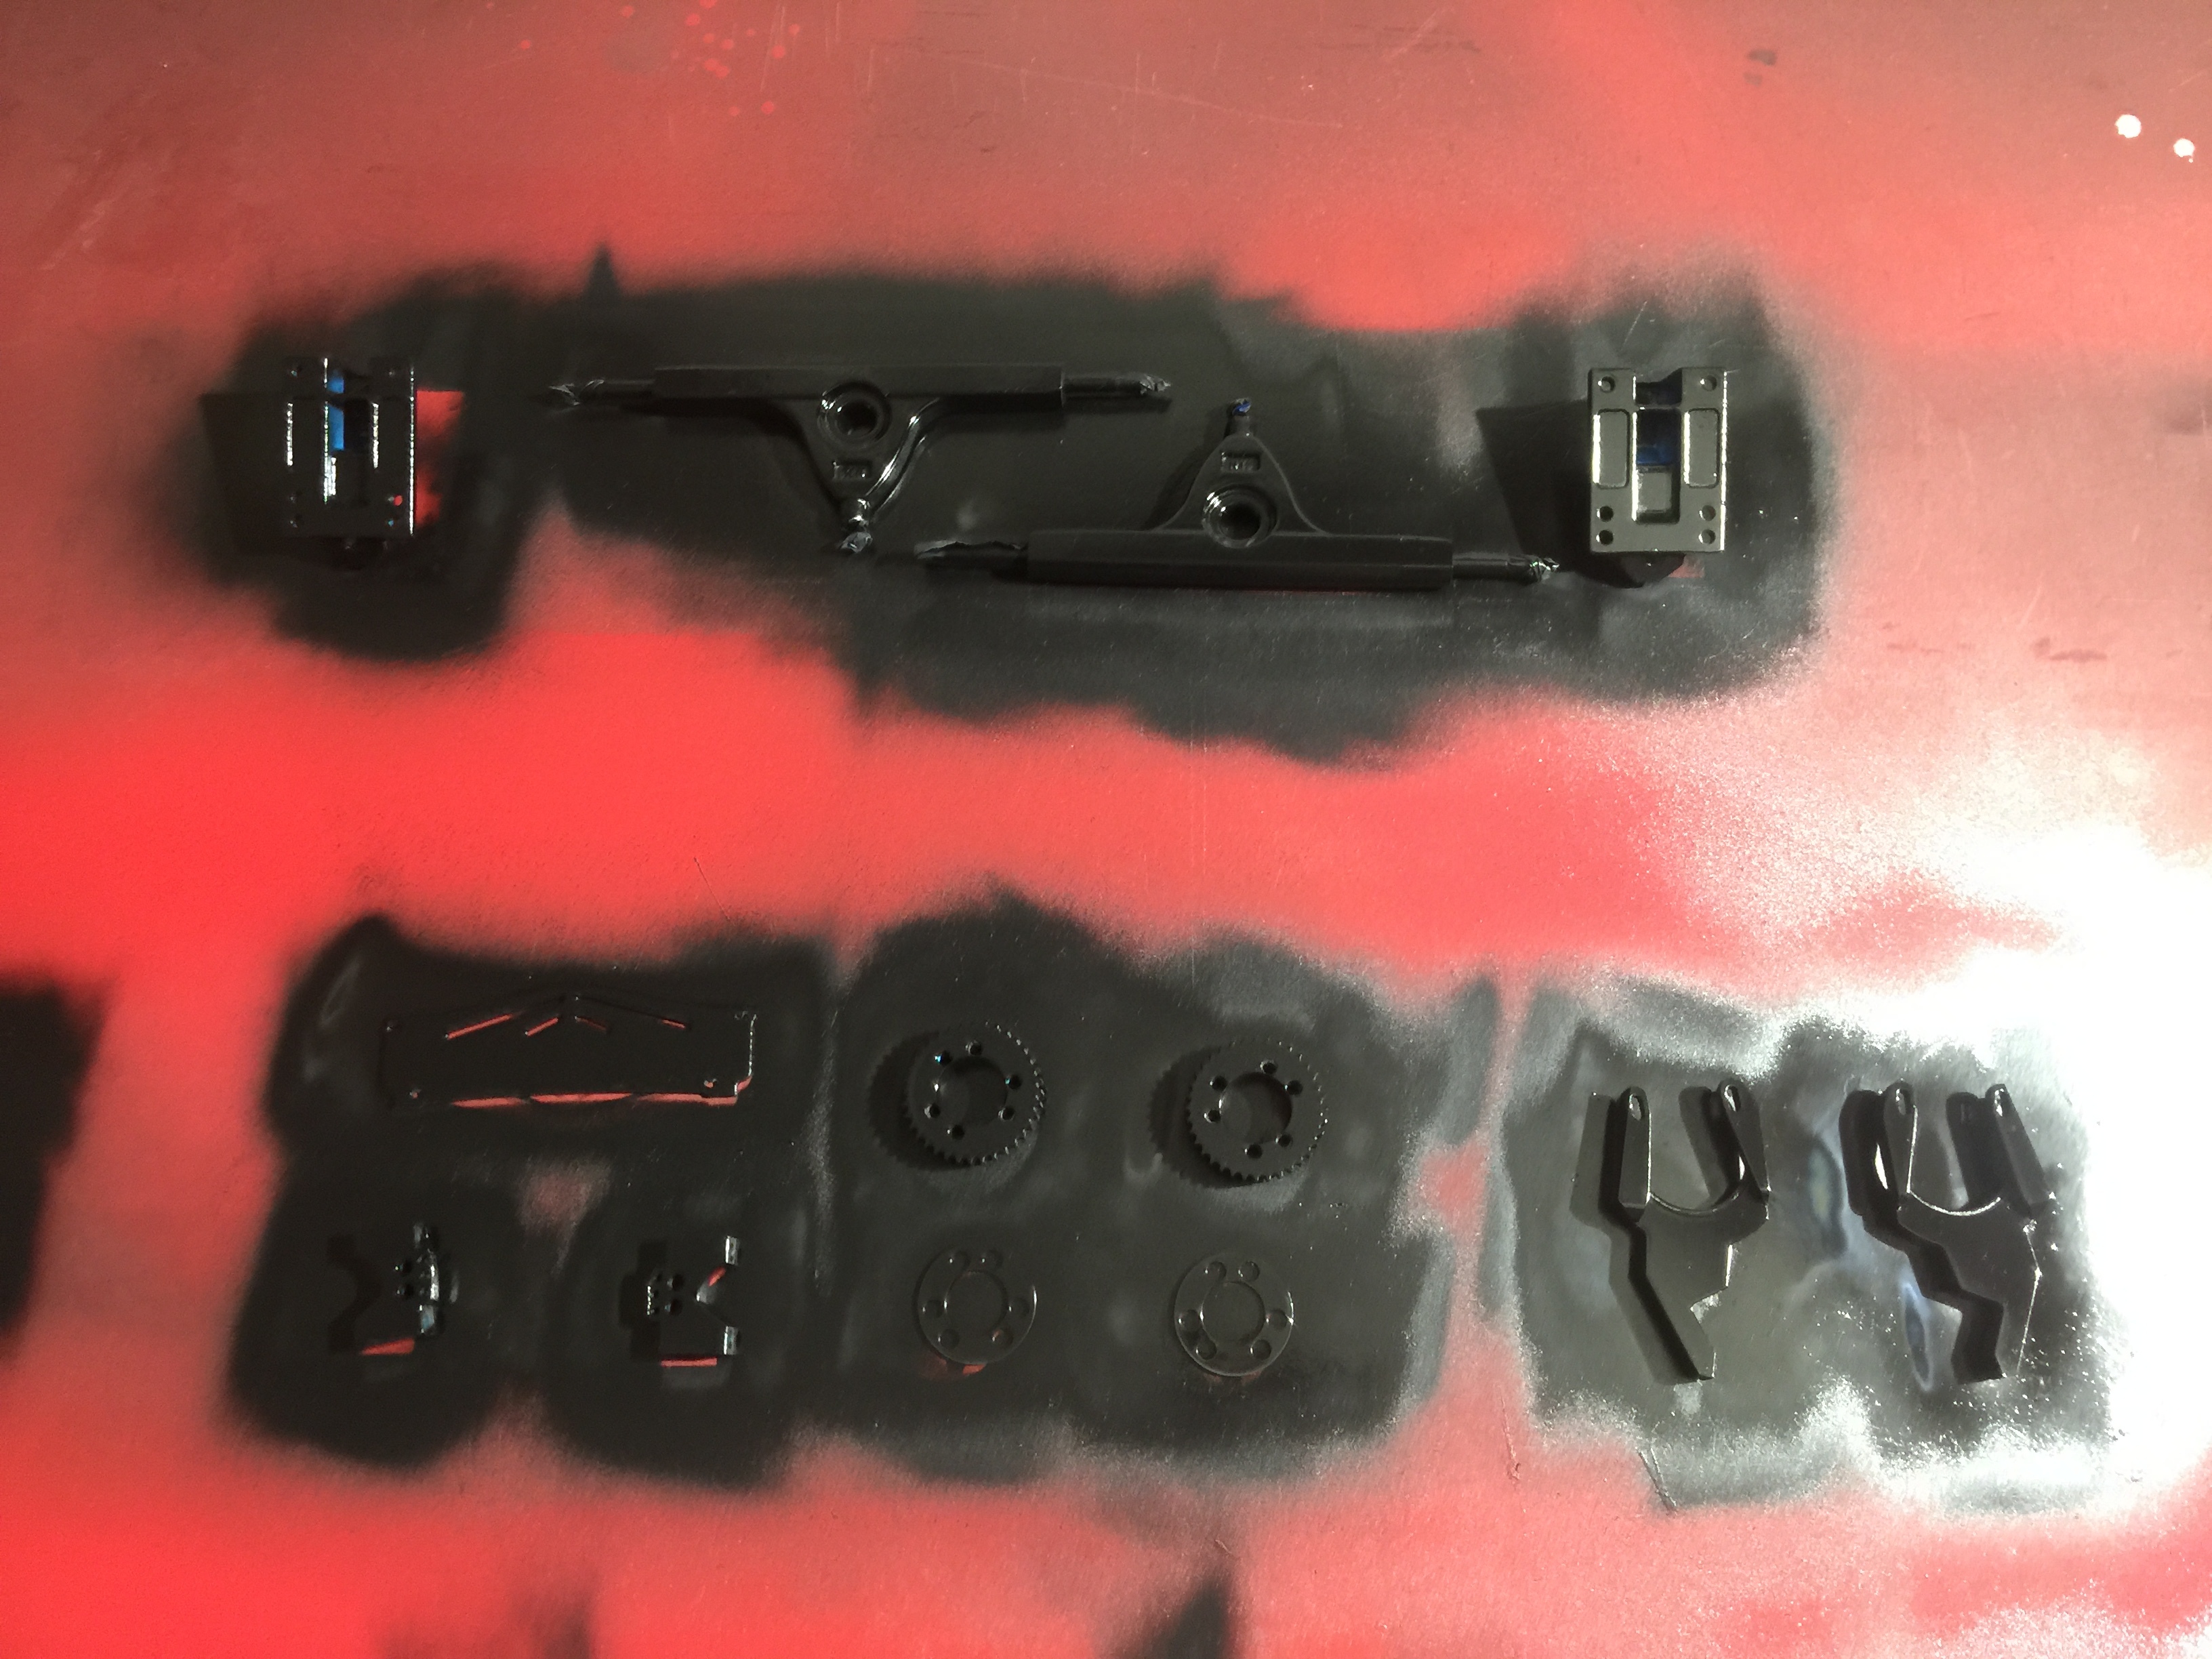
then after assembling the wheels, trucks, and drive system, it was time to mount the box and tape the leads together:

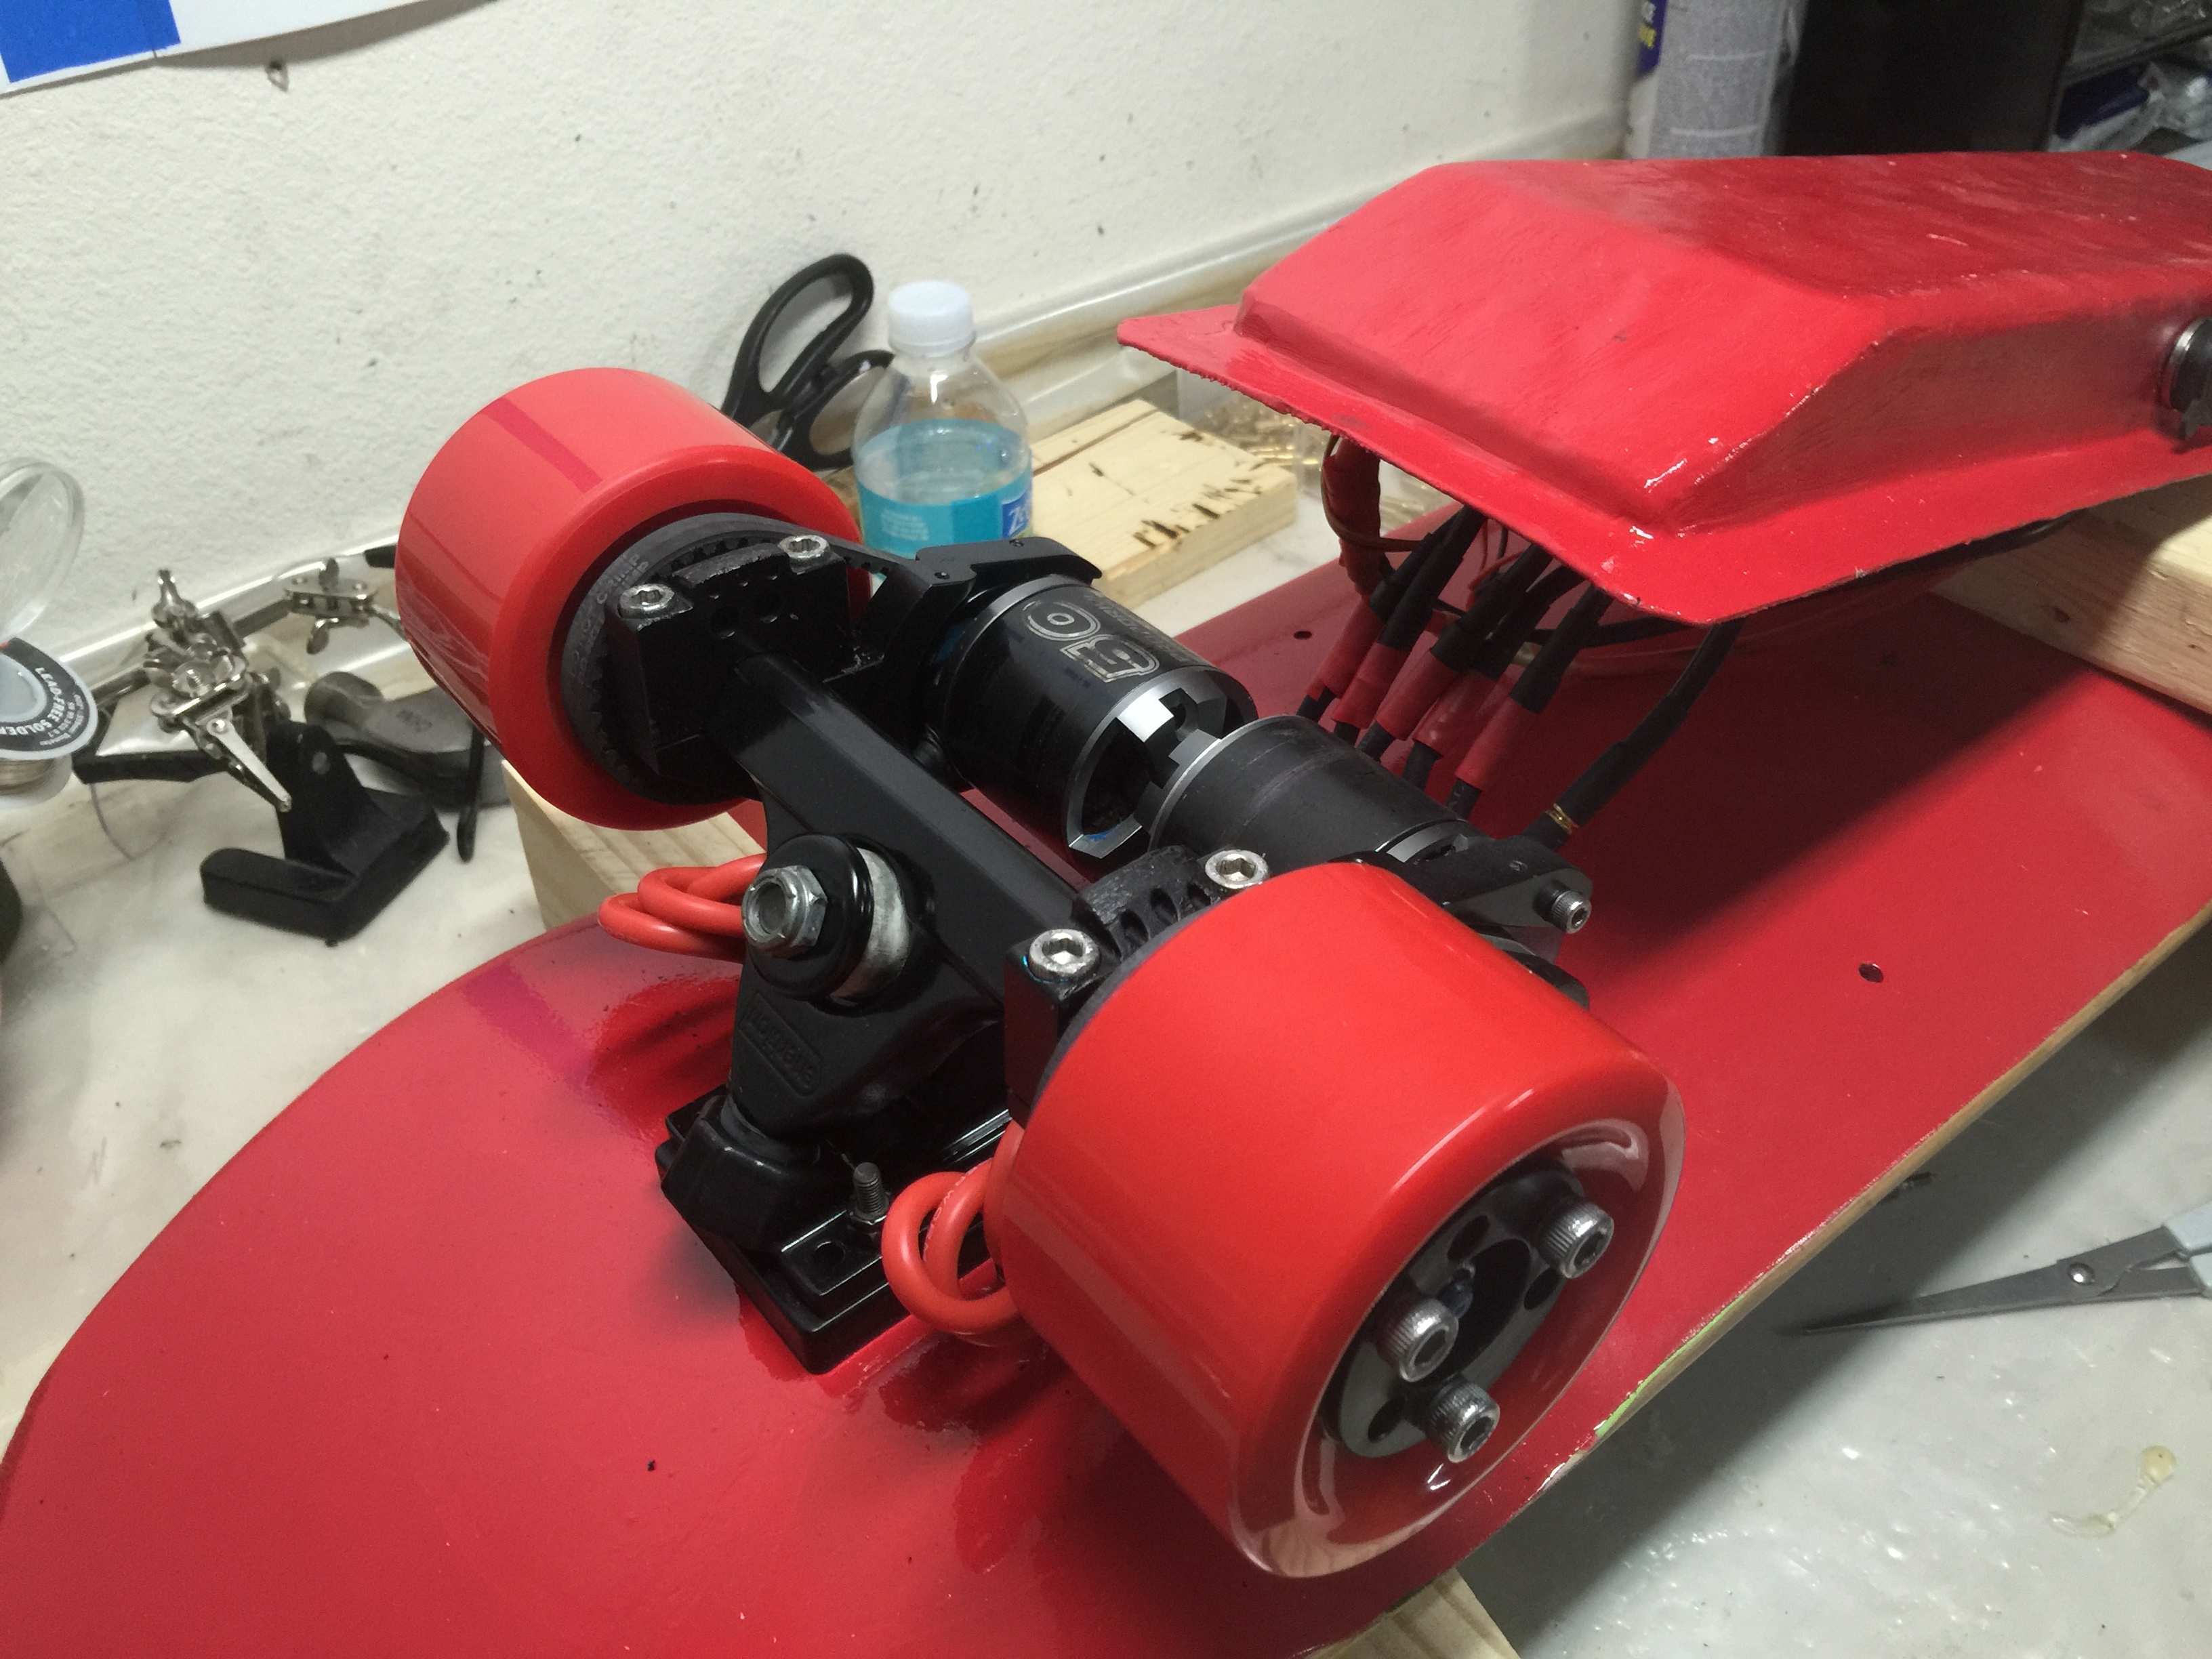
so now it was complete. Here’s a few shots of the complete build:

So to recap, this actually turned out pretty well despite the Bondo. If you look closely, though, you can see why Bondo is crap. It shrinks, warps, and flakes. And oh my god the fumes. Its just terrible. Next time I have to do a drill and fill for wiring channels, i’m definitely using epoxy based resin and probably will spring for the good stuff like West System 105 or something. Also, don’t waste your time making a box with fiberglass using this mold method. Do an inverse mold for a smoother result or better yet vacuum mold an ABS sheet instead.

10 Likes

This was a nice read!

1 Like

LHB - man, that is great looking. I think you are being way too critical of the result. That thing looks AWESOME! I see a couple of the wavy bits on the enclosure, but hey you can fix that with v2.0 in ABS right!? Keep your mold to vacuum form to and you are golden. I just got my vacuum pump this weekend and spent 2 days trying to find any sort of adapter from the AC/flare fittings to NPT so i can easily plumb into 1/2 ID tubing… what a PITA! Got it done finally, but jeez it was stupid difficult to find.

What about vacuum forming the Fiberglass? Same setup, but in a vacuum bag? I want to try this as well as vacuum forming Kydex for my battery cover. I hope to have at least 2 or 3 covers so i can have my small batteries or my large (distance) batteries depending on what i plan on doing. Will try CF/GF w/ vacuum bag at some point for sure.

Motor wires into the deck looks great! Love how they come out on each side of the truck perfectly. I would add a little wire sheating to your red wires (still red, still 20% faster, just protected). Might be able to find the sheathing in red if you hunt.

You used bondo (thanks for the heads up - i’ll avoid), so what about some actual bondo filler skimmed/sanded and then painted so it’s smooth? Aesthetically would look smoother, but add a bit of weight. Not sure how flexible your deck or enclosure is, i know flex and bondo filler don’t mix well… Just a thought.

Great work man and helps me plan my next couple projects!!! Appreciate you sharing, especially the parts that were challenging.

1 Like

GF question - which fabric did you use? E-Glass? S-Glass? weight in oz? How many layers and what does the enclosure weigh when completed?

I got 3 fabrics to use. 2 GF to start and practice with, one CF for the final project. Trying to ease in since i don’t really know what i’m doing… 5-9oz i believe depending on the fabric.

@sl33py i’ll have to go back and check the package for weight. I did three layers of fabric, but its basically just 3M’s Bondo brand woven fiber glassing cloth. i think its just polyester to be honest because it came all folded up (not in a roll) in a tiny plastic bag and there was 8 sq ft of it in each little bag for like $5. When you order the good fiberglass fabric it comes on a roll because creases are terrible and also some of it has a bend radius, i know CF does. Also it costs more.

One thing i did not do was weigh the entire board again. It was 18 pounds before i started this, but i know i shaved at least a pound off in doing this because the old metal box was noticeably heavier.

I’m also thinking about doing a vac bag setup and just forgetting about using a press when I make my decks. Now that i know I can get a clean and flush mount from a plastic box with flanges on a concave deck, I’m less concerned about using hard angles to get a flat bottom and won’t have to worry about making rock maple veneer do things it doesn’t want to do, like take sharp turns around hard angles.

Call me crazy, i just like my wooden decks. I’m looking forward to seeing the results of your experimentation! Maybe one day i’ll post all five of my failed deck pressings here. It’s really rather comical the way i almost succeeded a couple times except for one stupid bubble or something.

Wow!! That’s effin beautiful Man!!

1 Like

A+

how much different do the clones ride compared to rear abec 11 flywheels?

1 Like

Well done! Well written. That’s pretty sick.

2 Likes

Awesome build? What are the specs/performance?

I was fully expecting there to be some noticible, probably negative difference between the ABEC11 Flywheels I was using and these clones. What i noticed what that the clones actually provided a smoother, less noisy ride. They’re slightly softer, though i can’t off the top of my head recall the durometer rating of the clones. The Flywheels are 83A. I can’t speak to durability yet but i’m half expecting them to start chunking in 6 months or so.

One thing I did notice is the the machining of the wheels is noticeably less precise. In all four of my Flywheels the the bearings have to be pushed in with a good amount of force. The clones varied in the amount of force it took to get the bearings in, and in one wheel they fell out on their own when placed back on the table, so not a tight fit there.

but overall, i’m happy with the clones. And they’re half the price with Bones Reds included.

this is an older 6S, 10Ah system based around one of @onloop’s complete kits from late last year.

  • Enertion trucks, motor mounts, 6-8S ESC, pulleys, belts
  • DIYElectricSkateboards high amp electronic switch
  • NTM PropDrive 270kv 50-60’s in a rear drive config
  • GT2B remote and receiver
  • Bones Reds bearings
  • Flywheel clones
  • Bustin YOFACE double kick brad edwards 41" deck
  • LHB Flavor
  • top speed: (with me on it) ~31.5 mph (fucking scary bro) for ~18 minutes
  • top range: ~12 miles @ ~10mph
  • top ride time: ~1:20 @ ~10mph

This thing is really fast, but i normally cruise around at about 15mph in bike lanes and about 10-15mph on sidewalks. I only ever open it up on the paved bike trails, and sometimes when i do that i get stranded and have to walk it because once the wind hits your hair time does funny things then suddenly you’re approaching 20 volts. Of course the instant it drops below 20 volts it explodes into a giant fireball and I have to walk away slowly or i’m not cool.

1 Like

This looks really awesome. I had just recently been admiring how clean Boosted boards look and I was wondering how they were routing their wires. I think they put theirs through the board and inlaid under the griptape. Taking griptape off is probably more of a PIA than going this route though.

Nice job! Hope mine comes out half as nice as this!

1 Like

Next time i do this i’m going from the top side down, under the tape. Yes, it will be a pain to strip and replace the grip tape, but i think from a polish perspective it will definitely yield cleaner results. Especially on a wood-stained deck.

This method will work equally well for dual diagonal configs which often look like there’s just wires everywhere when seen from underneath. I’ll try it out on my next one which i think is going to be a dual diagonal with some big 63s.

This might be a good excuse to start saving up for some custom die-cut tape though. Last i checked you could get 100 sheets die-cut with whatever design you want for about $4 a sheet. That’s a lot of money, but for me that would last literally forever and I’d have my name on every build i sold.

1 Like

Just FYI Boosted uses a flat braided wire under their grip to keep profile low without needing to cut into the deck (says one of the boosted folks on ES). Like this. Not sure on size they used though. Doesn’t seem to follow standard awg sizes - measured in flat width.

LHB - what’s your gearing for this setup?

1 Like

Yeah, I think it is right. I had a customer mention it and I think boosted guy even mentioned it as well.

@torqueboards please check my enclosure post.

cool build man!.. I personally am not a huge fan of red… as you know blue is more my colour :blue_car: But now all I can think about now is Ferrari

I love that you invented a new way of routing wires… I’ve never seen that done! it really makes it look neat!

& making your own enclosure is definatley one way to get a perfect fit!.. try the “reverse mold” to see if it help with smoothness.

My only design critique is I would suggest a nice black sticker or logo to go on that case! just to ad a bit more contrast! maybe a picture of a stallion galloping… Or you could make a stencil of a stallion and spray it with red paint on the grip!

Maybe one day I will make a FULL BLACK enertion kit!.. Considering @torqueboards is fully copying my colours now! :smile:

Hell yeah that braided flat copper looks perfect. I’d still want to etch a channel, but it definitely wouldn’t be very deep at all with this stuff. Just enough to insulate the top and seal it in. This would be ideal for running power between separate battery and ESC boxes as well for those that like the split setup on more flexible longer wheelbases.

This would also be great for some battery cable management by setting up terminals in the deck next to each of your multiple packs. You could literally turn your deck into a kind of PCB full of plugs and fixed mount points and say goodbye to stuffing the spaghetti monster back into the cage every time you have to close your lid.

1 Like

do you have pictures of the steps you took to replace the motor wires?

What if i will be adding one layer of carbon fiber on bottom of the deck, can i glue with epoxy those bullet connectors as you showed? Or do i need put those connectors in shrink wrap before gluing them in the deck so CF will not mess up connections? Or epoxy will be enough to insulate bullet connectors?