Just thought I’d share my progress on the printed wedges while we wait for @unik to release his to the masses. Being my first attempt ever at this, they’re definitely in need of refinmant, but hopefully they’ll work. I made them somewhat thicker than I would have using metal, since I have no idea how the plastic will behave over time. I ended up using ASA-X , a variant of abs that’s used for engineering mechanical parts. I’ll be happy to post the print profile if anyone’s interested.


7 Likes
great job mate! I will be getting the risers next week !
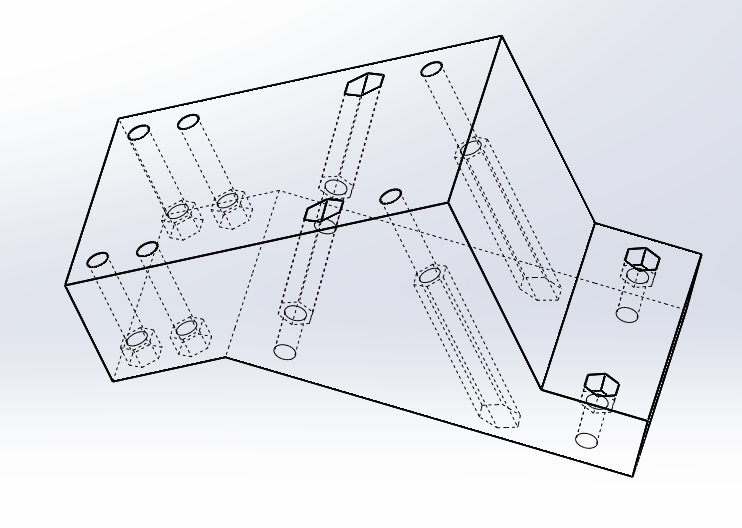
I went a bit more integrated approach for mine 3D-printed angle pieces. I integrated the nuts directly into the piece itself, which saves up vertical space and you get the deck closer to the trucks.


Earlier prototype

6 Likes
Very nice! I’ll definitely try your technique next time! I don’t suppose you’d be willing to share the build file? I cant tell though, is your deck a drop-through? What material did you use? how thick is it? I don’t have a printer of my own yet and mine cost $82 for the pair. I wanted to to make sure I would have something sturdy before I tried to do anything too fancy.
I’m building a new iteration of my board and I’m moving to the Trampa trucks, so I modeled and printed the angle pieces with pretty thin solid walls and infill, just to test the geometry. So I get the trucks mounted to the new deck and decided to test how everything would hold together, so I went to our lawn and just started jumping on the deck with full weight with the intention of inducing a failure. On the hard jumps I could hear the deck start to crack and decided to go ahead and see where it fails (picture below of results). The Angle pieces held up fine, but the deck cracked. I’d rather induce a failure in a safe environment, rather then faceplant on the road at speed when the deck gives out. I’m making changes and improvement to the new coming deck based on the results. The deck is shortened from 85 cm to 74 cm, width is increased from 24 cm to 26 cm and the trucks are moved further inwards to reduce their bending leverage to the deck.

The filament was PLA and with thin solid walls and infill, the total length of filament (1,75 mm dia) per piece was around 24 meters (for reference, a 1 kilo spool of 1,75 mm dia filament, holds about 330 meters). I’d estimate the price per prototype angle piece to be about 1 €, but I get free filament from a local 3d-printer building company. I will probably double the thickness of solid walls and infill once I have confirmed the fit on the new deck, just to make them more sturdy. Below images from blender, which I use to model.


EDIT: and the angle pieces are 35 degrees. EDIT2: The current angle piece design has non-standard mounting holes to the deck, so it wouldn’t fit directly to any normal decks. normal mounting holes for a truck are 1,625" x 2,5", but the deck facing holes are on the new piece 1,625" x 1,97" (50 mm)
EDIT3: I also prototyped a wheel gear for the Trampa SuperStar hub

1 Like
Do you get the Trampa motor mounts in the same order? I’m waiting for 2 of them 
I used Solidworks for mine.You could probably fix your mounting hole issue by extending the upper plate out a little, just enough to give you the space for the second set of deck-mounting holes in the front. I did the same thing with stress-testing my board, just standing and bouncing on it- so far so good! (I’m rank newbie at this bty, can’t even really ride it yet) Ive always been a bit wary of PLA due to it’s brittleness. Granted, it held up better than you deck here, I just prefer to have a bit of elasticity. That way I’ll have at least a little warning if it starts to break.
The mounting hole situation is deliberate. It’s to save a little bit of space on the new deck length wise and helps to offset the mounting holes from the deck and trucks so they don’t “collide”.
Below the CAD picture for the new deck. It fits a 10S5P 18650 pack.

And here’s the problem illustrated that comes with the standard bolt holes. Standard 1,625" x 2,5" holes on deck. The needed hollows collide within the piece, which causes the lower truck nuts to be unmountable inside the angle piece

With the non-standard deck holes the needed hollows inside the piece don’t collide.

yeah ! should get everything next week and they we can launch the group buy
@SimosMCmuffin, I hope you don’t mind, I had a go at your design using standard deck-hole placement. What do you think? I’m debating also boring a cylindrical hole lengthwise through the center to save weight while retaining the structural strength.
It’s fine, actually I’m glad that you did it yourself and you actually showed motivation to learn how to model using your preferred software.
I recommend doing a test piece first just to see if the size of the nut hole is correct and not either too loose or too tight.
What Ply is that cracked Deck ???
Thanks! Yeah, Solidworks was the first CAD program I ever learned, so it feels the most natural to me. I’ll make a quick prototype with PLA and see how it goes.
It was a clear weak point where it cracked, which couldn’t be seen on the picture above.

The plywood itself is 15 mm thick with 11 plies. I have already re-designed the deck to be more sturdy and also shortened it and brought the trucks more inward to reduce the bending leverage the have on the deck.
This is a deck you built yourself?
Yes. I posted a snapshot from the new deck’s 2D-cad files earlier above.
Here’s a imgur album of my current board

They’ve held really well so far! Keep in mind that I’m an absolute beginner in terms of riding, so I haven’t exactly TRIED to break them. I’ve done some pushing tests, jumped on the board a bit, haven’t had any problems yet. @unik, what do yours weigh? Mine turned out quite bulky:
I wasn’t sure what would happen, so I made them a bit thicker than was probably necessary. Now that I know they work I’m actually redesigning them based on the pic I posted a little while back, as well as @SimosMCmuffin idea: It’s more compact and it’ll lower the clearance another centimeter or so. I still need to make sure the hexagonal holes for the nuts are the right size, then I’ll have my 3D printer-owning friend print a pair.

Speaking of, @DeathCookies you convinced me- I ordered a prusa i3 mk2 last week! Once I have it set up, I might just do a whole run of these for anyone interested. Only six more weeks till it ships…
1 Like
the ones I created months ago are AL7075
Can you post some pictures?