This is going to first be a list of the components going into my DIY electric longboard and then transforming into a build log. But first, a bit about me (because I’m conceited and love talking about myself…not really).
I’m a master student in upstate New York, recently got my bachelor in Mechanical Engineering. I LOVE LOVE LOVE (did I mention LOVE?) DIY stuff and tinkering with electronics a bit. I have an extensive multi-year background working with drones in both hobby, recreational, research and commercial applications. Thus, I keep up with news and topics about those types of electronics which led me to these longboard thingies. I use to skateboard as a kid, longboarded for a couple years but have not been on a board in years. I have scoured forums, looked at countless build logs, read opinions, filtered through personal insults and come up with what I have decided is going to be a decent first build for myself. I’m 6’2" - 215 pounds, hardly any hills around here, though I might find some if I look hard…
I have no idea about range (anyone want to point me in the direction of some rules of thumb/calculators to determine range?) but without further ado…adue…a-doo…? Here is the list of parts I have already purchased and is now on the way here (Merry Christmas to me!!)
Board:
-Arbor Axis Maple 40"
(originally was going to make my own Loaded Vanguard clone, but time is of the essence)
-Caliber 2 50 deg. Trucks
-Pacific Flyer Abec 9 Bearings
-83mm Flywheels (Abec clones from Amazon)
Propulsion System
-Alien 6374 HEV 240KV 3300W for mono drive
-DIYElectric VESC
Mounting
-DIYElectric Mono Drive Kit:
>13/36 tooth 12mm wide pulleys
> Single motor mount for Caliber Trucks
Power System
(2) 4s 6000mah Turnigy running in series to make 8s 6000mah
DIYElectric Power Switch
8s lipo balance BMS 4A charge/ 15A discharge (bypassing to use for charging only)
XLR microphone connectors
33.6V 2A brick (laptop style) charging adapter
DROK digital battery indicator
Control System
-Alien Power System 2.4Ghz Remote with Rx
I think that’s all for now. Let me know what everyone thinks of my parts list. I will keep you all posted on my progress as I’m sure I will get very giddy when boxes start to arrive later this week. Also, thanks in advance to the community for all of the valuable knowledge that you all spend your time to give so that passionate people can pursue their own endeavors - Cheers to you all!
For calculating the range, use this. It is a article sorta thing from DIY Electric Skateboard. Very helpful. Obviously they are many other factors that go into the range, such as the speed you go and any hills you go up etc. but this is a general rule of thumb. I would say that a voltage check would be helpful, so that once you build the board, you can really test to see how long you can go.
Awesome, appreciate the input! It looks like I should get a range of about 11 miles with this setup if I take the right routes. Going to assume closer to 9 since I’m on the heavier side of riders, but it’s a good starting point. Looks like parts are going to start arriving today!
@jamoir, sure thing! Anyone else please feel free to correct me if I am wrong about any of this. I’m not claiming to know all, this is just what I have gathered from other posts…
the 6355 will allow you room if you decide to go dual rear motor. I only intend to use this as a mono drive so I went for more power out of the one motor. Plus, as I stated earlier, I am a bigger rider and the added power of the 6374 will keep components from working so hard under load. The larger motor was only about 10 dollars more. If you want to save money and want the possibility of using a dual motor setup (dual on the same axle) go with the 6355. If you are not over 185 pounds, I would say go with the smaller one as well. The smaller one would work fine for me - but again, I like to overbuild. I hope this helps, and good luck on your build!
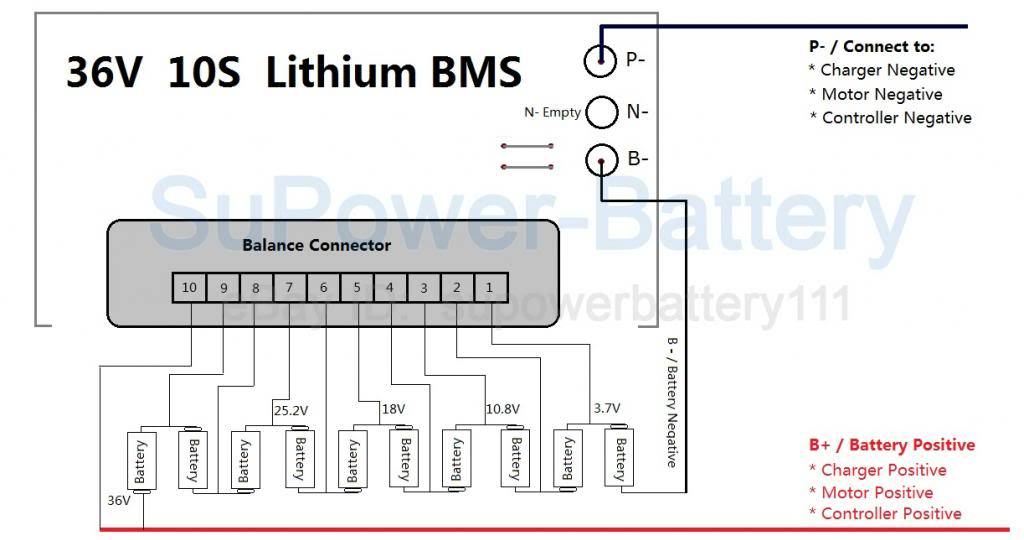
Here is a diagram I made of how my board will be wired up. I’m especially concerned about the linking of the balance connectors between the two 4s batteries. I looked at other peoples’ diagrams and this is how I think it should be done…right?
I realized later I didn’t add the link between the two batteries (negative terminal of one to positive of the other to make the series connection) but I realize it does need to be there, I was focused on the balance connectors. Any other concerns about my diagram please feel free to let me know!
Im interested to find out what difference on the battery the bigger motor will make. Does it have higher demands and thus creates more heat and less range for the ride?
As far as I Iknow, it shouldn’t make a huge difference. It does have a higher maximum current draw, but it won’t be pulling that unless it’s under enough of a load. I would assume that it wouldn’t create as much heat because it’s not working as hard (higher capacity to do work). The motor just came in today. It is HUGE. I built a ginormous quadrotor drone once using four of the 5055 motors that are common here also, and I thought it was a beast - but this 6374 is friggin monstrous!!! I’m starting to get a bit scared.
Your list looks good. I am also running the Alien HEV motors. 6355 dual 190kv.
Very happy with them. Be aware though that their 63mm motors have a 10mm shaft.
Alien sells motor pulleys for 10mm shaft and 9mm belt 15t.
240kv looks like a good choice for 8s voltage, safely under the 60k erpm limit of the Vesc.
Those Arbor maple decks are nice!
About the batteries, you didn’t mention the C rating. This is very important. You want as high a C rating as you can get to minimize voltage sag during hard acceleration and hill climbing.
I run Lipos that are 60C continuous discharge and 5C continuous charge.
the high charge rating is important for regen braking.
Please check out my 10s Lipo build with BMS. I used five 2s Lipos in series to get 10s. The 2s packs are only 1" tall allowing for a low profile enclosure and greater ground clearance.
Note: I found that the higher C rating increases range because of less voltage sag.
I got better range with this setup than I did with my 12s 5000/25C Lipo setup.
I just noticed your balance wiring diagram.
The cell order is backwards.
Cell 1 should be at the Negative end of the series.
Cell 8 should be at the Positive end of the series.
This is a 10s diagram but its the same concept.
Hey thanks alot, @Namasaki! Good info on the battery pack in your thread! I thought about what you mentioned on the ordering of the balance leads after looking at the wiring diagram of the bms again, but just assumed it didn’t matter.
First things first, here is an updated wiring diagram. I added the mains connection from one pack to the other and reversed the numbering order (and added the word ‘motor’ on the circle for the least ambiguity. haha). This looks more accurate right? I updated the connection from the VESC to the Battery from an XT90 to 5.5mm bullet connectors as I already have some of those and I don’t want to order xt90s for just this one connection.
Next, I looked into the LiPo packs again. They are 4S 6000mAh with 25C constant, 50C burst disharge, and 5C charge capacity. That’s 150A discharge continuous and I will limit the VESC to probably 60-70 anyways. I need to look more into the regen braking features because I don’t know much about that.
Oh yeah, I have disassembled LiPos before, so I was thinking of doing that to these just to make them 4 x 2S 6000mAh (still in series for 8S total) for a lower profile. I’m not sure I care too much at this point, though. I know playing with LiPos can be dangerous and I take every precaution necessary to stay safe when doing it, but any concerns are always welcome - I am not an electronics guru, I just have common sense and know how to safely operate tools. I think I might just leave these as is for now because once I save up I would like to make a Li-Ion DIY pack, that just wasn’t monetarily feasible for me now.
@DreadBiscuit it looks like a good list, nice work. My advice is to start planning your enclosure, mounting and weatherproofing as early as you can. It’s a drag to have all your parts but no place to put them, and it can take a while to sort how how it will all be mounted. I personally wish that I had planned for this earlier in my building process.
@treenutter, definitely a good idea!! I have done some rough layouts of the batteries on the board - still waiting on other components. Since I have a stiff board, I think I want to do a long, skinny enclosure going down the center of the board with the two batteries laying end to end, then bms, then room for display, switch, etc and finally VESC down by the motor on the back end. I have seen a few of these, but not many. I use to build custom subwoofer enclosures from fiberglass so I have some leftover fiberglass mat (woven) that I am going to spend my winter designing and fabricating for the enclosure…I probably won’t go too crazy on the design this go around. I’ll focus more on weatherproofing and functionality and then do a cool one when I switch to Li-ion.