Project LACR | Globe The Maiden Deck | Enertion Single Drive Propulsion | Turnigy SK3 6364 190 KV | VESC 4.10 / Turnigy Sentilon 100A | 24V 10AH Zippy Flightmax Lipo Packs

Hi my name is Laurentius. I am quite new into posting in this forum, but I’ve been reading both endlessphere and electric-skateboard.builders from time to time. This is my first build into small EV, also RC electronics as well as longboarding.

I started this build with very limited knowledge of RC Car and Hobby parts. I can’t even skateboard / longboard until December 2015 last year (Start the build October - November 2015). I am not an electrical engineer or mechanical engineer, just a web designer. However I used to be a member of a robotic team in high school and the knowledge of soldering and electrical circuits come in handy.

For me building this eBoard has always been a dream. I always want to make small-medium EV project. Since I am living without the comfort of home (ex-international student, expat worker) I don’t have all of the best and right tools to build this project. But hey, I did it anyway! Cost me more than expected, but worth the satisfaction of achieving a small dream.

My plan is to create “The create the ideal eBoard (for my self)” that are:

  • Safe speed and safe battery packs, easy to charge and fast to charge
  • 30Km++ distance and easy to carry (thats why I choose Globe Maiden deck so I could drag it along instead of carrying)
  • Has lights both front and rear
  • Has matching colors, all black (besides the wheels, I love the orange wheels :smile: )
  • Last but not least, easy to maintain with available spare parts easily purchased in the Netherlands.
  • Allowed to be used in open street legally
--- Facts:

My 6S 5000mah could cover solid 10 km, hence with 10,000mah I could cover solid 20km. If I ride efficiently, does kick push, relatively flat ground and not so windy, I could reach around 30km.

My riding speed is around 20km/h - 25km/h, I found riding 30km/h starting to be dangerous as you can’t really brake it hard incase of emergency.

Charging time with 3.5A power supply takes about 2hours and a half to make full charge of the 6S 10,000mah lipo packs.

Below are the complete list of parts I am using (Might be useful for new people who are looking to build one, as I also have difficulties starting to build one my self to begin with). Hope helps for newbie :smiley:

Complete List with Links:

Deck (Globe - The Maiden Deck) http://unhooked.be/en/skateslongboardsbikes/1018-globe-the-maiden-deck-37.html

Propulsion and Wheels (Enertion Single Mount) http://www.enertionboards.com/diy-electric-skateboard-kits/enertion-single-motor-mount-pro-kit/

Trucks (Caliber II 50 Black) http://calibertruckco.com/product/ii-fifty/

Riser (Khiro 0.5inch) http://caerboardsports.nl/khiro-hard-riser-pads-flat-set-of-2.html

Bearings (Bones Super RED Ceramic Bearings)

Motor (Turnigy SK3 6364 190KV) http://www.hobbyking.com/hobbyking/store/_42031__Turnigy_Aerodrive_SK3_6364_190kv_Brushless_Outrunner_Motor_EU_Warehouse.html

ESC Turnigy Sentilon 100A HV ESC http://www.hobbyking.com/hobbyking/store/__38787__Turnigy_Sentilon_V4_100A_5_12s_HV_Bulletproof_Speed_Controller_w_RPM_Sensor.html Programming Card https://www.hobbyking.com/hobbyking/store/uh_viewItem.asp?idProduct=2169 and or VESC ESC 4.10 by Benjamin Vedder http://www.ollinboardcompany.com/product/vedder-s-speed-controller

SBEC (Hobbyking YEP 20A HV (2~12S) SBEC w/Selectable Voltage Output) https://www.hobbyking.com/hobbyking/store/uh_viewItem.asp?idProduct=40274

Enclosure (2 Rosti Mepal Flat Bread Lunch Box - 3cm Thickness) https://www.rostimepal.com/en/lunchtime/lunchbox-take-a-break/lunchbox-take-a-break-flat-silver.html

Batteries Lithium Polymer Packs 4 Zippy Flightmax 3S 25C 5000mah (2Series 2Parallels - With making the packs parallels first before series. Best setup for balance charging) http://www.hobbyking.com/hobbyking/store/_8583__ZIPPY_Flightmax_5000mAh_3S1P_25C.html and or Custom Li ion 24v 10AH 18650 with 30A BMS and 2A Power Supply (LG / Panasonic Cells) Custom request to China

Remote TrackStar TS3t 2.4Ghz FHSS 3-Channel (I thought Telemetry was useful, but remote size too bulky. Has ABS brakes, Speed Limiter, Multi Opt for gradual slow down with ESC that has no brakes) http://www.hobbyking.com/hobbyking/store/_73991__TrackStar_TS3t_2_4Ghz_FHSS_3_Channel_Digital_Proportional_Radio_Control_System_EU_Warehouse.html and or Wireless WiiNunchuck by MadCatz https://www.bol.com/nl/p/madcatz-wireless-z-chuk-wii/1004004010490662/

Switch (2 High Quality Industrial Grade Inrush Rocker Switch by Marquardt) https://www.conrad.nl/nl/marquardt-19323112-wipschakelaar-250-vac-16-a-2x-uitaan-ip65-vergrendelend-1-stuks-700093.html

Current Limiter (Anti Spark - 100 ohm Metalfilm Resistor) https://www.conrad.nl/nl/metaalfilmweerstand-100-axiaal-bedraad-1-w-royalohm-mor01sj0101a10-1-stuks-1289851.html

Additional Caps 1 Super Capacitor 40v 10micro farad Industrial Grade capacitor https://www.conrad.nl/nl/elektrolytische-condensator-snap-in-10-mm-10000-f-40-v-20-x-h-30-mm-x-40-mm-vishay-2222-056-57103-1-stuks-446226.html

Chargers + Power Supply 1 Laptop Charger (4A) by Trust https://www.conrad.nl/nl/trust-laptop-netvoeding-19975-65-w-34-a-1268784.html?WT.mc_id=gshop&insert=8J&gclid=CPry7fvLysoCFQcYwwodWDwOvw&tid=211354628_17335160228_pla-182178674228_pla-1268784&WT.srch=1 and Turnigy Accucel-6 80W 10A Balancer/Charger LiHV Capable https://www.hobbyking.com/hobbyking/store/uh_viewItem.asp?idProduct=75599

Cables All 10AWG Cables (Black and Red) https://www.hobbyking.com/hobbyking/store/uh_viewItem.asp?idProduct=79850 https://www.hobbyking.com/hobbyking/store/uh_viewItem.asp?idProduct=79661

Heat Shrink http://www.hobbyking.com/hobbyking/store/_76019__Turnigy_Heat_Shrink_Tube_6mm_x_1mtr_Black.html

Motor - ESC Connectors (5.5 Gold Plated Connector) https://www.hobbyking.com/hobbyking/store/uh_viewItem.asp?idProduct=36241

Some XT60 Connectors (Black and Yellow Colors each colors for specific connections) https://www.hobbyking.com/hobbyking/store/uh_viewItem.asp?idProduct=36270 https://www.hobbyking.com/hobbyking/store/uh_viewItem.asp?idProduct=52300

Parallel Balance for Charging (Cut Open & Modified to fit into the Box) https://www.hobbyking.com/hobbyking/store/uh_viewItem.asp?idProduct=10993

Voltage Alarm (2s - 8s Low Voltage) & Servo Tester https://www.hobbyking.com/hobbyking/store/uh_viewItem.asp?idProduct=42757 https://www.hobbyking.com/hobbyking/store/uh_viewItem.asp?idProduct=8296

LED Light (Brooks Lezyne Femto 300 Lumens Water Resistant) http://www.simplebikestore.eu/brooks-lezyne-femto-pocket-size-front-light-system/dp/5505

Misc (Might be / might not be needed depending on build) Some extra XT60 Connectors Some JSTXH 3S Extension cable Some JSTXH 6S Extension cable Some smaller cables 14 AWG + for small connectors such as Anti Spark PZD 2 Black screw head plug (To cover top side of the bolt, just making it neat) - https://www.praxis.nl/gereedschap-installatiemateriaal/ijzerwaren/afdekkappen/sencys-afdekkap-voor-schroeven-pozi-pzd-2-50-stuks/5368279 Artic Silver Thermal Paste (for PC) - https://www.conrad.nl/nl/arctic-silver-as-5-koelpasta-89-wmk-35-g-150352.html


Further Upgrade - Coming Soon: 1 dual motor CarvonSkates Hub Motor or Sets of Orang Atang Kegel Wheels with additional Enertion propulsion and 2 Turnigy SK motors *still not quite sure yet as well as budget wise that cost alot :smile:


Here are some quick shots Globe The Maiden Deck
300 LED Lezyne Brooks Light
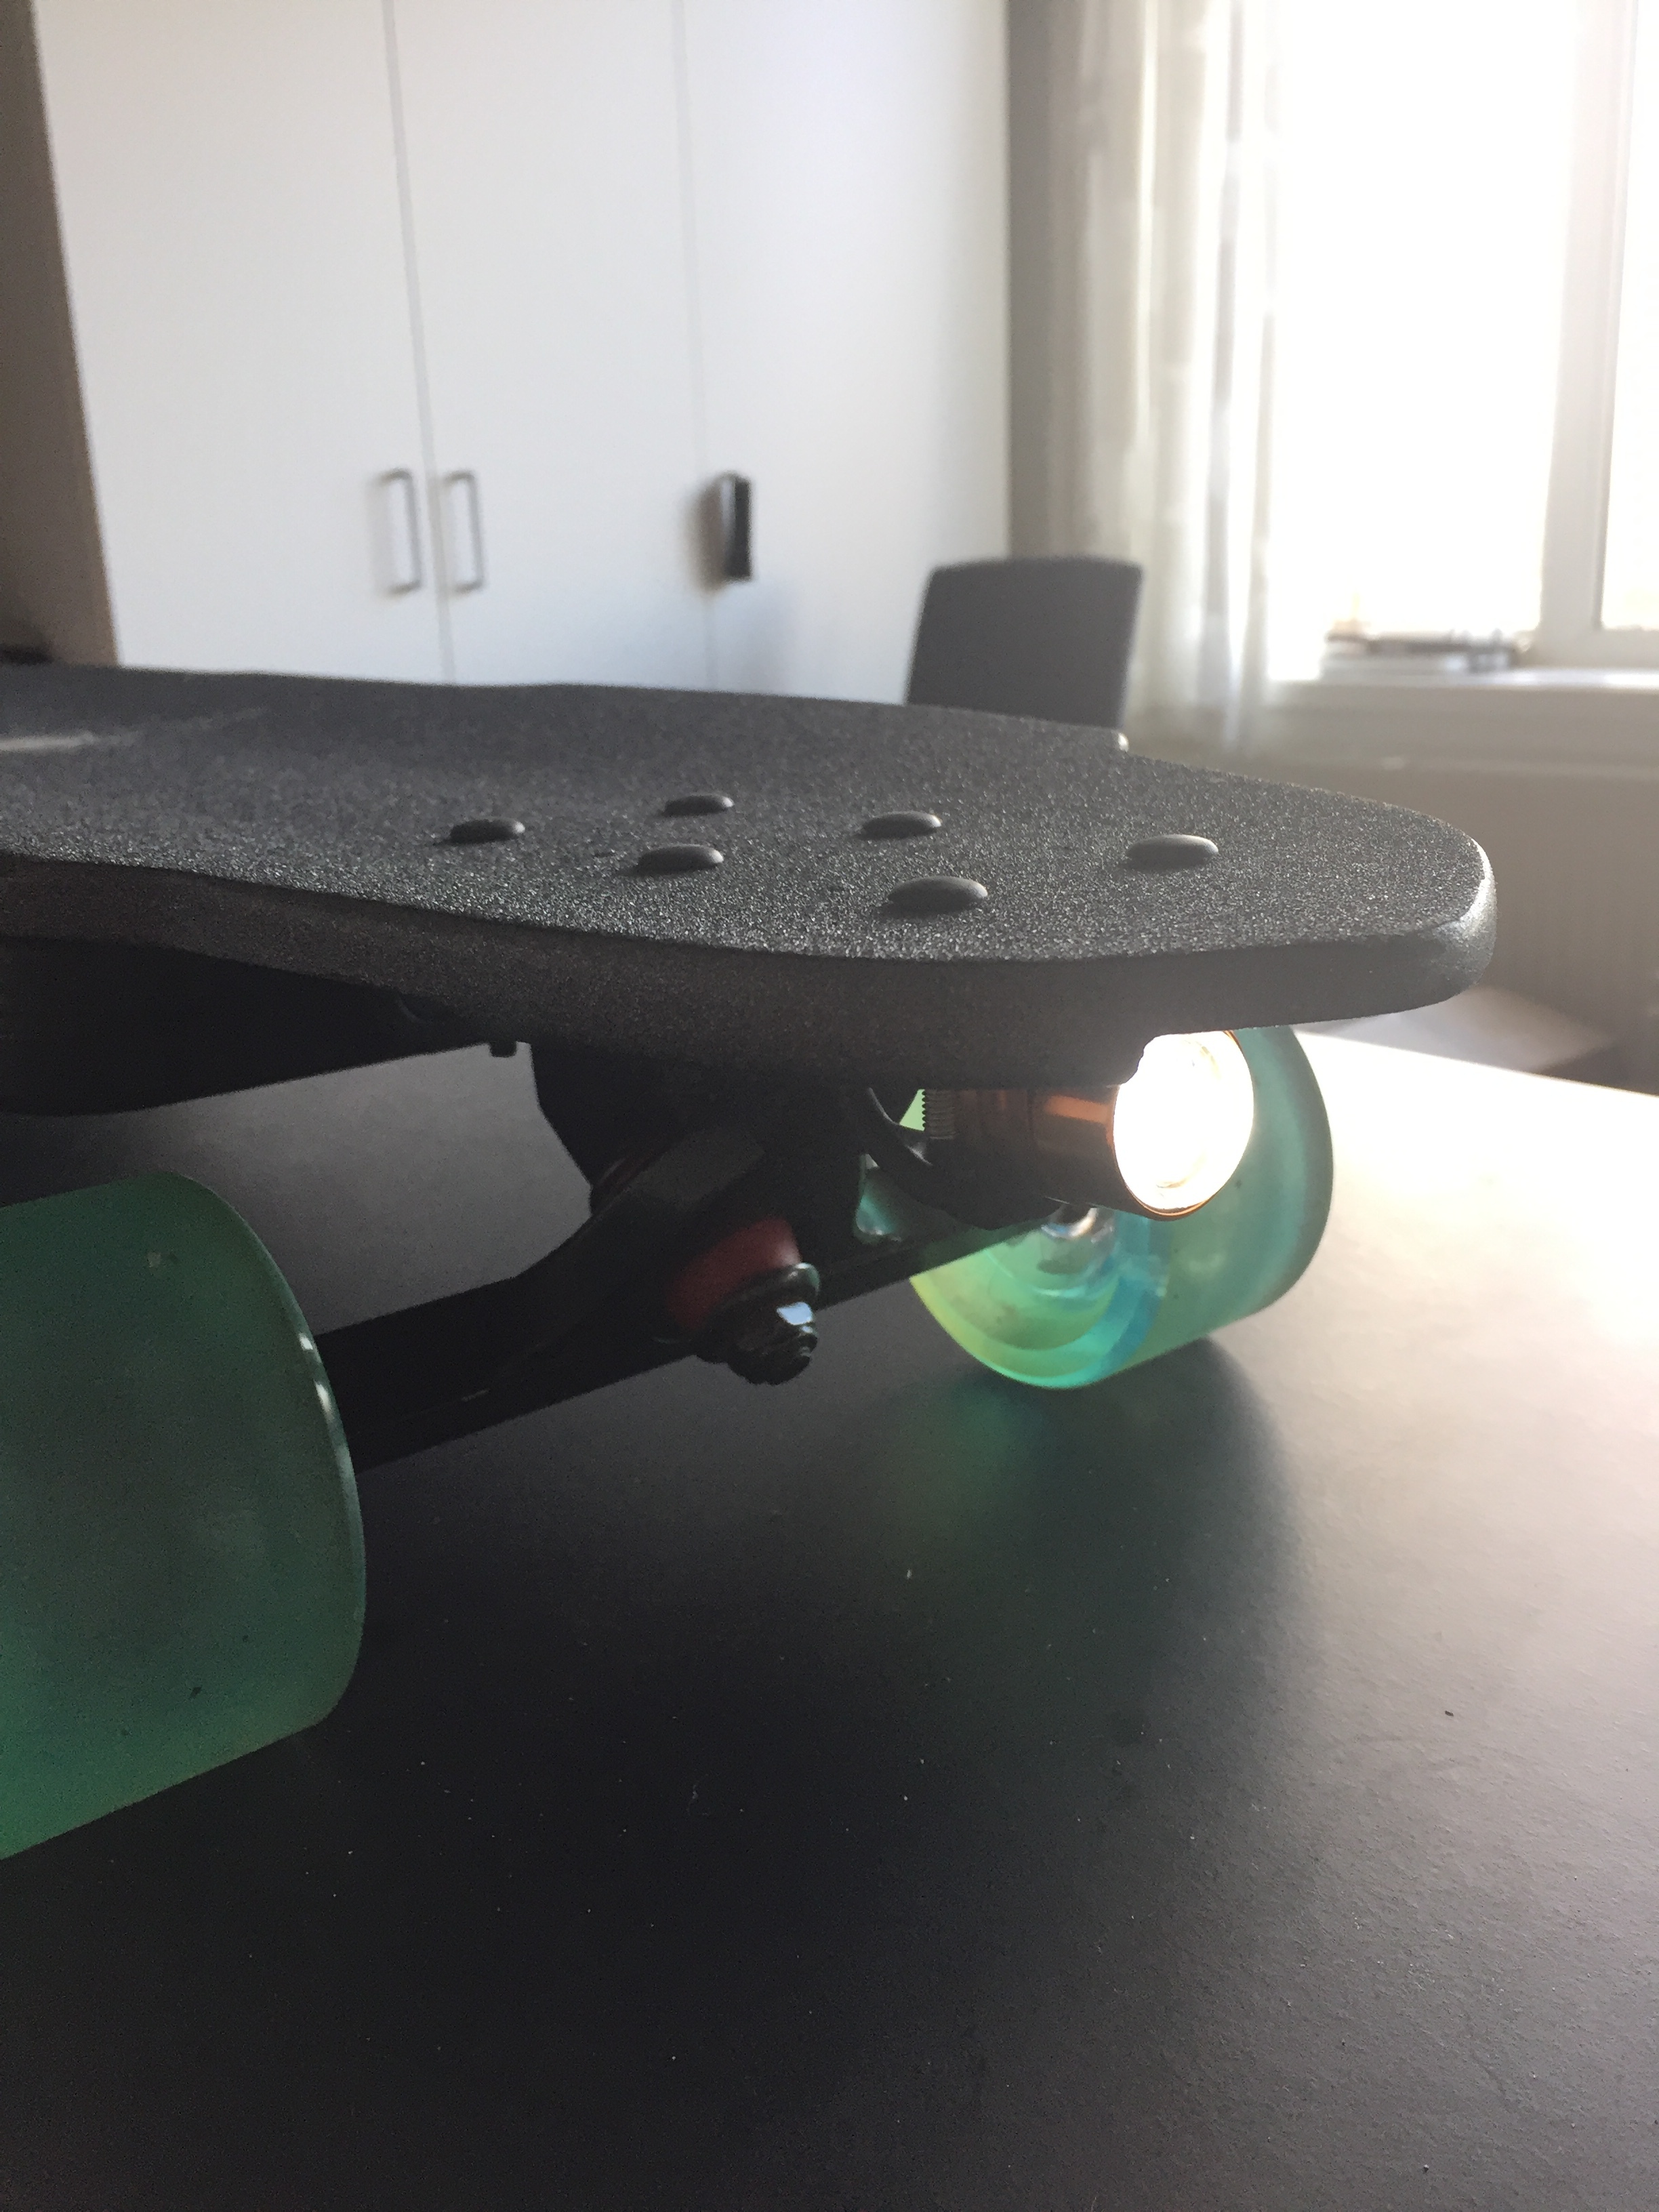
Front view with LED turned on and some black plastic covering the flat head PZD 2 bolts.
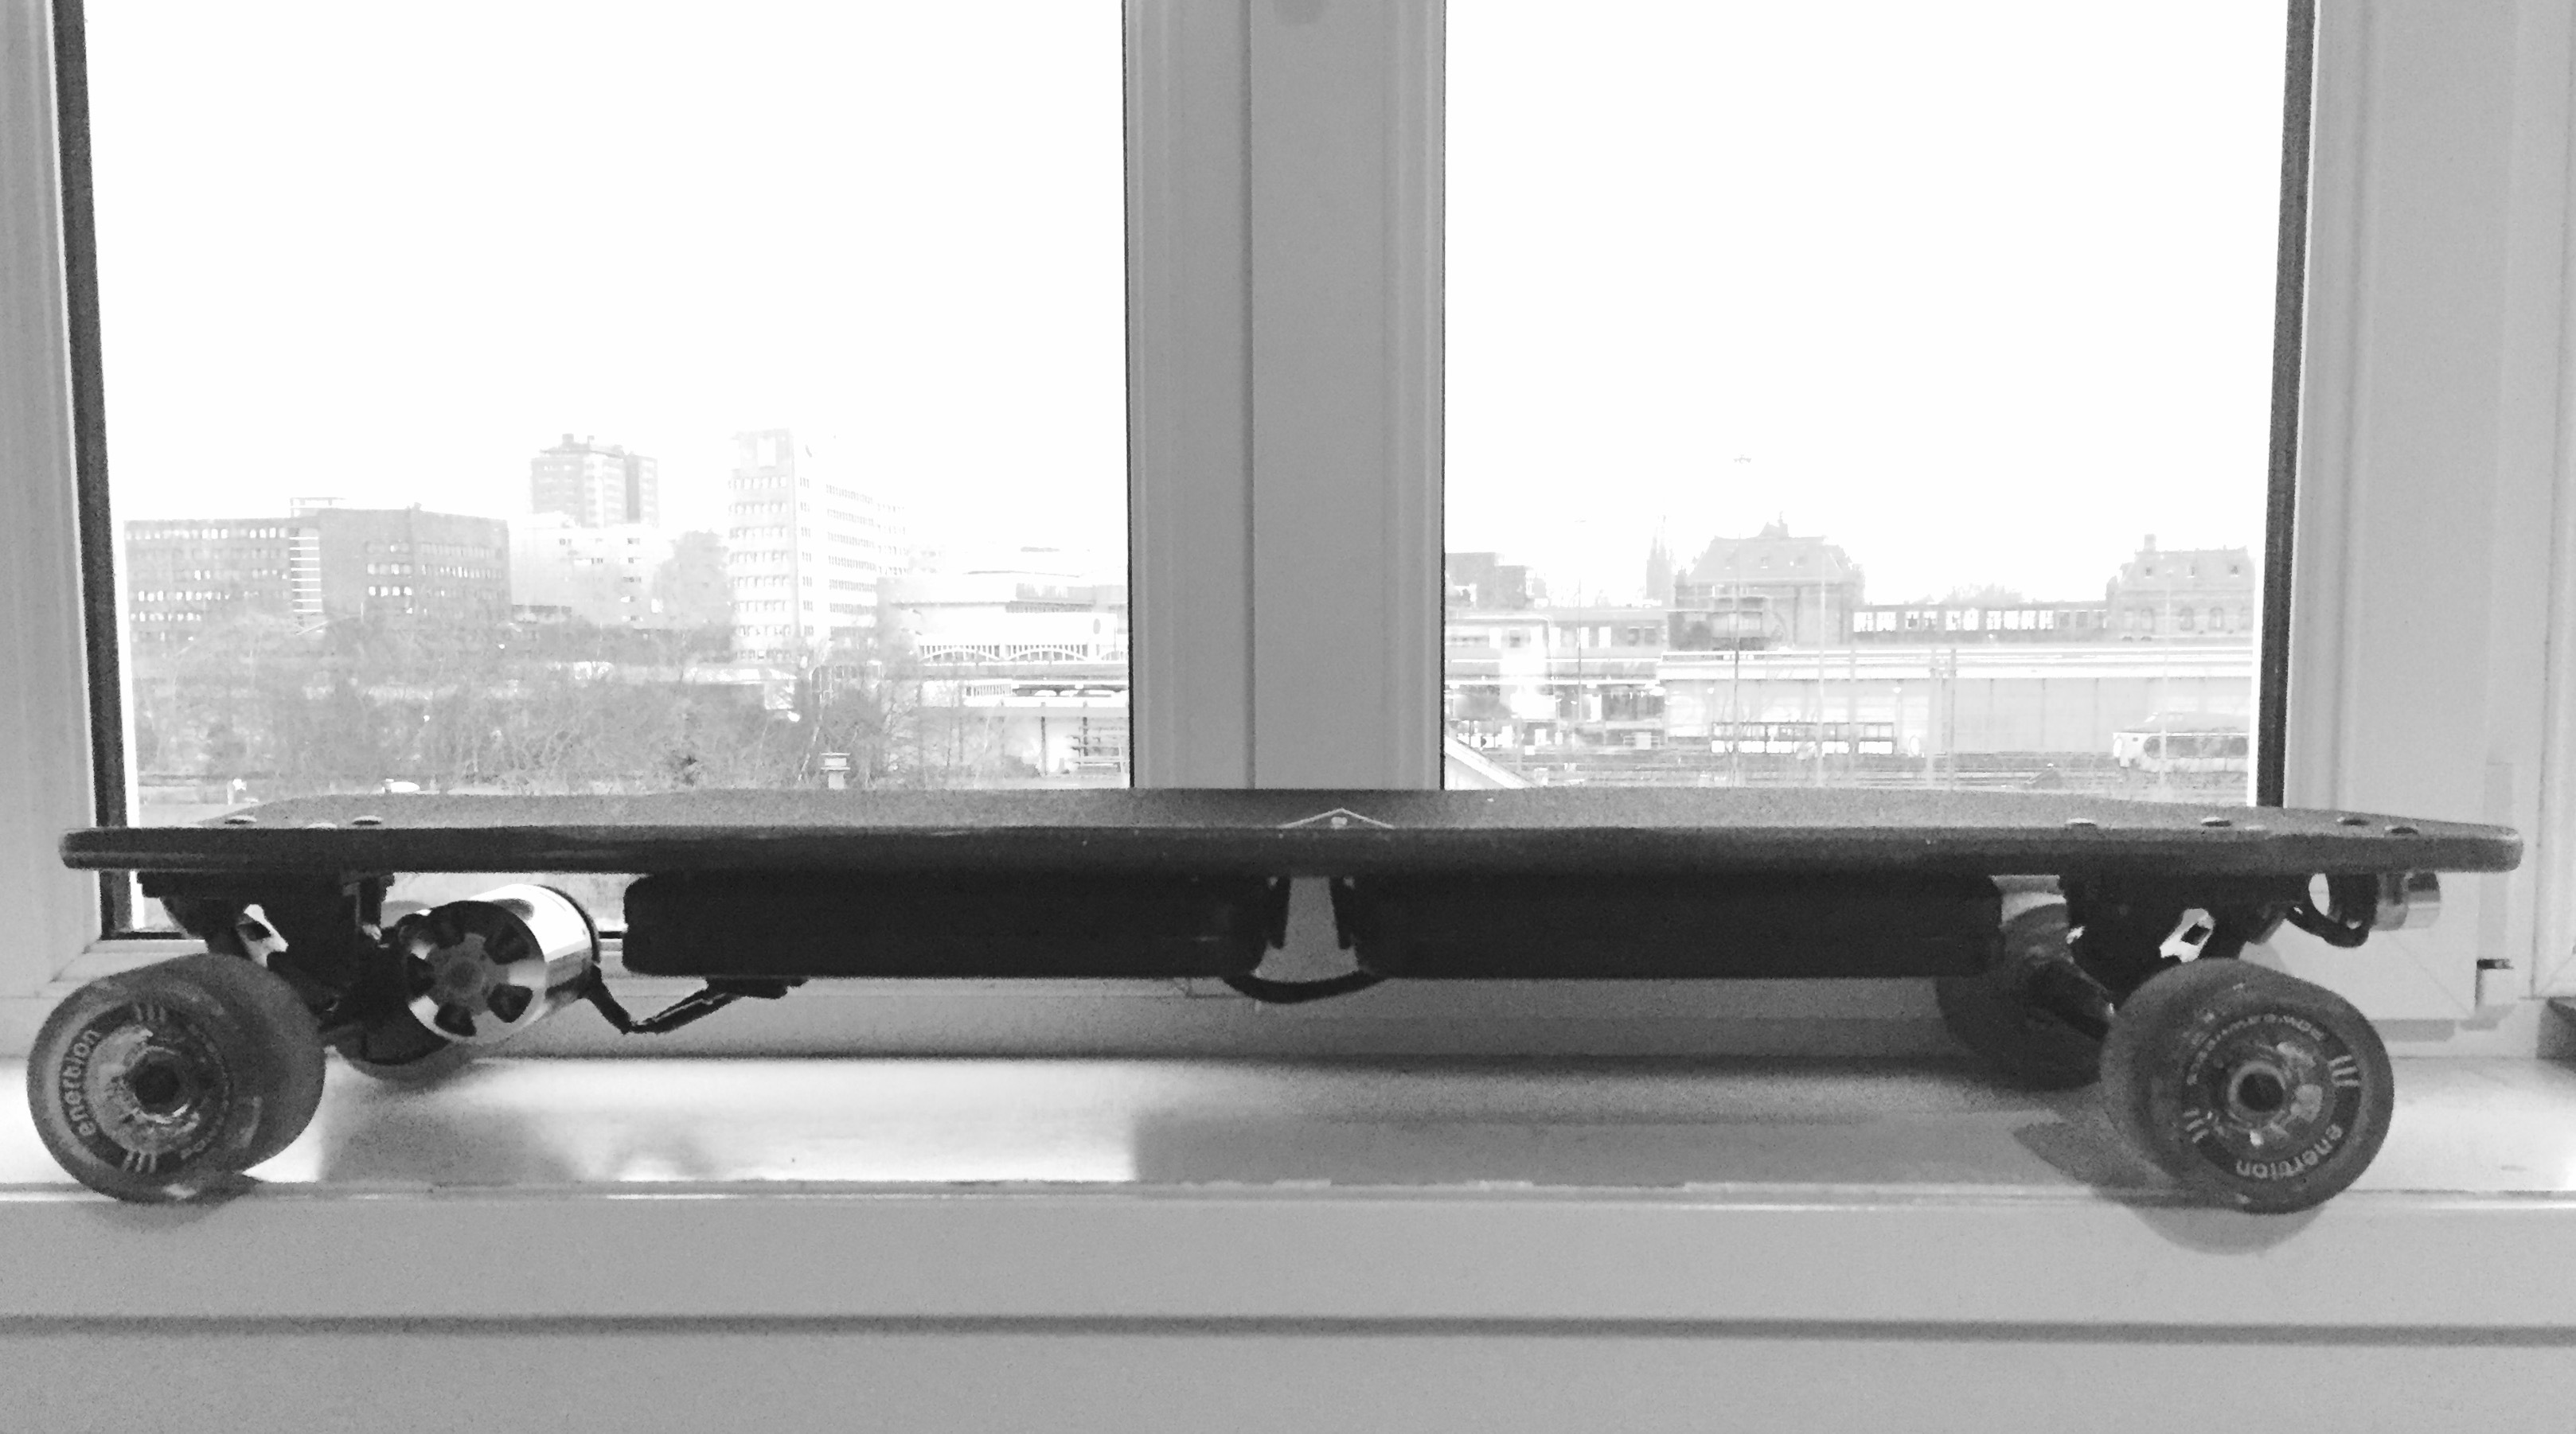
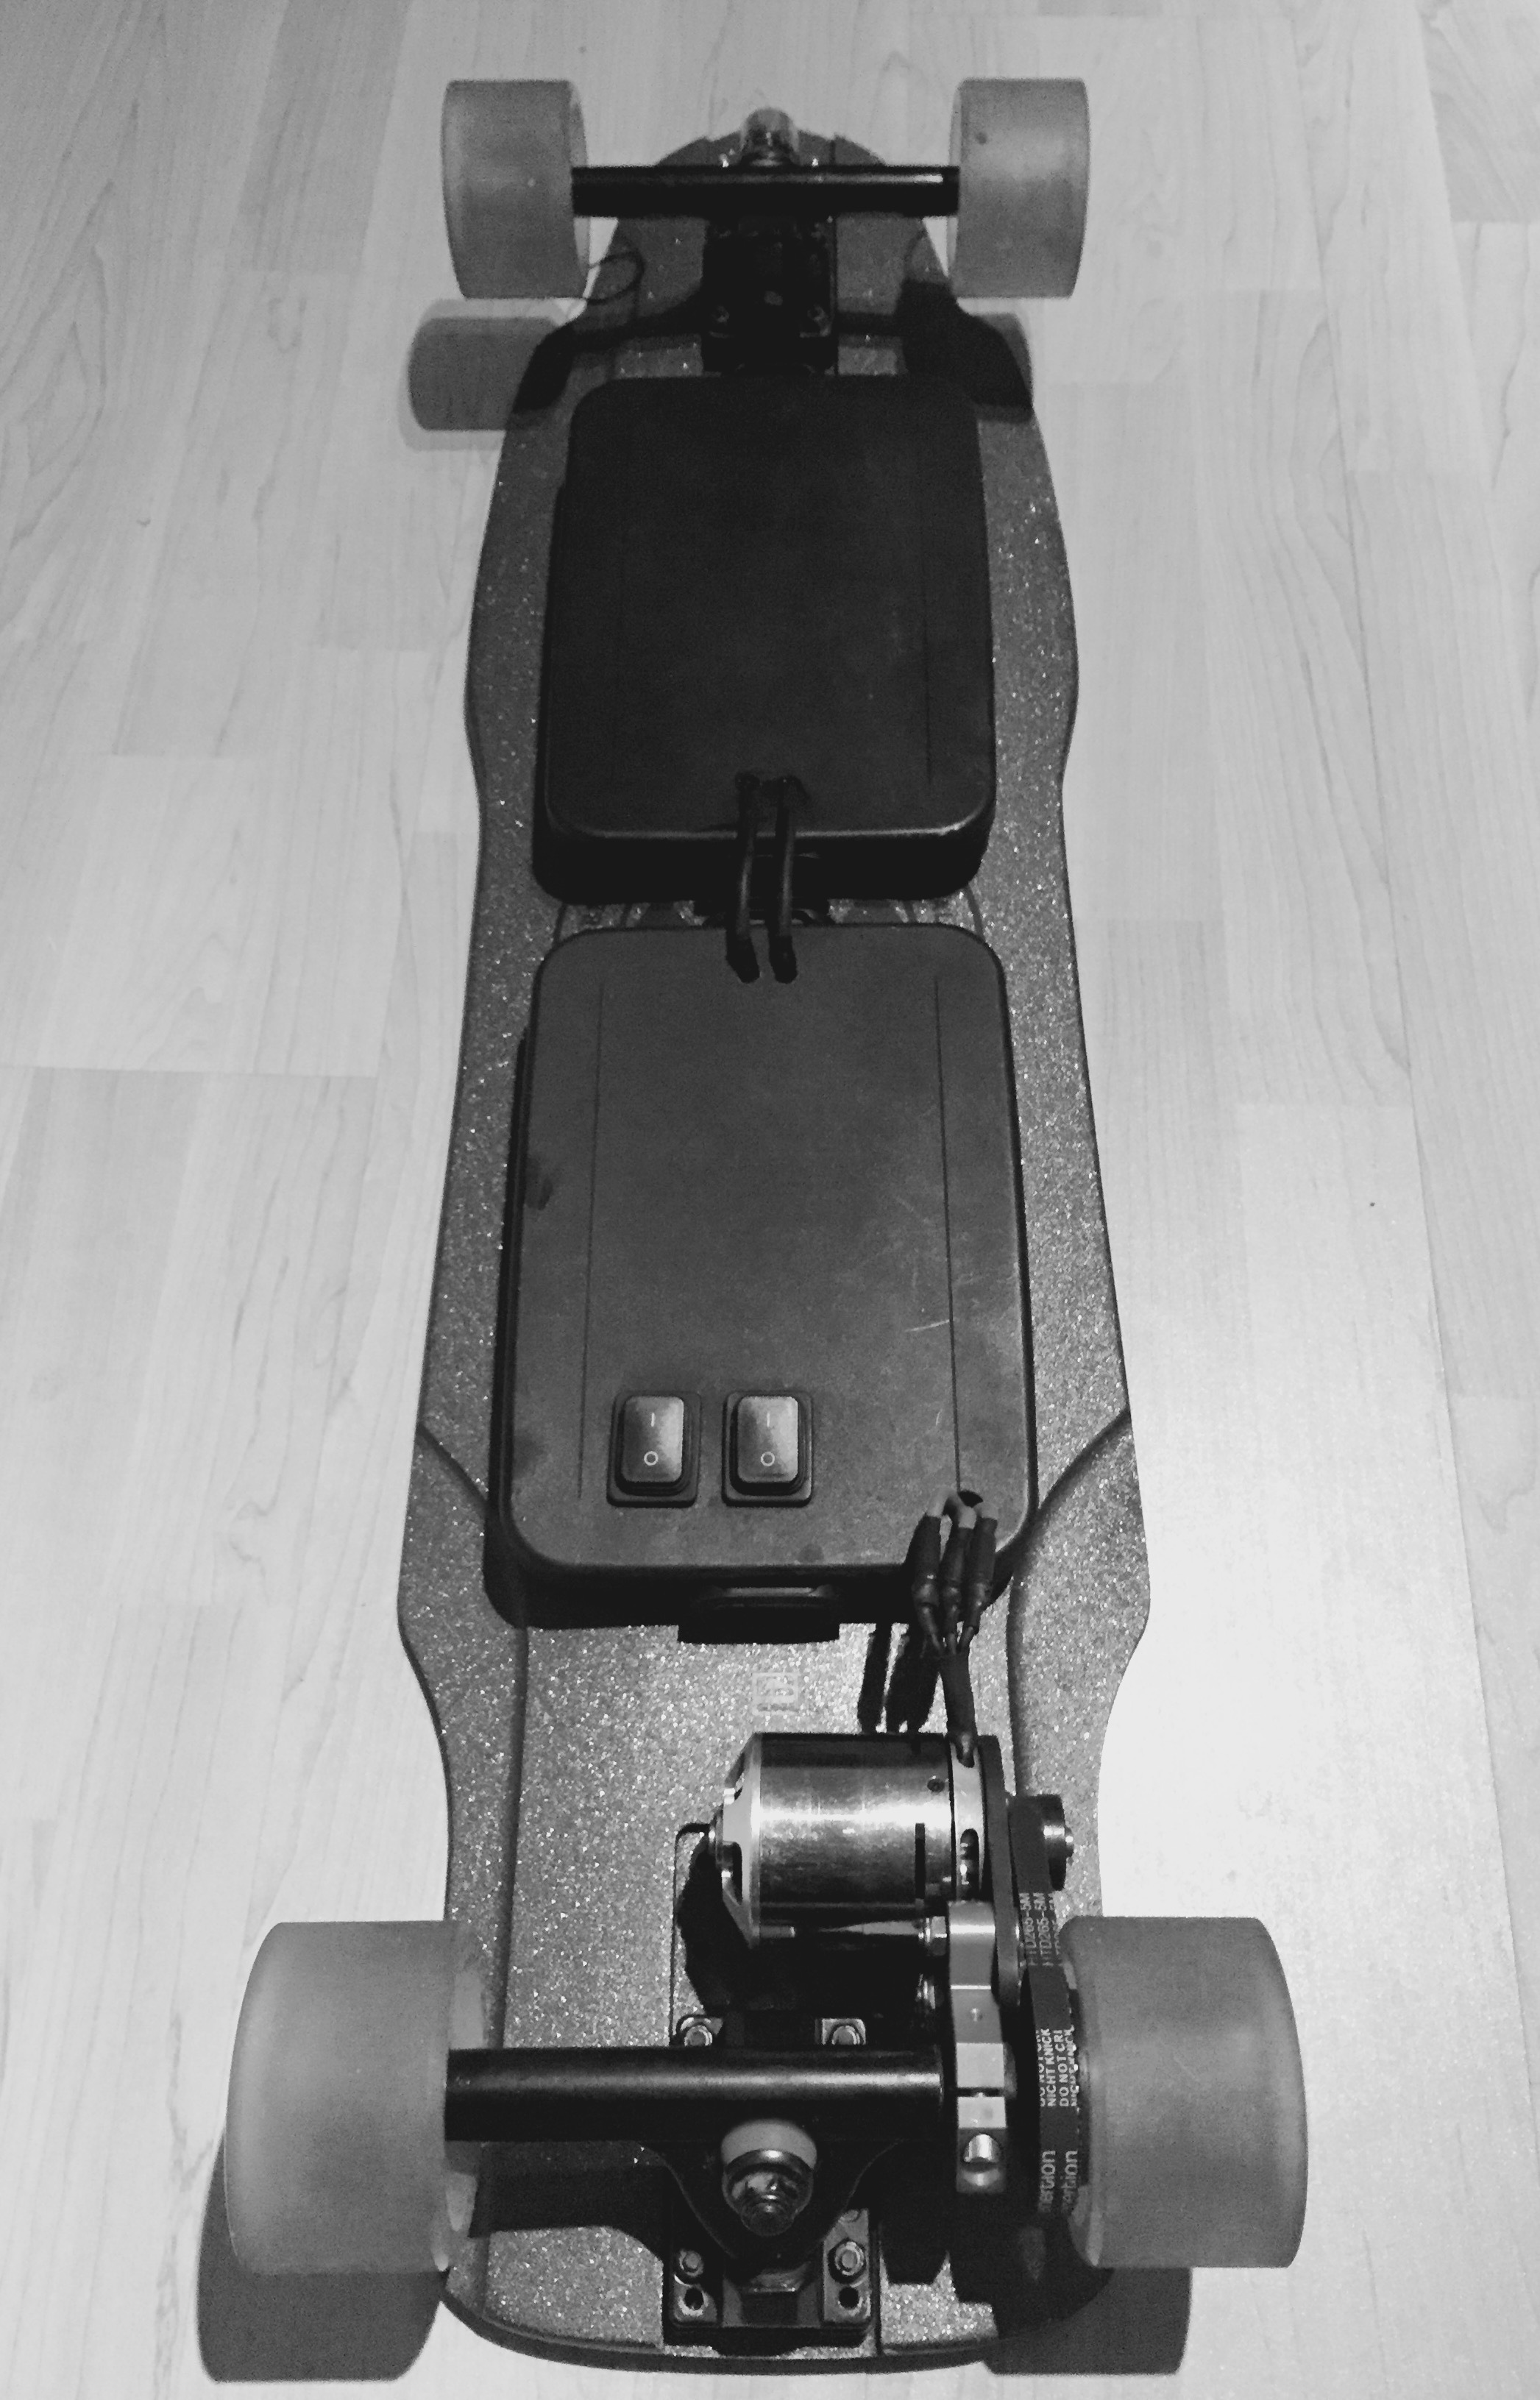
Low top mount deck with alot of ground clearance as the boxes are only 3cm in thickness. Front box contains batteries and the rear box contain electronics and emergency tools.
2 High inrush rocker switch, the middle one to charge the caps and activate SBEC when using Turnigy Sentilon. The left one is for power.
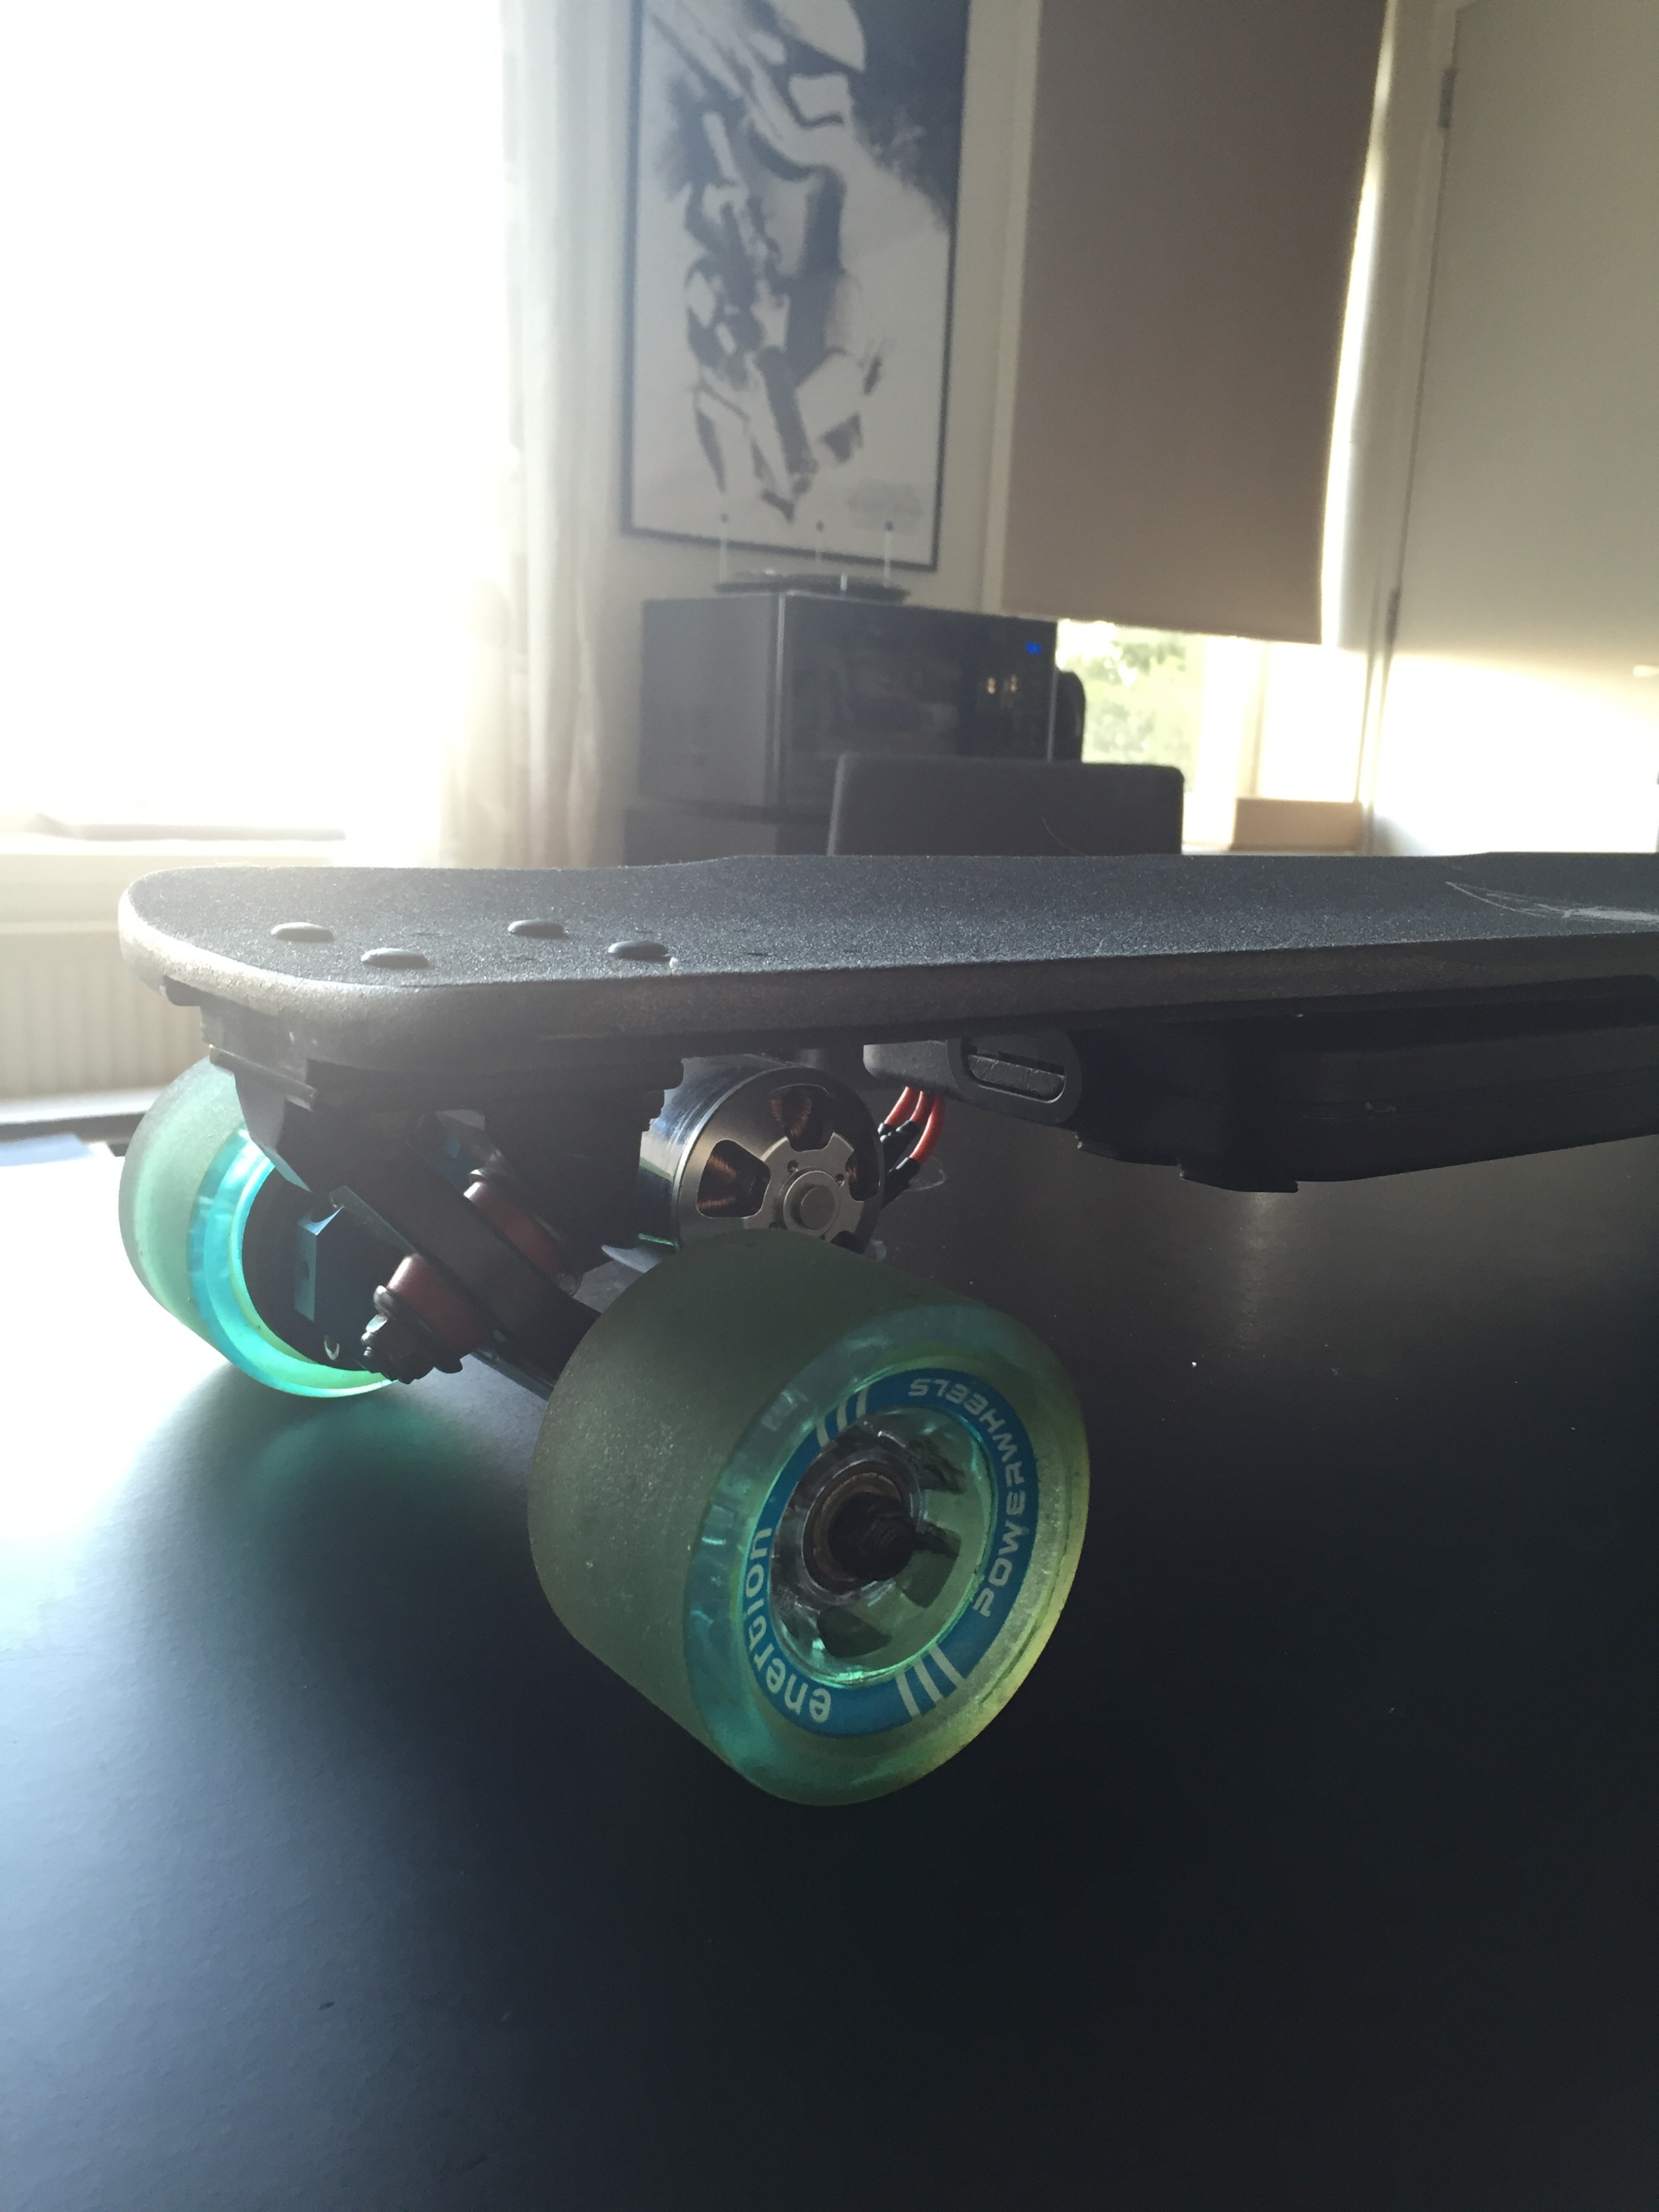
Motor & wheels rear view

Since I reside in the Netherlands (Rotterdam &/ Groningen), I am looking for fellow Dutch builders here. I am not born here, limited with language barriers and knowledge of the countries, it might be quite handy to get in contact to some of you for questions about building eboard, riding, maintenance, the law, etc. Since parts for eboard most likely produced / distributed in US / Australia / China, we might also purchase in bundle together.

Currently I have broken 4.10 VESC (new ones ordered) that I wish to fix, but I am not sure where should I fix it in Europe. Shipping cost to US / Australia is alot and close to getting a new VESC.

I am also trying to get RDW uitkering license to get eBoard for the public road (openbare weg), not quite sure what are the requirements for it. What I know from a local shop is that it was not allowed before because it has no brakes.


*I’ll be uploading more photos soon with inner parts of the board! Let me know if there are information I need to know / missed. Open for comments and suggestion.

8 Likes

Hi @laurnts, I’m in Belgium, so we share the same language. Can’t help you with law issues though. PM me if you want to discuss anything.

1 Like

nice board . i dont have the same patience as yours . i simply hook everything up til it starts to spin . and I’m off on the road . good build !

1 Like

Sick build! Okay major question. Those ESC’s the Turnigy sentilion. are they any good? is it sensored? Is an rpm sensor the same as the 6 sensor wires that are standard?

It looks exactly like product/torqueboards-12s-120a-car-esc-opto-hv/ Also they have pretty much the same stats @laurnts

I wouldn’t get this ESC anymore after testing VESC. I am using it at the moment because my VESC broke down due to unknown shorts. Still looking for the opt to fix it, but I already ordered new ones anyway.

This ESC was recommended by Charles who is an MIT student studying about EV. It has the best low speed (less cogg) for sensorless BLDC. It’s very robust, rock solid and low temperature in operation. The only draw back of this ESC is that it has no SBEC and unadjustable brake. Means either hard brake or no brakes at all (This is a HV ESC not car ESC). This esc also has no hall sensor, but still preferable than those noisy small 6s car esc that has bad startup and loud high pitch brake.

I use the RPM sensor once and connect it to the Ts3t telemetry. Although the ts3t using an optical rpm sensor, I tested and attach the rpm sensor from the Sentilon into the ts3t transmitter module and it works (less accurate).

I would only use this ESC for eBike preferably since bikes has its own mechanical brake.

1 Like

Thanks for the info!

I’ve just updated the complete list of parts I am using for my build. Might be useful for some here who are newbie in building electric longboard (inc my self) :smiley:

did you need to create a keyway on the motor shart? or grind one side?

Good question! I actually don’t have dremmel to flatten one side. I just use hand metal saw to make a wide flat cut that fits for the small bolt that comes from the pulley.

  1. Can u provide some information about the anti spark resistor? I would appreciate to see some pictures of the wiring.
  2. Do you need a bigger switch, don’t you? I think it need to resist about 65A because the motor could draw that amount. Correct me if i am wrong.
  3. I think you made 2 battery packs in series and these two “double packs” parallel, am I right? Hope to hear from you soon.

Here is a diagram of an Anti-Spark Circuit

Then instead of having those banana plug, I replace them with a switch.

The reason why anti-spark is needed because everytime you connect battery packs and ESC capacitors (especially low resistance high discharge packs), the ESC capacitors directly draw so much current to fill them (FYI: capacitors just like a batteries). Without anti-spark you will constantly see and hear those spark everytime you connect your XT60 connectors. In the long run, this would ruin the female and male connectors (melted) from those sparks. Similar to switch, it would destroy the connectors within the switch.

So the diagram uses 50 ohm, I just use 100 ohm. Bigger resistance means limiting the spark existence even more but it took the toll by slowing down charging the capacitors by miliseconds - seconds. So practically you would like to connect the auxiliary connector first (smaller cable with the 100ohm resistor) before connecting the power connector. Since there is this small cable and resistor, the capacitors cannot draw that much power in a very short time. Within miliseconds - seconds the capacitor is fully charged and by then the charges between batteries and ESC capacitor are in balance, thus connecting both power connector would be spark free.

Alright there is something you need to know about this rocker switch, it’s a double polar switch (DPST). That means within 1 switch it has 4 pins instead of 2 pins. That also means you could switch 2 different lights with 1 single physical button.

Since 1 pole could deliver 15A max (I really should be getting the 20A or 30A), I am doubling it to 30A by using all 4 pins (2 poles) together as 1 switch. So the two poles shares the load 15A and 15A.

*See the yellow loop lines connecting both poles. *Special Note: within this photo I am using normal 100ohm resistor not the metalfilm I listed within the description. I like this 100ohm resistor more compared to the small ones because of it has higher resistance from temperature abuse (if you forgot to switch on both switches).
Similar to the principle the bigger diameter of cable (lower AWG) the easier the current flow. Same applies here, the more poles, the easier each poles handle the current.

So that left out with why I am not getting those 20A / 30A switch and instead getting the 15A ones. That is simply because of cosmetics :smiley: But I am doing so also with some underlaying test. If you see or use Enertion SPACE cell / li ion cells, they are very low in c rating, means they could only provide max around 60A. Enertion SPACE cell has the ability to deliver 30A max discharge because theres a fuse that protects it from drawing more. If you ever test the current draw of your longboard with a multimeter, it draws around 3A to roughly 15A and sometimes peaking at 20A. So I am really on the safe side here. I am also trying to avoid motor drawing too much power as it would totally shortened the distance travelled.


[quote="DeathCookies, post:10, topic:1115"] I think you made 2 battery packs in series and these two "double packs" parallel, am I right? Hope to hear from you soon. [/quote] Yes you're right sorry, it's 2S2P. If it's 1S means I have nothing connected in series :smiley:
2 Likes

Thank you very much for your very detailed answer!

This is the overal electronics inside the box. I’ve decided to reverse mount this electronics so I could detach everything from the board. Another 2 good reasons I am doing this is first I don’t really need to glue / bolt any of the electronics to the enclosure incase of maintenance / service as they sit nicely when everything was flipped upside down. The second good reason is I could insert the whole battery pack into a lipo safe bag during charging (Safety First).

This is the close up view of the battery packs. Since I don’t really like to cut short the wire from the batteries, I’ve decided to place them facing each other to be able to fit into the box size. Everything here are almost thight fit and compact.
This is the modified balance charging harness from HobbyKing. It’s being stripped down, cut and resoldered to fit in perfectly inside the box.
This is the overview of the electronics department for the Turnigy Sentilon 100A ESC configuration with the Ts3t Remote (with Telemetry) from HobbyKing. I didn’t attach all of the telemetry cable and sensors due to the telemetry transmitter module there being faulty. I will switch to the VESC - WII nunchuck anyway within couple of weeks, so I didn’t bother fixing this version at the moment.
Since this HV ESC as it’s meant for planes or helicopters, temperature could be a big issue here. Nevertheless, I don’t want any open port within my enclosure as we have alot rainy days in the Netherlands. So I decided to open the ESC and put alot of the PC arctic silver thermal paste for better heat dissipation. The thermal paste works like a charm without short circuiting and it’s literally impossible to desolder any wires on the ESC with 60W solder because of it.
Closer look to the switches here, these are high quality inrush rocker switch with double poles (DPST). That means each single physical switch can switch on and off 2 separate electrical switch at the same time. Each poles can handle 15A current, hence by creating a double U shape loop connecting two poles it’s capable to handle 30A current.

You could also see my 100 ohm resistor anti-spark circuit. This is not the metalfilm one as I described and this is also not the normal 100 ohm resistor. This has bigger diameter to handle the abuse of heat (incase forgot two switch both switches on).

The remaining parts of the setup including remote, power supply and balance charger.
Last but not least, I’ve also carry this complete service kit for long trip. Because this is a DIY longboard, though I make sure that I am making the best setup possible, there always chance that there will be mechanical failure / stress could occur anytime. This toolbox has everything from spare belts, T tool, brush, bolts as well as volt meter. In case all electronics are dead or there is a mechanical failure, I could fix or detach the whole electronics and propulsion drive then push the longboard with ease!

5 Likes

Awesome build! I’m following this thread now…

I’m from Groningen, building a one-off (ollinboardcomapny) with dual drive dual VESC. Project is on hold now because I’m at work for 3 months outside the NL. But when I’m back I’ll hopefully be able to put my deck together and ride the first time.

How about dutch laws of electric vehicles, have you been in contact with the police already? Theoretically it’s illegal to drive an electric skateboard in NL. I’m wondering how your experience is…

@jeroenimo Hi nice to know someone from the Netherlands also building an eBoard!. I am currently living both in Rotterdam and Groningen lately (just moved to Groningen few days ago).

To be honest it’s very shady about electric longboards law here. I’ve ride it one or two times in front of the police and they just look at you and not stopping or asking questions. In Rotterdam is actually alot more scarier because of this “hoverboard” bans (500 euro boete), no one is riding any sort of those board. I believe as long as you ride it within normal push cruising speed, no one will actually notice. Everytime i see those cops, I’ve just tried to hide my remote and push my board once in a while :smiley:

I have tried to reach the police via email but no respond. Yet I also contacted RDW, but their response through email are slow. Maybe I should call them. I’ve also check what they are doing and small part of their price list, it could be quite expensive. But not sure if those are applicable to individuals as I am not trying to manufacture / sales. RDW it’s self is a private company (I believe so according to their description) and their vehicle regulation are EU approval / almost worldwide. So if you have RDW certification, you can ride this board literally everywhere in the world.

Yes, I’m assuming there is more people building and playing with e-boards. Law is a shady grey area in NL as far as I know, EV’s are allowed as long as they are “assisted” and not fully powered, and above 25KM/h they have to cut off assisting the driver.

It’s off course doubtful whenever you are pushing and/or you are fully electrically propelled forward. If a judge has to decide I’m pretty sure a e-board is electric vehicle that will need registration and insurance. This having made the board yourself it will be hard to get a RDW acknowledgement for it. (type approval is a long expensive and tedious process)

Hopefully the law changes, but that I don’t see in the near future. Nonetheless I’m hoping to make a lot of safe, none police encounter, hassle free miles on my e-board.

@jeroenimo I actually just called RDW and they send me back to this email department so I could further explain my build. They also said that I have to have the complete build ready before testing and not as prototype yet.

However I am now asking via email mentioning that I am a student doing research on interaction design and innovation. The project would be building a small portable electrical vehicle in a form of longboard. Then I asked them if I could get an approval for open street test prototype product for research purpose and not for manufacturing or sales. Lets wait and see what they reply would be :smiley:

The only way to progress is to push the boundaries so yeah, riding as much as possible and getting caught doing so is part of the process ! I think you’re right regarding a home-made board, I too seriously doubt we will ever be able to legally ride a DIY e-board due to missing type approval and CE compliance.

That would mean you will have to have a license plate on your e-board, when approval regulations are met. I doubt it, but it would for sure be cool.

I’m pretty sure segway paid quiet some money for type approval, and I’m not sure if a single person will have enough funds to get a specific type approval for a home build board.

But don’t get me wrong, something should be done!

e-boards are the future, just as anything that is emission free, gets people from A to B in a nice, fast, and safe way. It wondered me why these segway things have not been more popular, but I would not want to be seen on one of these ugly things ;-). Bicycles are still the way to go in NL for “normal people”, and that will remain for a long time I expect…

@trbt555 & @jeroenimo Well lets see how far I could get this into. I’ve just sent them a more complete email with some tech specs regarding the board. I’ve mentioned VESC and RC motors. I also explained it’s a research project, similar to TU Delft student building solar cars. RDW also appreciate innovative industries, so we have abit of gap here to exploit :smiley:

Anyway first goal:

  1. Get my own board a license (prototype / research / legal moped / any legal category).
  2. If I could, then lets see about manufacturing or licensing parts.

If fail:

  1. Lets see if I could get any of the parts VESC &/ Motor &/ Batteries &/ Remote CE compliance
  2. If still fail… YOLO!

If it’s too expensive / not possible, at least we tried and we know the price. We also know what category of vehicle it should be / they will make new ones.

But if succeed, we revolutionised portable personal electric vehicle. Well said! Getting approval for each parts of the board would be the gateway to start. Open new possibilities to another DIY project and expanding. If it’s only for a particular product / brand, it’s still not doing any good, end up like Segway.