Hey awesome People!
After what feels like ages my build is finally (almost) complete! ![]()
Its rideable, but I am missing some bullet connectors to get the second motor running as well. In Korea some stuff is more difficult to get than you would think.
I will try to make this as comprehensive as possible, because these build threads helped me the most in doing my own build.
This is an EU build (even though the board is now in Korea), so all the major parts I got are actually available through european vendors.
First things first, pre assembly picture:
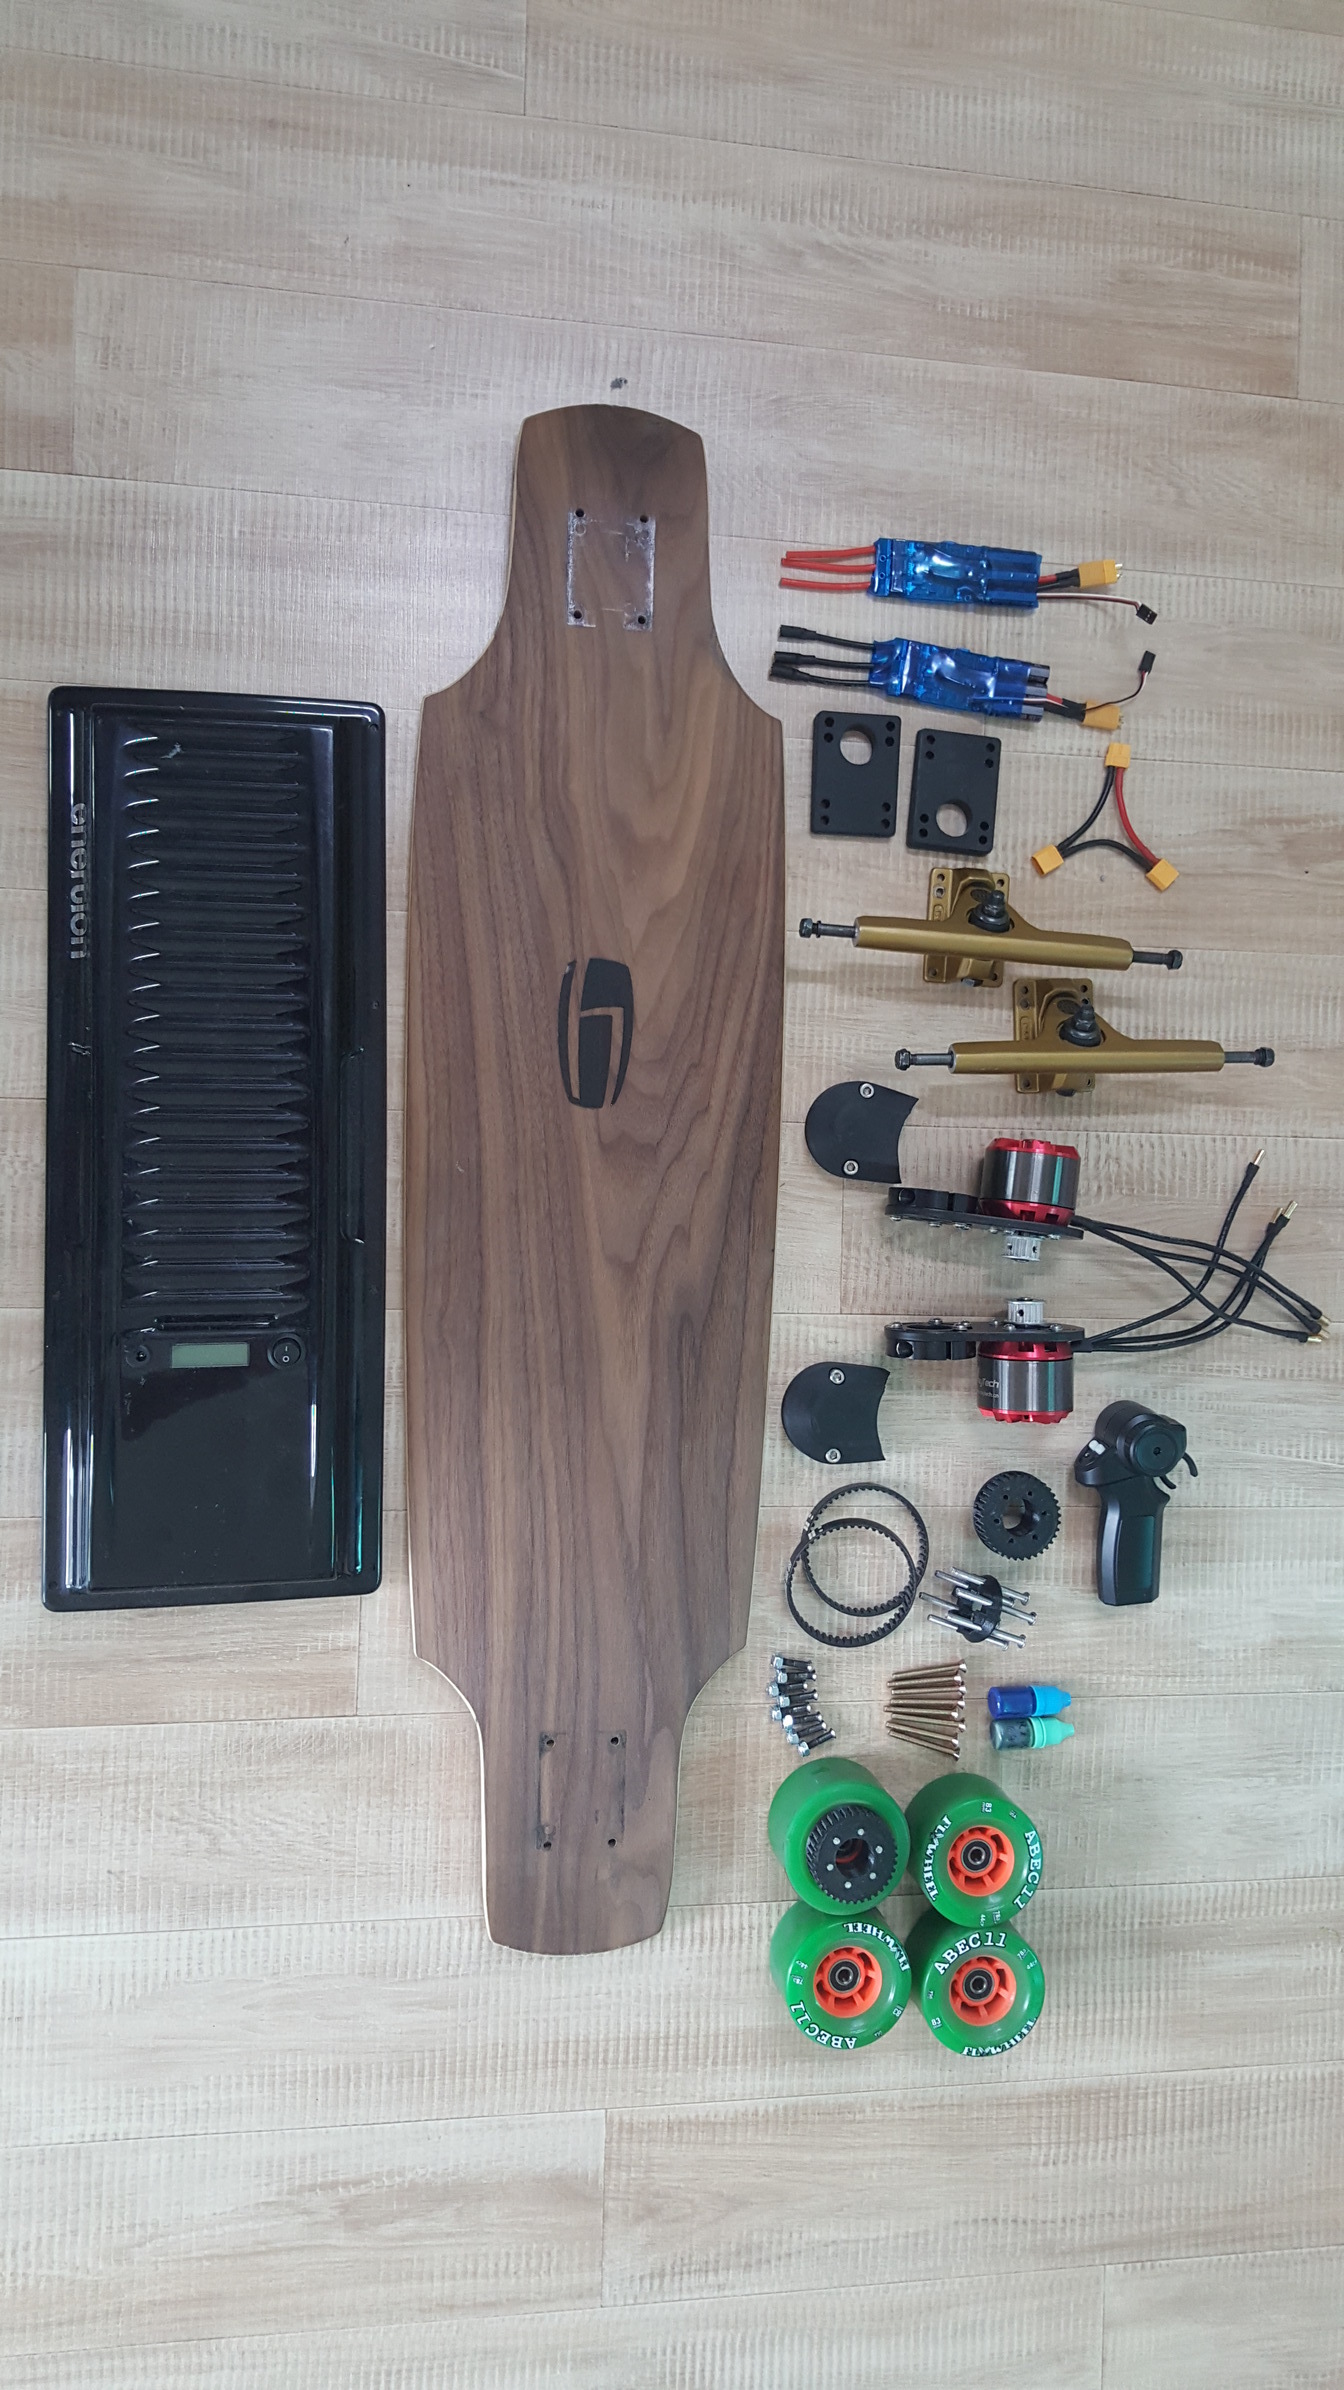
Now the parts list (with links where possible):
- Deck: Olson&Hekmati Basic FD100 ~130€ (These guys are actually a local company out of Mainz, Germany, absolutely dig their stuff)
- Wheels + Bearings: ABEC 11 Flywheel 83mm + Bones Bearings Super Red ~80€ + 35€
- Trucks: Caliber II 50° ~50€ (slightly used from Ebay new ~70€
- Mounts: Stealth Motor Mounts from @WSB ~100€
- Pulleys: Wheel- and Motorpulley + Belts (x 4) from @Idea ~70€
- Motors: Maytech 6355 190Kv (x 2) ~205€
- Speed Controller: VESC (x 2) from esk8.de ~340€
- Remote: 2.4GHz Mini Remote from esk8.de ~55€ (unfortunately esk8.de uses some weird shop system that doesn’t give you links to the products directly, so you have to navigate to them from the main page)
- Battery (+ Enclosure, Switch, Battery control): SPACE Cell Pro 3 ~280€ (this actually ships from europe, so no import tax!)
- Misc: Nuts, Screws, Loctide, Truck Risers, Bullet Connectors bought from random stores in Korea ~30€
This brings the total cost to about 1395€
Comments about part acquisition process:
- Best experience with purchase from electric builders users, they were helpful, had good prices and shipped fast or let me know if there was a delay.
- “Normal” experience with most of the big name shops, protoboards, evolve, esk8.de they all shipped on time and prices are what they are here in europe.
- Worst experience with enertion, I bought the space cell because it was a good value in the sale, considering that it already comes with an enclosure, battery management system and switch. But the shipping was awful, it took them 3 weeks just to get the item shipped and then one more week for it to actually arrive, ridiculous if you ask me. Considering they are an actual company doing this they just were not up to handle this in a timely manner. If we would be talking about anything else than e-skate parts people would never order there again…
- Special shoutout to @elkick from esk8.de, Service has been exceptional here, he even prepared some cables for me free of charge.
Problems in the building phase:
- The drivetrain has given me the most grief, it felt like a million different little parts, washers, circlips, loctide etc, were needed that I didnt anticipate. Now this might have been not such a big problem in europe, but here in Korea its actually kind of a challenge to get some of these parts.
- I never soldered before and I didn’t want to start now with parts that are this expensive, so I actually found an RC store here in Korea that did the soldering job on the motors (bullet connectors to motor wires) I paid like 3€ for 3 connectors and I am pretty happy with that.
- The RC store only had these three bullet connectors and told me it takes a month to order new ones from china, thats why I am currently only running a single motor setup. Still waiting for the bullet connectors, which so far I didn’t find anywhere else (not even online lol).
- This might be a minor problem for most but it was super inconvenient for me: Mini USB connection on the VESC. Why on earth would you put a MINI USB connector on that thing instead of a MICRO or even USB C connection?? I probably have like 6 of these cables lying around at home, but didn’t bring any to Korea (why would I, nothing uses it anymore). So I actually spend the better part of the afternoon trying to find a MINI USB cable, none of the stores had them because it is an old format. Baffled me.
Learnings:
- So i choose the “traditional” drive train over hub motors because I just can’t imagine how the thin urethane around these hubs can actually deliver a similar ride experience as a full blown longboard wheel. There is just no way. Now after the whole assembly process, I would probably consider it. Just for ease of use, it seems like the nicest thing to just plug in the motors and go, without any of that lengthy assembly and making sure everything is secured with loctide, bringing it in the right position, all that. If you’ve got the coin Carvon seem like an amazing solution, hubs with normal wheels, perfect! I actually considered the V2.5, but the price (including the ridiculous import tax into europe) is just too damn high. I hope Jerry can get his stuff so popular that he gets an distributor for europe. That would make things waaaay easier.
- A single motor setup is great if you are not planning on going up ANY sort of hill. Now I am actually a man grown and bring 200lbs on the scale, so maybe if you’re 15 or don’t lift you can also manage to get up some slight hills with a single motor setup. Maybe with 12s it gets a bit better, but with the 10s SPACE Cell I am really only going up slight inclines if I have a long way to gain some speed beforehand. Now Seoul is pretty hilly, so I hope the new bullet connectors are coming in fast so I can actually get the second motor running.
- As a last thing I would like to bring up the potential of buying a premade board. I think there is more and more premade solutions popping up that are actually decent, and considering the amount of work I put into this project, including massive amounts of research, I would probably not built a second one. That might be an unpopular opinion, but really if your goal is just to ride an electric skateboard, it doesnt really make sense to built it yourself. If you are looking for a challenge or just love to built stuff than great, go for it. But here is why I wouldn’t built it myself again:
- Price is about the same as premade boards, but you’re getting none of the warranty or customer service (repairs etc.)
- It takes a LOOONG time to get all the parts and then you actually have to take significant time out of your busy schedule to built that thing
- Getting to choose parts from all kinds of different suppliers is great because you can customise your board, but you really have to pay attention that all parts fit together well. Just because parts actually fit together doesn’t mean they run in a nice kind of “harmony”. If you look at companies like boosted boards, they actually spend a lot of time figuring out which parts harmonise together well.
- I just want to ride RIGHT NOW and don’t worry about any setup, break intensity or stuff breaking.
This is in no way supposed to weaken the accomplishments of this amazing community. It is more a personal learning for me. I enjoyed building my board for the most part but I am probably just not “that kind of guy” that would do this more than once.
Now that this is said, I am actually still having problems with my built and hope you can help me. I have an alignment issue with my belt. I made a little video explaining what is happening and hope somebody has a solution. Here it goes.

Thanks for sharing you knowledge and help so openly without this community I couldn’t have done it. Stay awesome!
All of you have a wonderful day!
