Hello dear reader,
If you’re working on your own first build please don’t hestistate to ask me any question you might have. I’ll do my very best to answer it correctly (and if I don’t know it, surely someone in the community does). If you’ve already build multiple e-boards then don’t hesitate to tell me what’s on your mind, so i can get a tad bit closer towards perfection. 
Components list
- Motor : SK3 245Kv - Link
- Battery : 2x Zippy Lipo 5000mah 3s 20c - Link
- ESC : Vesc by Enertion - Link
- Motor mount : Single motor mount by Enertion - Link
-
Pulley : Old enertion aliminium system - Not sold anymore
- 15t motor pulley
- 36t wheel pulley
- 12mm belt
- Switch : Toggle switch DPDT 20ADC 30VDC - Link
- Led : Powerled blue 3W 1A/3,5V - Link
- Deck : 4 layers of berch wood at 3mm thick
-
Trucks, Wheels : Whole set - Link
- Trucks : brand unknown, 92A Rubber, Inverted axle
- Wheels : brand unknown, 70mm 78a
- Bearings : Abec 7
-
Controller : Old R/C car controller i had laying around from a Kyosho nitro car (my hobby before ESK-8
 ) .
) .
##Pictures

##Notes
I wanted to create a DIY E-board, w/o it looking DIY. Thus I was certain that I’d be making my own deck so I could run the battery wires from the front to the back though the deck itself. Bare with me, as I don’t have any experience in wood-working or such. So i just used a jigsaw to cut-out a cable channel on 2 sheets of the birch wood. Applied a bunch of wood glue and clamped the sheets together to let them rest and harden for 24h.
Once they were stuck together I drew up my design on the wood and again, with my jigsaw i cut it out. I would have preferred to use one of those wood disc-saws but sadly the jigsaw was the only sawing tool I have laying around at home. While sawing I made sure I followed a half centimeter away of the lines i drew on the wood previously. Then I just used a wood file to narrow down the gap. After this I used an electric sander to smoothen out everything. Finally added my Prints on the wood, again letting it rest, this time just overnight. Next day I added some layers of protective paint.
Since the deck was finished I could start working on the electronics.
This is how i set everything up, not that much to it though.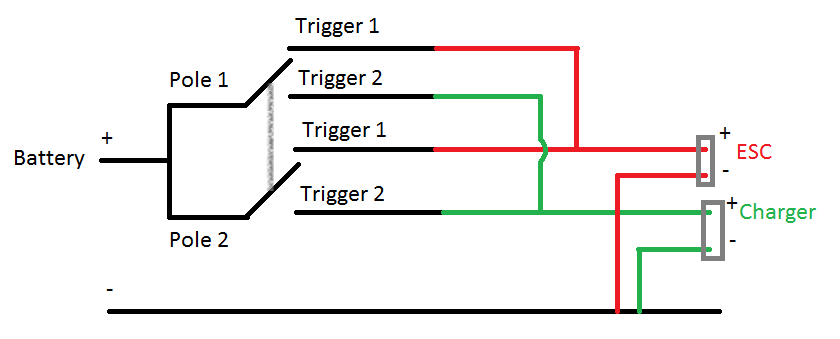
Now that I have the electronics finished, I had the idea of homuch space etc everything would take in. So I started designing the battery enclosure, send the STL to my local 3DHub guy and got the print the next week. Went to get me some plexiglass and sew out the required form. added some screw inserts to my deck and putted everything together.
Finally The Vesc arrived after 6 months of waiting, lmao (no disrespect to Enertion, @onloop and @carl.1 kept me updated all the way) . Those 6 months meant that I had plenty of time to read up on the vesc and it’s BLDC tool.When It did arrive, it was just a matter of hooking everything up and boom I was on my first test ride .
Currently I have some exams comming up so I’ve put the project on a hold. Hope to start making the vesc enclosure
begin September.
##Log Make deck Wire electronics Make battery enclosure Config Vesc […] Make Vesc & Receiver enclosure […] Make smaller remote […] Install better wheels


 .
.