BUILDLOG: 12s4p Li-Ion 80A 10400mAh (Sony18650VTC5A) battery. Part 2

Hello everyone!

The construction of the battery is almost complete, unfortunately I had to make a new topic as I can no longer edit the old one (which is only 3 months old)

I’m back, and I’m tired of running my Multistar LiPo’s to the point of failure. (3*4S 10000mAh 10C) After convincing myself to justify the costs, I ended up pulling the trigger to make myself a sweet 12s4p battery pack. I’ll also be making and installing a sparkswitch.

Here are the parts thus far:

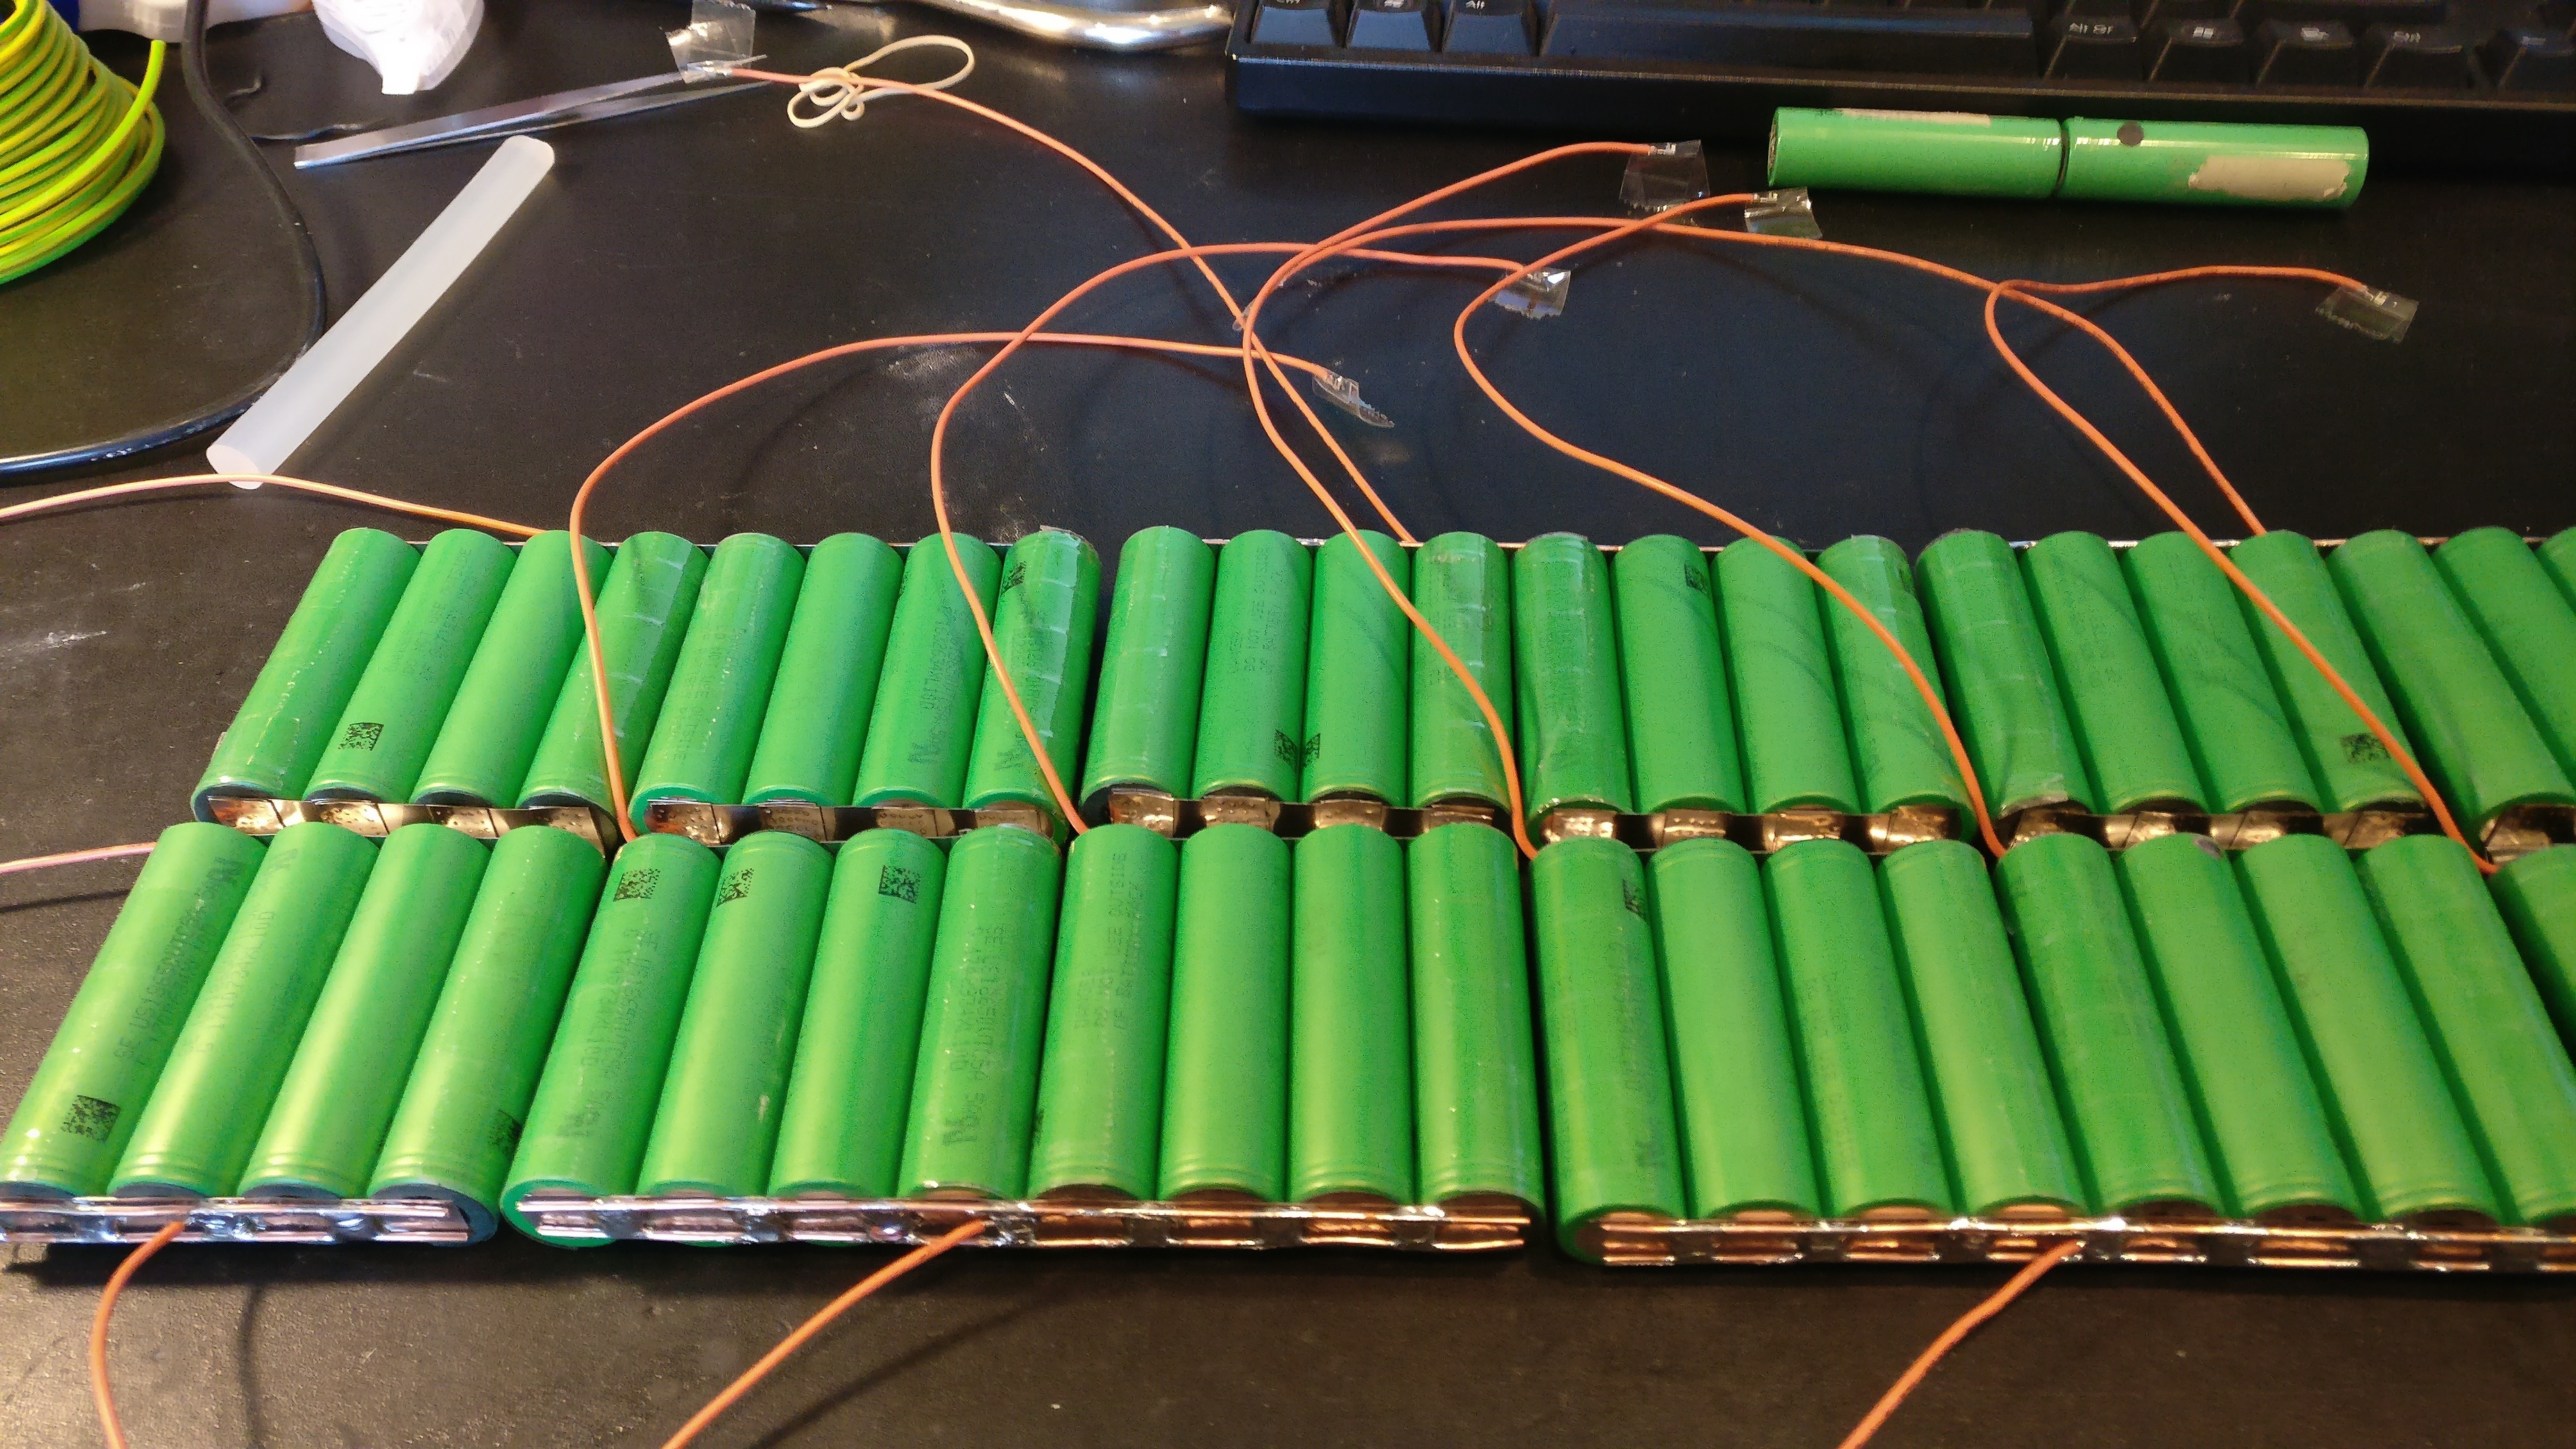
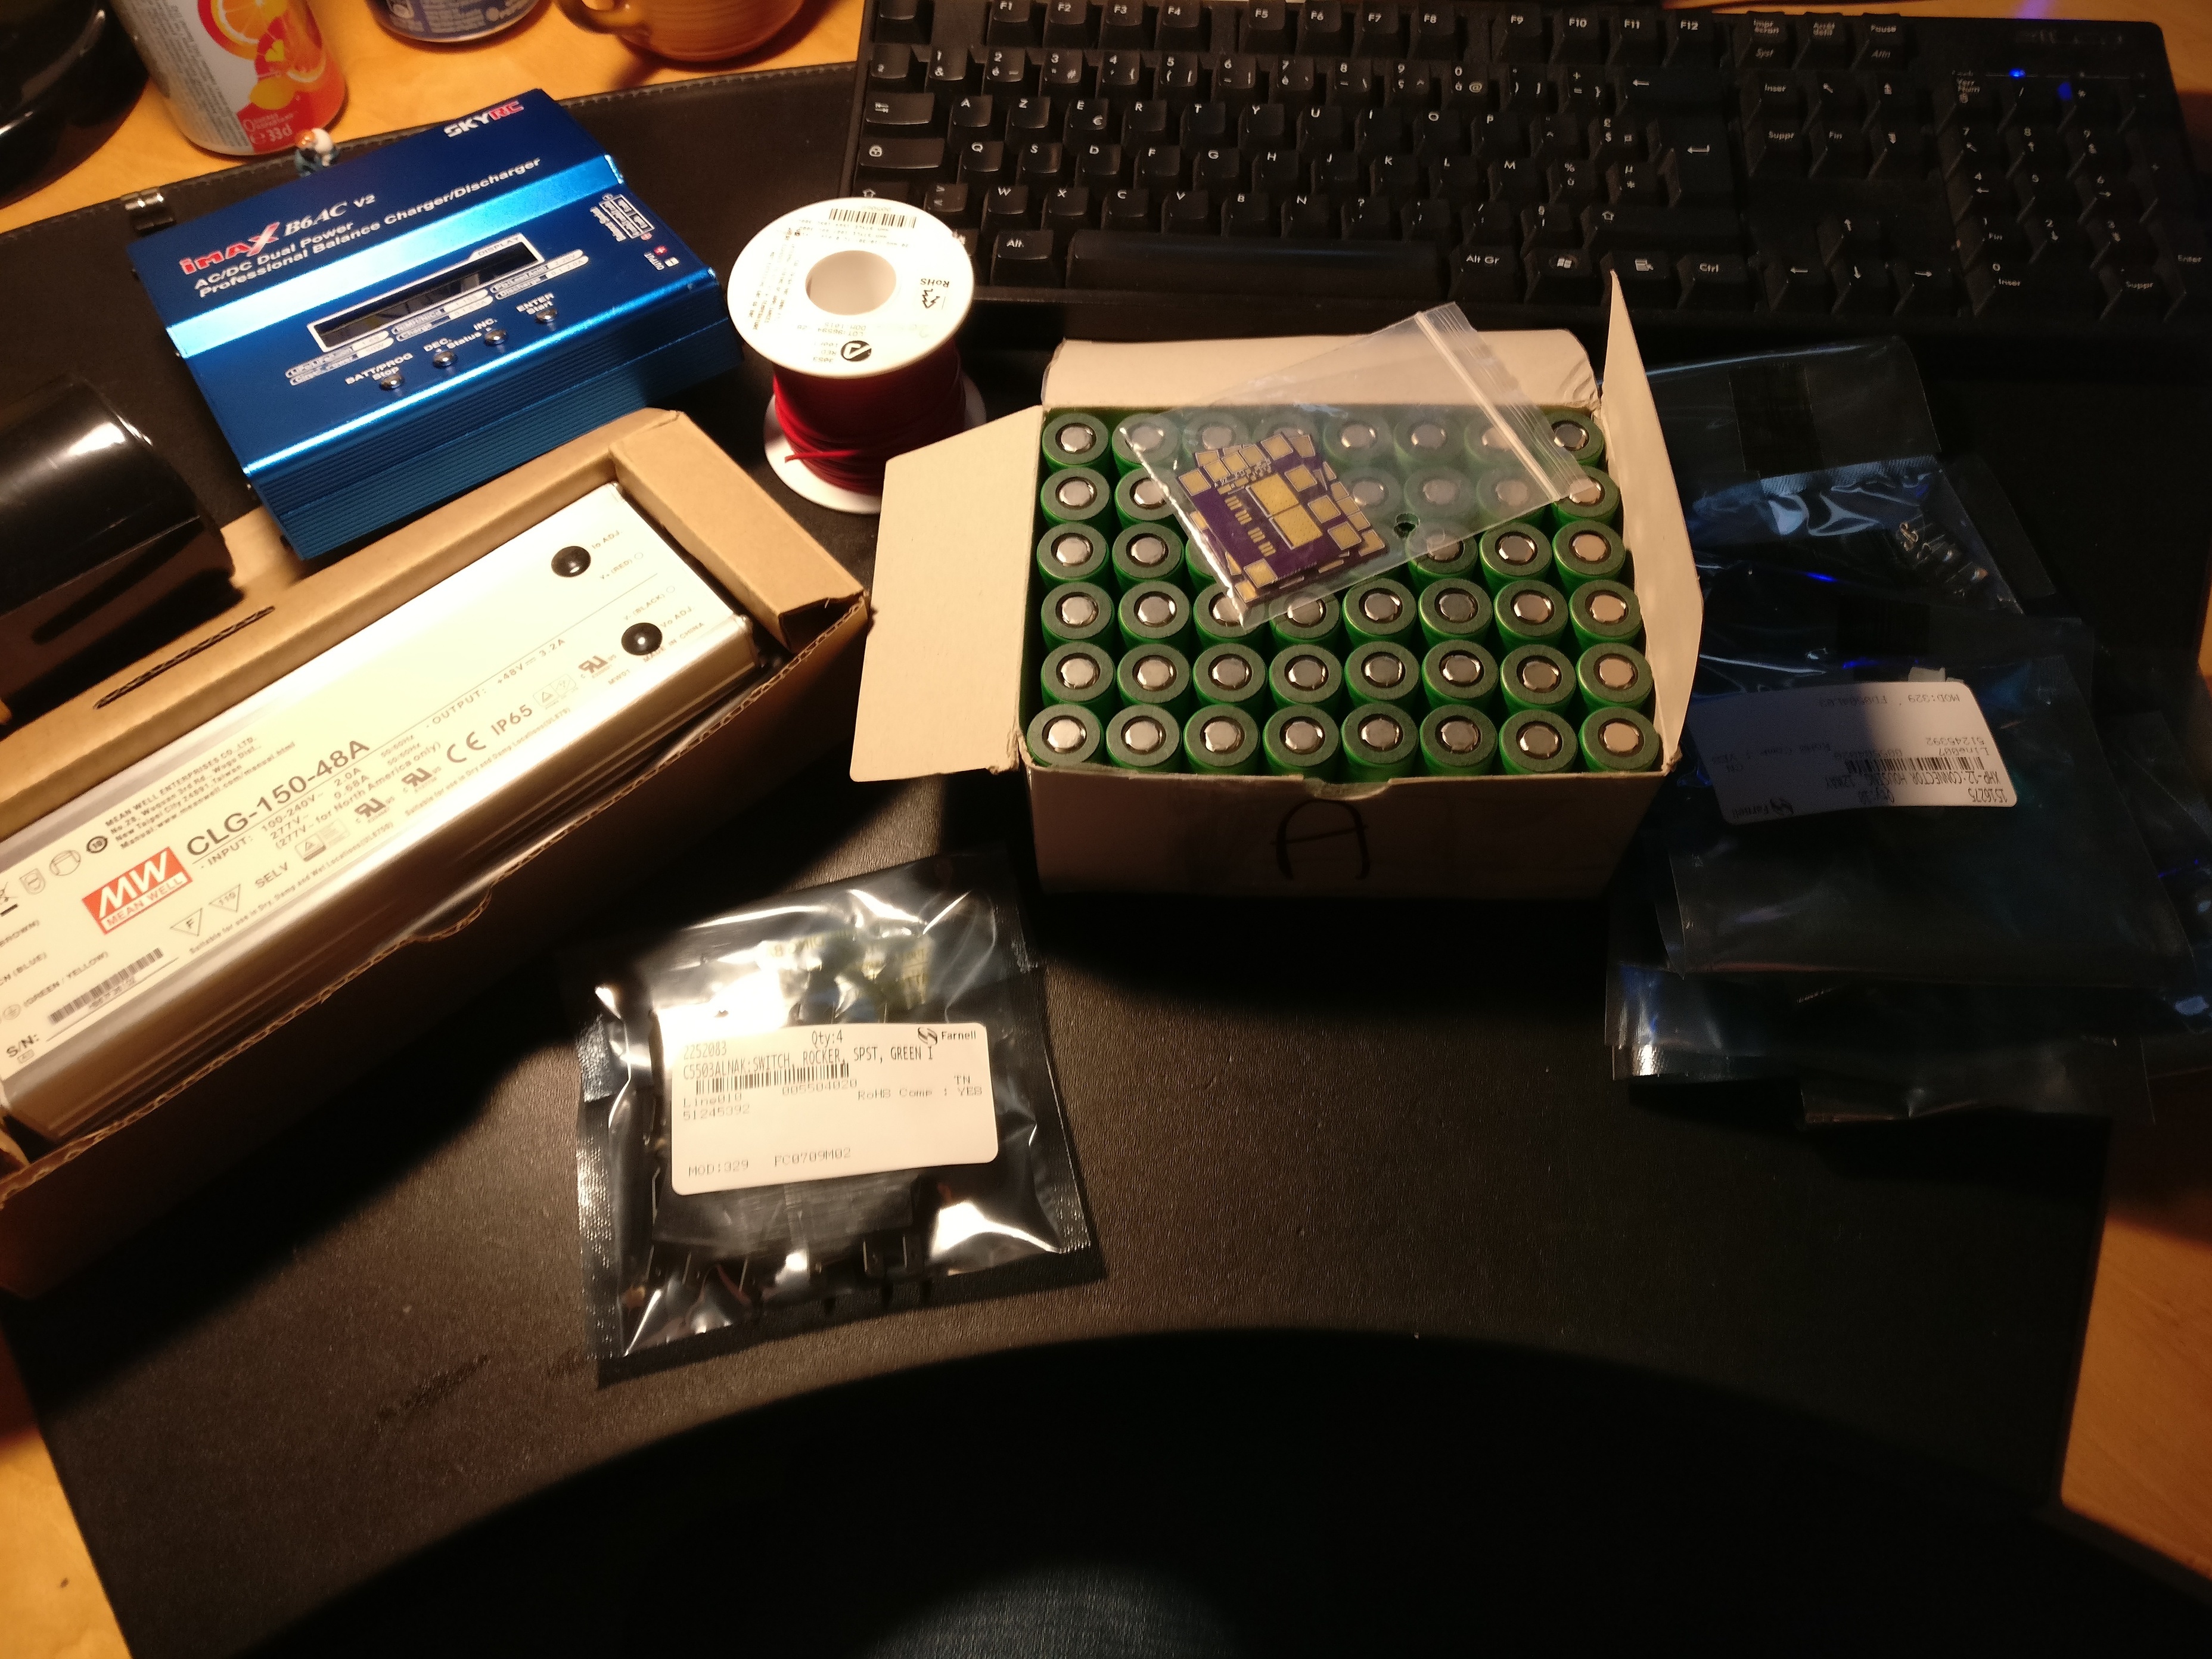
  • 48 x €5,05: US18650VTC5A Sony Cells (35A/2600mAh) (nkon.nl)
  • 13 x €2,8 : 10mmx0.15mm Pure nickel strip (nkon.nl)
  • €4,60: 50 pcs of battery holders. I’ll probably have to file down the tabs to accomodate the 10mm nickel strips. I didn’t end up using them, maybe for another project.
  • €80: BMS 12S 80A. When charging I’ll supply it with a (4,1*12)V power supply to extend the life of the cells.
  • 10€: 3 Antispark chaka/vedder 1.4 boards.
  • 15,5€: PVC Heatshrink aliexpress.
  • ~€20: Parts for 3 antispark boards from Farnell + miscellaneous.
  • €63: CLG-150-48A: is normally 48V but I found out it can be adjusted up to 56V.
  • €10: Voltage/capacity display.

I’ll be spotwelding batteries to save the cells from getting to hot. For that I purchased a car battery and a DIY spotwelder of which I’m very satisfied.

I’m excited! Hopefully this will help others as well Dries

This is the spotwelder and battery that I’ll be using to assemble the cells:

3 Likes

Progress;

So a couple of days ago I finally got an adequate car battery to run the spotwelder. I had to return the first one because it arrived with a broken cell and got stuck on 10.58V (it got beaten up during transport). The battery I’m using is a VARTA B18 which is nice and compact but delivers alot (440A) of current.

I first charged all the cells to about 4.08V to see if they are all good and hold a charge. No problems there.

As I’m building a 12s4p and each battery can deliver 20A (They’re rated for 30A according to sony, but alot of reviews said that 20A is a more accurate limit), I went with a 80A BMS. Why 80A and 4p? Well, I wanted to make this battery upgrade-proof, so that I can one day step up to a dual hub setup if I want to. According to the Carvon guy (my dream hubs), 80A was plenty for a dual hub setup.

By doing some research I found out that the 10mm*0.15mm pure nickel strips can safely carry about 10A. That’s why I decided to reinforce the outer serial connections with 2 copper wires of 1.5mm². The inner serial connections are made with a double layer of nickel strips, for a total of 8 nickel connections, as you’ll see in the pictures.

I did the pretinning before the spotwelding, this saves the cells of being exposed to alot of heat. I also placed the solder blobs in between the cells, for the same reason.

The inner serial and parallell connections. The battery will be folded open at the end of the process.

The outer serial connections:

The inner serial connections (4*2 strips) and the parallell connections (1 nickel strip should be plenty as there won’t be going alot of current from one battery into the other). The balance leads were also soldered into place at this stage. Please, don’t forget to tape of the ends of the balance leads, even though you think you’ll be carefull enough :stuck_out_tongue: , trust me haha.

Soldering the copper wire to reinforce the serial connections on the outside and to allow enough current to pass through.

Now comes the fun part, folding open the battery. It’s easier if you decide to hotglue the cells to each other before doing this:

Alot of hotglue. This doesn’t really damage the cells, low temperatures and quick cooldown. I also made sure to alternate between cells to make sure I don’t heat up individual cells too long.

At the top and bottom I placed a piece of 4mm corrugated soft plastic/foam. This’ll protect the cells a bit against scratches.

I decided not to install the BMS before shrinkwrapping it. That way I can always access the essentials if I want to check the connections and make any future troubleshooting alot easier.

I was amazed to see that the 12s4p was alot smaller then I anticipated.

9 Likes

Reserved for final updates: assembly of the sparkswitch; mounting of the sparkswitch/chargingport/display

Awesome build man. I really like the homemade spot welder. Any links to the kit you bought? Or did you make it?

Didn’t make it myself, it’s a kit that’s gaining popularity on endlesssphere. But I see the price went up after the second batch. It’s a very complete kit though. I also see that he now charges extra for the welding leads etc…

I made the suggestion to him to add a schotkky diode. A suggestion I read over at endlessphere to limit the avalanche currents. He now seems to offer this as an option as well. Personally I didn’t use them (and had no problems), but if you tend to improve the reliability even further then feel free to add that.

1 Like

Can I ask how exactly you completed this kit with the foot pedal? I am thinking of buying this kit as well but I want as much info as possible. Any other info about what settings you use and anything else would be great as well.

I did exactly as the tindie link said. He provides a pdf that contains all the different steps. I think there’s even a video on how he uses it. You just need a battery and footswitch. The footswitch is just a contact that temporarily closes.

The settings themselves, I set it up to about 10ms, that was plenty for proper welds.

So I need to solder a 12v (3s) battery to the 12v and GND places on the board? Where exactly does the foot switch connect? Which footswitch do you use and what is your exact setup? Really sorry for these stupid questions. Also I couldn’t find the PDF download. I looked but one place said I needed to have a ‘premium’ membership to download.

No problem. Yes you’ll need an extra 12V psu (like a spare router psu) to power the arduino, you can do this also by battery.

The datasheet is on the tindie page, it’s at the bottom right: ‘datasheet’.

There is a jst-2pin header already in place to connect to the footswitch. You’ll also get the female header that you have to solder to the footswitch you bought.

Just a 2dollar footswitch from aliexpress.

So I would just solder the included female wire to the plus and minus of this foot switch then connect it? And how exactly do you change the milliseconds? Just push the stick button? One last thing, the welder turns on when you connect the 3s battery correct?

i built mine from scratch and got components from Mouser. I actually used Kaeptnbalu’s code vs the original from github since he had some improvements.

I’m curious which mosfets he uses. There are the original ones recommended on ES, and a slightly more $ option that was supposed to be more durable. I got the later ones. IIRC it was about $60 in parts… so he either got a better deal from quantity discount, or maybe the cheaper mosfets? the 1324 FETs were the upgraded ones i got.

Recommend the “Diode Set” he sells as kit for 7$ - it will prevent the 100’ish millisecond avalanche current from damaging your FETs. Good $ to prevent having to replace all the FETs when one fails (you replace all at the same time even if only one fails).

Read up on the Endless-Sphere thread - tons of good info!

HTH - GL!

I know some folks have had luck w/ super high output Lipo’s - but the original is intended to be powered by a car / lead-acid battery not lipo. I’d stick to what works as it makes a big difference from what i recall.

Re-read what you wrote - i think you are simply asking about powering the arduino to control it - i just pulled the power from the car battery as well, but you could use a separate 3s lipo (i think it takes 7-12v).

1 Like

@sl33py But the arduino needs to be powered by another 12V source (which is what he was talking about). You can connect the arduino to the car battery as well, but as the voltage drops when the weld is made, I’m not sure if that will affect the arduino. That’s why I suggest running the arduino from a 12V(3s) lipo or a wallpsu.

@Smorto Yes, that’s correct. I used this one, even cheaper: https://nl.aliexpress.com/item/THGS-SPDT-Nonslip-Metal-Momentary-Electric-Power-Foot-Pedal-Switch/32719602425.html?spm=2114.13010608.0.0.s0oQBG

I really suggest that you please read that datasheet and watch his video, it explains most of your questions. He explains how you just increase the timing by adjusting a potentiometer, the timing is displayed on a display. The welder turns on if you power the arduino with the external 12V source. The welder welds if you press the pedal and have a car battery connected. Can’t go wrong.

1 Like

Awesome thanks a ton for the help. I will have to go out and buy the 3s battery as well, any specific Mah or C rating necessary? If it takes almost no power would a simple 9v battery work (almost certainly not but its worth a shot). Either way it’s still cheaper than buying a 200+ dollar spot welder from china.

Great post, I’m gearing up to make one and you’ve made it much easier for me with something to follow. Cheers!

No problem!

Yeah maybe a 9V battery might work, maybe you can find some info on that. It’s just to run the arduino and display, so it’ll probably just use a few mA (so any battery wof the right voltage will be plenty).

A 9v has around 500 mah, do you think that would work?

Not sure, depends if an arduino can run of a 9V battery. Worth a shot. The mAh isn’t really that important, because the arduino uses negligible currents.

I have a 9v rechargeable i can test w/ my spotwelder - simple enough. let me check tonight and i’ll let you know.

Hello, this is my first post, so please be patient with me.

I have an initial idea of what my longboard build will be. Atm i have already purchased the following:

  • Longboard Deck,
  • Caliber II Longboard Trucks, 50 Degrees.
  • Orangatang Kegel 80mm Wheels.
  • 30 Teeth HDT 5mm Pitch 11mm wide wheel pulley
  • 20 Teeth HDT 5mm Pitch 11mm wide motor pulley. The pulleys have already been drilled and connected to the wheels.

I’d like to create a 10s4p Samsung 30Q battery pack. But im unsure about what type of bms i should buy, if you have any recommendations please provide them, or if you can teach me about how to pick a bms, that would be greatly appreciated.

I would like to get dual Turnigy Aerodrive SK3 - 6354-260kv, and dual vesc.

What are your thoughts and comments will be appreciated